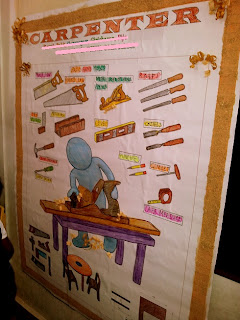
My cousin invited us over during the weekend to her kid's project day at his school. The theme was "Community helpers". 5-6 kids took up one community activity and had to explain the role of the respective helper in the society. Postal service, Police station, Fire Station, Hospital, School, Agriculture were some of the stalls on display. It was a pleasant surprise to see my nephew take up the role of a carpenter :)
Carpentry in India
Carpenter - A Community Helper
"I am a carpenter and I do various kinds of wood work. I use these tools to build houses, cots, shelves, chairs", is what the kids were explaining to the onlookers. They had all kinds of woodworking tools on display including a drill, hammer, planer, clamp, chisels, screw drivers, hand saw and more. They also had miniature models of a shelf, couple of chairs and a table. And they were well prepared to take up any question related to what was on display in their stall.

Woodworking
Carpenter and his tools

Carpentry tools in India
Carpentry Tools
We went there to cheer for and encourage my nephew and were pleasantly caught unawares to see him explain an activity that I have, in recent times, been so passionately taking up. I liked it that the parents chose a respectable uniform for the mini carpenters despite many insisting on going with the cliched "Lungi". Carpenters, much like many others, work towards making our lives much easier and it is a positive sign to see this thought being instilled in the kids.

Do you agree that carpentry in India can be beyond just a profession and can be a leisure activity that anyone can indulge in ?  Or think it is just another myth ? Leave me your comments.

Due credits : While I did take the pictures, the credit for the charts and the entire set up goes to the parents of the kids and the school faculty.


Linking in : Colours Dekor


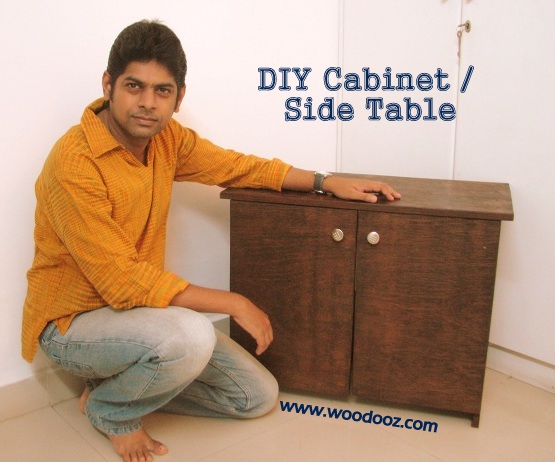
This DIY project started off as a requirement for an inverter battery case. The need was to make something that will blend in with the rest of the living room furniture and so we decided to do a side table / cabinet that will hide the out of place battery and the stabilizer. Though I started off with a very simple design  it took me close to 6-7 months to really start putting the effort to build it. Decided to pose with it to give you an idea on the size of this cabinet.
Indian DIY
Do it yourself - Side table 
While I shall come back and put up a detailed post on how this can be effectively built by you too, I was a little impatient and wanted to show off the finished product here. I will leave you, for the moment, with  some work in progress photos.
DIY Cabinet
The making of a DIY Side table / Cabinet
While I have all along been used to working with one side teak, this time around I decided to apply the finish directly on the plywood. This is something I had not done before and so I was a little skeptical. That said, I should accept that the outcome was quite satisfactory. If you have been following our "How to stain wood" series in Woodooz, you would understand how the  finish for this cabinet was achieved. 

I used European cup hinges for the cabinet door. The installation procedure for a cabinet door using cup hinges has earlier been documented in this blog. I chose a very simple pair of knobs from the local store for the door. Work is still in progress as I need to apply the final coat of varnish and also install a shelf to hold the stabilizer.
Woodworking DIY
Battery Cabinet
Meanwhile, do let me know how this cabinet has turned out. Do you think I should have done some things differently ? Share your feedback.

- Somu
Linking in : Colours Dekor


Having a really smooth surface is critical to achieving highly attractive finish and sanding helps achieving that.  Sand papers are available in all Indian hardware stores and will cost anywhere between Rs.5 and 10/-.
Complete guide to wood staining

Choose your sand papers

Sand papers are available in different grades. The grade mentioned in the rear of the sand paper refers to the number of sand grit particles per square inch. So, lower the grits, more is the roughness of the sand paper. Ideally, you have to start sanding with a lower grit sand paper and move upwards towards the higher grit papers. In essence, you need to have 4-5 levels of sanding before you can achieve that perfect smooth finish.

I normally use 80, 100, 120, 150 and 220 grit sand papers. Depending on the initial level of smoothness of the surface you need to choose the following :
  • Whether to start with 80, 100 or 120 grit papers and
  • How many levels of sanding is required
Each level of sanding would increase the degree of smoothness and will also reduce the scratches that were a result of the previous sanding level.

How to sand wood
Basics of sanding wood

3 key rules to follow

  • Always sand along the direction of the grains. Never sand across the grain direction.
  • Apply gentle and even pressure as you sand along the surface, Overdoing it might damage the surface.
  • Wipe off the leftover dust particles using a rag cloth after every level of sanding.
  • The not-so-key rule is to use a sanding block if required. It will ease the stress on the arms and will help evenly distribute the pressure.
For staining wood, surface preparation and in turn sanding is one of the most critical activities. Any blemish, or scratch on the surface will be distinctly visible making the whole staining process a failure. While it is a really tedious task, it would make sense for you to go through the inconvenience of sanding rather than to repent as you start staining.

Besides sanding, sealing is the other important surface preparation step which we shall look in the next post. Meanwhile, remember to enter your email address below just so you do not miss the rest of the posts.

Linking in : Colours Dekor


In one of the previous posts, we did look at an introduction to wood stains, the different brands available, cost and the basic application procedures. From this post on, we will look at, in detail, how to approach applying wood stains to your wooden substrate. We will delve into the various materials and supplies required, surface preparation techniques, the actual application procedure of stain and the top coat.
Complete guide to wood staining

For the purpose of demonstration, I will use a spare sheet of One Side Teak. I will use both sides of the sheet to lay bare how stains work and enhance the look of the substrate.
Staining wood tutorial
How to stain wood - A beginner's guide
The following are the topics that I will discuss in detail in the forthcoming posts. Each of these steps is important and critical to the effectiveness of the staining process.
  • Step 1 : Sanding the wooden surface
  • Step 2 : Understanding sealers and why they are required
  • Step 3 : Applying Sealer as a pre-conditioner
  • Step 4 : Applying the wood stain
  • Step 5 : Applying a top coat (Varnish)

Materials / Supplies required

  • Sand papers (Grit 80, 100, 120, 150, 220)
  • Muslin cloth (Ask for Gada Thuni if you are in Chennai) 1 meter
  • Thinner 500ml
  • Sanding Sealer 500 ml
  • Wood stain 100ml
  • Rag Cloth
  • Wood Polish 
The details of the brands, cost etc… , I shall discuss in the individual posts.

Wood staining in India
Materials required for staining wood

Some safety precautions

  • Using a mask is mandatory. Sanding can send in dust particles and staining can send strong fumes through your nostrils.
  • Cover your eyes to protect from the dust irritating your eyes.
  • Use gloves because it is very difficult to remove stain off your fingers.
  • Work in an open, well ventilated space
That said, shall come back and take you through each of these individual steps in the coming days / weeks. Meanwhile, do remember to leave a comment and enter your e-mail address below just so you do not miss the rest of the posts in this series.

- Somu


Saying am not bothered about numbers would be a cliché and a big lie too. Numbers indicate growth and consistency and they certainly have their way of providing the necessary push. This 100 signifies one key thing – That I have been able to hold on to Woodooz for 100 long posts. It also tells me that I have had at least one post a week in the last one year which is significant, considering how awful I am at managing my time. Just wanted to look back at those projects that gave us immense pleasure, and the required drive to keep the momentum on. Will leave you with the pictures and links to the posts that have been extremely special to us. Do visit each of these pages and leave us your words of encouragement.


          The one that started it all. The first thing that I ever made after deciding to indulge in DIY
   The first clock that I ever made for our master bedroom
The first lampshade that was actually a result of looking at ways to recycle an old kurta
Preethi's Aravind Kolapkar reproduction that adorns the living room wall
The first decoupage project and experiments with madhubani
The paper mache name board that we so proudly display in the entrance of our home
It may just seem like a filler post, but then this is a milestone and I wanted to place it on record. It does seem a little nice to sit back, go through the archives and wonder how all this started, but then reality kicks in and I realize I'd rather be working on a work in progress project. While I get back to it, do leave us a comment. Let us know what you think of Woodooz.

- Somu
Linking in : Colours Dekor


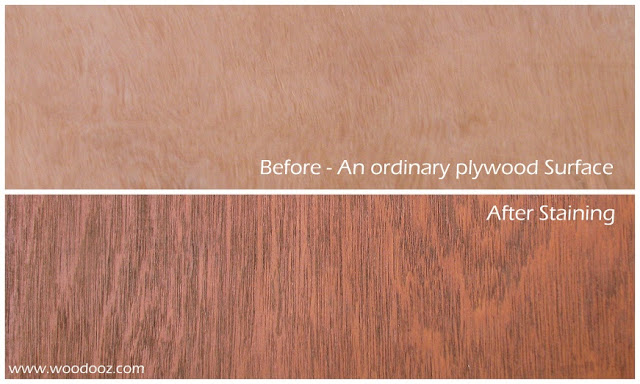
Ever wondered how the dull and boring surface of an ordinary plywood can be made vibrant with colours that enhance the surface patterns ? Enter Wood stains (Click on link for the beginner's guide to using wood stains). Wood stains are finishing media that allow for adding color to a wooden substrate. Staining the wood results in the wooden grains / patterns being enhanced resulting in a finish appealing to the eyes. Now, wood stains is a topic that I have been deliberately avoiding because of my inadequacy in the skill. However, over the last few years, I believe that I have gained enough practice and expertise to discuss it here.
Complete guide to wood staining
Walnut wood stain
Wood stain - Before and After
The surface preparation required and the method of stain application may make the whole staining process look very complicated. The idea behind this post and the subsequent posts (COMING UP) is to detail the process of staining for all to benefit. This will be a series of 5-6 posts explaining the individual steps involved in achieving the desired look using stains.

Wood Stains in India

I don’t claim to be an expert and I am not offering to elaborate on all the different types of stains that are there in the market. This blog is brand agnostic, and so am not endorsing any particular brand either. Following are some of the Wood stains that I have worked and have seen fulfilling results with.
  • Asian Paints
  • Wudfin (by Pidilite)
  • MRF Wood Stains
  • Sheenlac
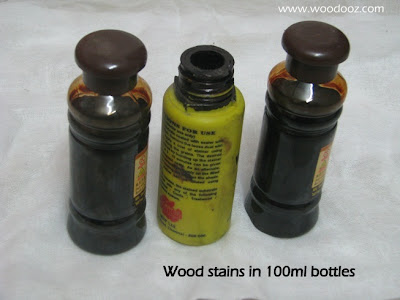
All these stains come in a 100 ml bottle and will cost anywhere between Rs.33-Rs.40/-.
Wood Stains available in India
Different wood stains - 100 ml bottles

Colour options in Wood Stains

Wood stains come in various colors that suits your needs. These are available in most hardware stores that also sell paints. Unfortunately, not all colours may be available at the local store as they stock only fast moving colours. The following is the shade range that I picked from the MRF Paints website. Other brands also have similar colour ranges.

Wood Stain colour options
Wood Stain colour ranges
Image Courtesy : MRF Paints

Stained Wood Finish

As I mentioned earlier, the stained finish will enhance the wooden patterns on the surface and make the grains noticeable more prominently. Unlike in paints, where the surface finish is one uniform opaque layer, stains will make the surface grains visible. Stained finish is certainly my favorite and I have shown few projects below that I did using wood stain.

Stain wood finish
Stained wood look

Application procedure

Though I am going to elaborate each of the steps involved in staining wood in individual posts, it makes sense to mention the steps involved in staining wood:
  • Sanding. Stains fill the grains and other dents in the wooden surface giving it a different color. And so this becomes a very important step. Staining requires a very smooth surface
  • Sealing. Sealants prevent uneven distribution of the stain and helps in achieving a uniform color across the surface
  • Staining
  • Varnishing
While there are certainly other types of wood stains, I have only mentioned those that I have worked with. The composition of these stains is beyond the scope of my understanding. That said, I should warn you that working with sealants and stains may result in inhalation of fumes and hence warrants the need to follow safety precautions. 

More later in the subsequent posts. Meanwhile, do leave a comment and let me know if there is anything specific you need me to cover in this series.

- Somu


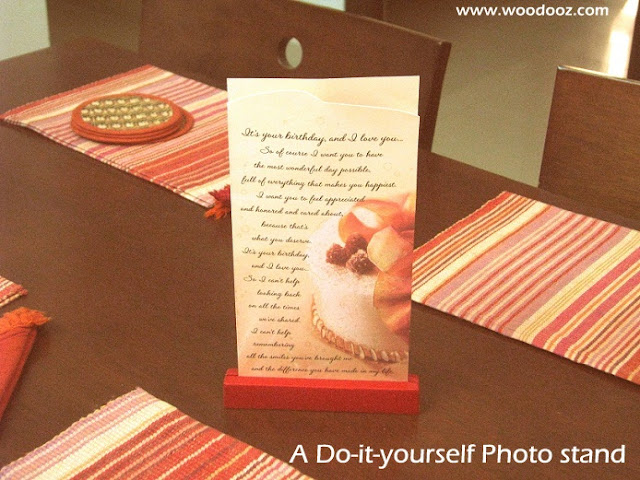
This is a very simple and easy to do photo stand that you can build in a very short span of time. The materials are easily available in the local plywood store and the only tool required is a Rs.5 hacksaw blade. 
The stand is ideal for showcasing photographs and also greeting cards at home. If you are a crafter displaying works in a stall, you can use the stand to hold your brochure or banner.

Interested in making one yourself ? Hop over to Craftsia where we have guest posted the complete step-by-step tutorial. Or continue reading. [Posting it temporarily here as the Craftsia site is temporarily under maintenance at the time of making this addition]
DIY photo display stand
Do it yourself photo stand 
Here is how you can make this one yourself:

Materials and tools used:
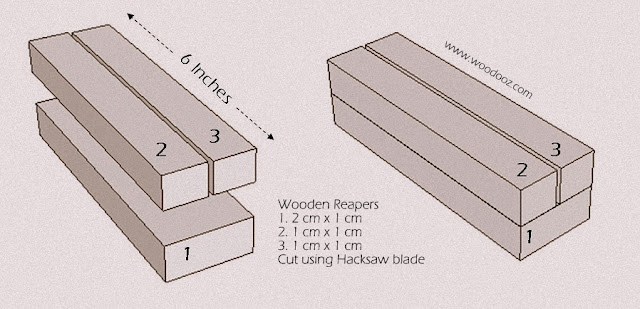
  • Wooden Reapers from "ANY" plywood store. I have used two reapers of different sizes here. One is 1cm (Wide) x 1cm (Thick) while the other is 2cm x 1cm. 
  • A Hacksaw blade available for anywhere between Rs.3-Rs.5 in "ANY" local hardware store
  • A synthetic resin glue (I have used Karenters while Fevicol SH would just work fine) 
build a photo stand
How to make a photo stand
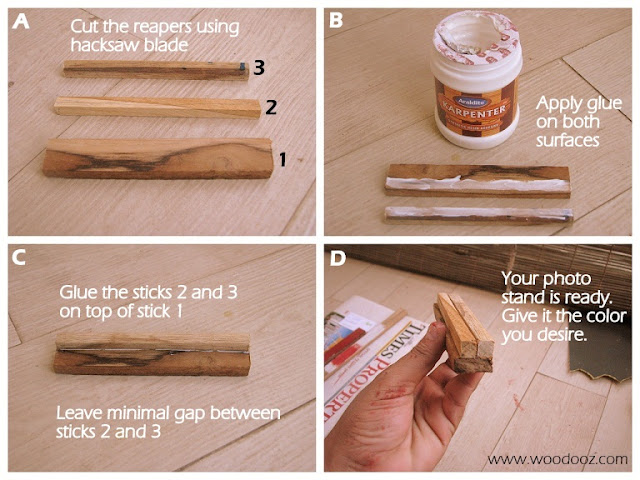
Step A:
Cut the wooden reapers using the hacksaw blade. This is not a herculean task and if you are used to using a knife in your every day chore, this should be just as easy. The length can be as big as you want it to be. I cut them to a length of about 6 inches.

Step B:
Reaper 1 would be the base while 2 and 3 should be glued on to of the base. Apply glue generously on both the base on the top sticks.

Step C:
Glue stick 2 first and hold it in place for a while until the glue bond strengthens.

Step D:
Glue the reaper 3 next to reaper 2 with a teeny tiny gap (About 2mm) between them. The photo or card will be sliding into this gap. The gap should be small enough to grip the photo and big enough to allow the card to slide through.

Here is a simple diagram that depicts how this photo stand is built.
photo stand do it yourself
Making a photo stand made easy
Once you give the glue enough time to dry, give it color as you desire. As you can see from the first picture above, I have colored one red, while I was too lazy to touch the other one and left it in its natural glory. The below picture also shows you how the photo stand looks without the photo and with some color :)


So, how did you like this DIY ? Do you think it is something that you can try at home ? I would most certainly love to hear your feedback on this one. Know that comments get me going and so leave me one :)

About Craftsia - Handmade with passion
Craftsia - Handmade with passion is a reliable and growing market place for unique and rare Indian Handmade products. You can buy and sell your products through Craftsia conveniently from the comfort of your home.

Linking in : Colours Dekor


Update : Join our DIY Woodworking group in Facebook. Discuss. Share. Take help. Raise queries. Some interesting discussions are happening at this very moment. JOIN NOW.

Ever since I started working on basic woodworking as a hobby, I have been on the lookout for workshops / classes that I can attend. It makes it easier to understand concepts from industry experts who are willing to part with their knowledge, than struggling to get answers from non-receptive carpenters or hardware store vendors. 

In Chennai, unfortunately, I was not able to find any such workshops. But Bangalore folks seem to be the lucky lot. I reached out to Hamsavardhan to know more about his woodworking workshop. Here’s what he had to say:
Carpentry class in India
Woodworking Workshop - Bangalore
Photo Courtesy : Esthete
1. Where is the workshop held ?
Workshop is held at Esthete studio, Tavarekere Road, Near Prestige St. John's Wood Apartments (1km from Forum Mall Koramangala).
2. What is the workshop all about ?
The agenda is to create awareness about wood and working with wood, carpentry, information on various types of wood and wood based products, such as plywood, MDF etc. The workshop will also cover basic tools and joinery techniques. It is an introductory lecture-demo on the science, craft and technology of wood and woodworking, carpentry and furniture making.
3. Who is the workshop for ?
It is a very informative and interactive session for anyone interested in understanding wood products, carpentry and furniture making.
4. How much does the workshop cost ?
This is a free class and is open to all.
5. Do the attendees have to bring anything along with them ?
A notebook to jot down points. Otherwise nothing.
6. When is the workshop normally held ?
The workshop is held on last Sundays of all months. You can “LIKE”  the Esthete Facebook page to get information on all upcoming events.
7. Contact information for any further details ?
Feel free to reach out to Hamsa Vardhan at +91 99020 59328.
The next workshop is on the 27th of Jan, 2013 between 1000 hrs and 1300 hrs. I hope Bangaloreans interested in understanding the nuances of woodworking would make good use of the opportunity. I am thinking of planning my next Bangalore trip with the workshop in mind.

Hope you found this post useful. I shall most certainly track other workshops around the country and provide details here for all to benefit from. Do leave a comment and let me know your opinion on this post.

- Somu

About Esthete and Hamsavardhan
Esthete is a design based company, specializing in Turnkey Interior Design and Execution, Complete Interior Decoration, Designing and Manufacturing of Customized furniture and accessories, Developing new and exciting designs in various materials, especially wood and suggesting space saving ideas for clients.

Hamsavardhan is Esthete’s Founder and Principal Designer. He started his design career as a furniture and interior designer specializing in children’s rooms, along with his partner, Mubina Vazirali, in the early 90’s. Their first clients were C.Krishniah Chetty Jewllers. Later he worked with Architect Omar Nisar as an architectural assistant. Know more about him in his official website.

Disclaimer
This is not a sponsored post. This blog post was written purely for bringing useful information / content to the readers of this blog. Also note that I have not attended this workshop and hence cannot provide any feedback at this point on the workshop itself.


CRAFTZINERS is a growing community of very highly imaginative and talented people who create art and crafts projects in their homes and communities. Craftziners is one of the most prolific art and craft  site providing a platform for new and upcoming talents and also a resource for how to create new art and crafts.
When Madhavi, the editor of the Craftziners magazine wanted to feature Woodooz and us in the January issue, we were thrilled beyond words can explain. Here are some excerpts from the interview. For the full interview, do check out the magazine. We are on the 10th page.

I was featured on Craftziners Magazine


Tell us more about Woodooz and how it all started ?
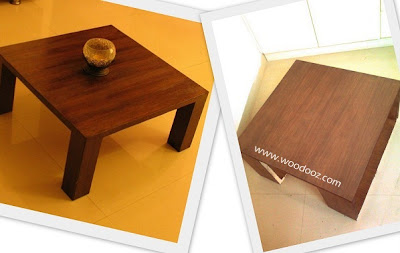
Woodooz right now is about everything (well almost) that one can do with simple hand tools. It is also about exploring creative outlets to escape the everyday routine, through arts and crafts. When we moved in to our new home and wanted to buy a center table, our search ended in vain and we did not find the right fit. It was Preethi's brainwave that we build the table ourselves with customized dimensions. We drove straight to a hardware store, bought a cheap electric drill, and it all started from there.
How did you decide on the brand name "woodooz"?
Working extensively with wood, which was our prime medium and with fabric, handmade papers and other media that added vibrancy to our work, we wanted our “brand name” to represent all that. So we derived the name from "Voodoo” that stands for black magic, only Woodooz is about the magic that is an outcome of a spectrum of colors, functionality, and the purposefulness of our work.
  • Do you still believe "Do what you love and the money will come" ?
  • How has blogging and the internet influenced your work as an artist?
  • What are your top 5 goals that you’d like to accomplish within the next 5 years?
These are some of the questions among many others that we so loved answering. Hope you like the read.

Thanks a lot Madhavi for the opportunity to be featured in your magazine. It is indeed very motivating and we wish you all the best in bringing small crafters and bloggers into limelight through your Website.

- Somu and Preethi


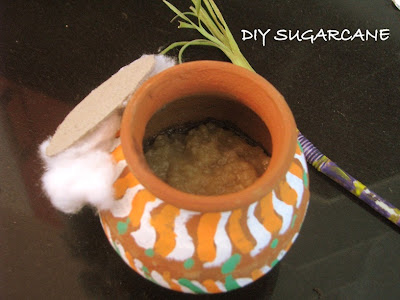
First and foremost, here's Happy Pongal wishes from both of us. This post was never intended, but the simplicity of the idea behind this DIY was so alluring, that we had to share it here. This little Pongal pot and the sugarcane was a gift from our Aunt Mrs.Kalyani Shankar when she visited us yesterday. The photo is self explanatory and hence we are going to leave you with the picture. 
An easy pongal craft
Pongal craft - DIY Sugarcane and a painted pot
A straw, colored paper and acrylic colors - It came in as amazing for us because we would never have thought of it. And what more, the pot even had yummy Pongal for us to relish. Well, unlike the sugarcane, the Pongal in the pot is real :)
Pongal DIY
DIY Pongal Craft
Do spare a moment to leave us your view on this sugarcane. And do let us know how your Pongal was.


When we worked on our first ever center table (which is also our first ever project), we had to stick a 4 mm sheet of One Side Team onto a plywood using synthetic resin glue. Because we had no means to hold the OST sheet in place and the glue required some drying time, we literally had to sit on either side of the table for a good 15 minutes. And we did this for the next few projects too. When it was a smaller work, like a DIY photo frame, I had to hold the sticks tightly together for a while before I was convinced that the glue has dried.
That is when I thought I should get my hands on C-Clamps (also called G-Clamps), purely for my gluing needs.
G Clamps
C-Clamps / G-Clamps
Clamps are wonderful tools for holding things together steadily in place while you are trying to work on them.  Whether it is for gluing two surfaces together or to nail them, the clamps come in handy to provide that firm grip which might otherwise not come from even steady hands. The clamps come in different sizes and it is important that you choose those that fit your needs.

I went for the smallest of ones that can open as wide as 1 inch and not more. Highly suited for surfaces of lesser thickness. I have ever since used these clamps successfully for making a wall clock and for laminating wooden surfaces.
Use for C Clamps
C Clamps for basic woodworking and DIY needs
I bought these clamps at Home Depot during my short visit to the US last year. I have also inquired here and these are available in hardware stores and tools shops. There are different types of clamps that are available and C-Clamps are just one of those. It has been an important accessory in my tool kit that has helped reduce the pressure on my fingers and deserved a special mention here.

Do you use clamps for your projects ? I believe they are extensively used even outside of woodworking. If you do use them for your crafting needs, share the details in the comments section. Will certainly love to hear about it.

- Somu


When the Chennai Crafters group decided to meet up, all of us wanted it to be one fruitful gathering besides  meeting up and discussing various crafts. And so when the admin suggested that we do a demonstration of one of the Woodooz products, we were quick to grab the opportunity. The lampshade was our natural choice for four reasons :
  1. It did not require complicated woodworking skills, expensive materials or any major tools
  2. It is relatively easier to demonstrate than the other products that we have here
  3. It is something everyone can go back home and try
  4. Light and color, we thought, would be appealing and interesting to everyone
Easy Lampshade DIY
DIY Lampshade
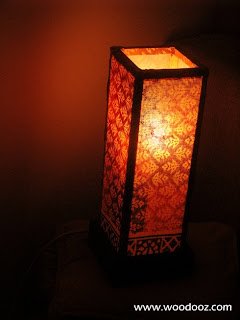
We decided to make a small (31 cm in height and 11 cm width), simple and yet a very colorful shade - something similar to the bedside lampshade that we made earlier. Red and orange with a green patterned border is what we finalized on. We also wanted to keep the base very simple, and used 19mm plywood edge banding sticks to build it.

We somehow did not bother to capture the step by step details of this shade because we were racing against time to be fully prepared for the demonstration. To save time, we had pre-built the frame and the base much before the actual demo.

Home-made lampshade
Handmade lampshade
Somu during the demo
We had just enough time to show how the fabric was wrapped around the frame.  What you see above (without the the light and after it is lit) is what we eventually came up with. Sooner or later, we certainly shall share the details on how the whole thing was built. For now, just going to leave you with the end product. Blame it on our photography skills, the photo below is not doing justice to how the shade really looks when lit. Nonetheless, do let us know how you like it.

We are happy that the shade was picked up by someone instantly after they saw what they saw. Certainly a boost to the efforts that we put into building this one. Leave us a comment. It is the much needed motivation for us in this online world.


2012 was an interesting year for Woodooz filled with lots of learning, sharing and showcasing. From focusing on producing helpful content to understanding the mysteries around SEO, it has been one hell of a ride. We worked with the purpose of bringing resourceful tutorials and DIY tips to whoever landed here and we hope to keep going with the same objective in mind. We built some goals around the blog and 2012 has sowed the seed for us to take baby steps towards those aspirations.  As we look back at the year that went by, and eagerly look forward to what lies ahead, here are some highlights.
Thank you note from Preethi and Somu

Some things new

Collage of paintings

Popular Posts

Number of organic hits, number of comments and number of Facebook likes were some of the indicators to what everyone loved in Woodooz this year
Woodworking DIY Projects

Featured posts

We opened the blog this year for others to feature their work and so far we have had some really wonderful projects that found their way into Woodooz
Featured posts

Tools and Accessories

Tools are the best things that we love investing in. Be it en electric drill or a small screw driver, each one has its own ways to make life easier for us.
  • The power screw driver was one such life saver that came as a gift from Indonesia.
  • We also lined up our tools for our readers to know what we owned and with what we made all our projects.

A live demonstration

For the first time ever we did a live demonstration of one of our products in front of an audience. When the Chennai Crafters team met up, it was an exciting opportunity for us to showcase and show everyone how we made, what we made. Meeting up with fellow crafters who are bestowed with varied, unique and exquisite talent by itself was an enriching experience. As we finish summarizing the highlights of Woodooz 2012, we will leave you with some pictures of the crafters meet.

Photos from Chennai crafters meet

As we set our foot into the forthcoming year, we want to come up with easy, innovative projects that everyone can make. We would like to bring to you the joy of working with wood and show you how much of a fun and useful hobby DIY can be. While we continue what we do with more focus on information and knowledge sharing, we long for your continued support, for, without you, this blog would merely be an online version of a personal journal that no one desires to read.

Please do come back for more and while you do so, have a happy, prosperous and a wonderful year ahead.


DIY as a hobby is so much fun. Being able to build things around the house by itself is a testament to the joy it brings. But what it also brings in with it is the eventual feeling of wanting to try everything yourself before really turning to a professional. And no. Am not talking about building a lampshade, or a center table, or a wall hanging. Am referring to leaking sinks, broken pipelines, overflowing flush, a flat tyre, a busted electrical fitting and more.
Home repair is largely never spoken about in Woodooz, but I wanted to mention how much it is part of everyday DIY activities and how much of trouble and money it can save us. These are things that I would have never tried if not for the love that I had developed for doing things myself.

Fixing a drain pipe

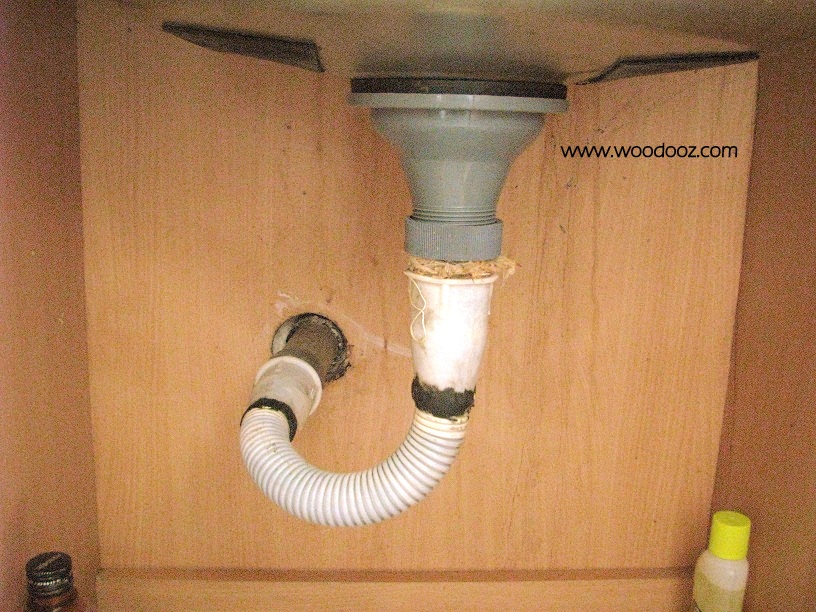
Take our kitchen drain pipe for instance. I moved my kitchen sink during installation to the corner of the counter. As a result the pipe outlet on the wall and the drain outlet were not aligned. The builder refused to move the wall outlet and hence the usual stainless steel pipeline could not be laid. What he installed was the plastic flexible pipe that required replacement every 4 months. Losing much of our patience we decided to do it ourselves. What transpired was a combination of PVC, plastic pipe and some M-Seal and a no replacement guarantee for a long time.
Fixing kitchen drain pipe
DIY Plumbing

Covering the pipeline duct

Rat menace was something that we could not live with. After a damaged sofa, catching 6 rats in 6 days and finding newly born pinky rats in the service area cabinet, we decided to block the pipeline duct (in the service area) from the terrace through which the rats were gaining access. We approached an aluminium window vendor who gave a quote for Rs.14,000 and a carpenter who gave a proposal for Rs.4000. Not wanting to spend so much, we decided to do it ourselves. With aluminium sheets and some duct tapes, we covered the opening for a mere  Rs.200. Not a pretty picture but never a rat ever after.
Closing the rat entry
Stopping access for rats to enter

Fixing a leaking sink

Have you ever felt the smell of damp wood hitting you on your face ? It happened every time we opened the kitchen cabinet below the sink. The grouting around the sink had caved in resulting in water leaking into the wood below. Despite having an in house plumber, we decided to fix it ourselves. All it took us was Rs.25 of white cement and about 20 minutes of work. Problem solved.
Kitchen sink leaking
Grouting around kitchen sink
Building things is fun, but I have come to realize fixing things is so much more fun. Being able to remedy an issue without having to go around looking for a professional is also much appreciated at home. Am sure many of you do it too and so might think what is the big deal. The fact is not many do it which  makes it really a big deal. That said it is also important to understand when to give up and really seek expert help.

Are you the kinds that changes his / her own flat tyres ? Fixes leaking sinks ? Rectifies a broken cabinet hinge ? Leave me a comment. Let me know your thoughts about how DIY home repair has saved you trouble, time and won you appreciation.


A cordless screwdriver was a perfect gift from my brother-in-law who just returned from Indonesia and is the latest addition to my tool kit.  I thought I was fine with the set of screw drivers that I had, but I was completely wrong. I just realized how much more convenient a power tool like this can make my life. I have been playing with it for the last couple of days and the  tool is really handy. I tried using it in place of the allen key wrench and it works like a charm. What I love is that it has driver bits for all possible screw heads and that means I do not need to keep track of each of the wrenches and hand drivers. I still feel that pre-drilling a pilot hole is essential as I was not able to generate enough power to directly drill the screw in. Maybe I need a self-drilling screw for that.
electric Cordless screwdriver
Cordless screwdriver, with the drill bit set
That said, it certainly eases the effort required by at least a good 40-50% and now am eagerly looking forward to work on my next project.

Here are some facts about this cordless screwdriver :
  • Rotates slower (180 RPMs) than the usual electric drill
  • The tool is strictly for running screws and bolts. It is not a drill
  • This one is single speed and rotates in both clockwise and anti-clockwise direction
  • Completely a DIY tool and unsuitable for professional and everyday prolonged use
  • It is not bulky. It is just as big as the size of my outstretched palm
  • Very easy on the hands and is completely safe to use, considering its lower RPM
  • It is battery operated and the power cord is for only charging the battery
  • Operates at 240V eliminating the need for a voltage step down transformer
  • Comes with 6 twist bits and 17 screwdriver bits 
Don't you think gifting something related to your hobby is a very thoughtful act ? I always ask for a tool when someone asks me what I need as a gift. What do you ask for ? Share your thoughts.

Did you like this post ? Enter your E-mail address and join our growing E-mail list

You may also be interested in


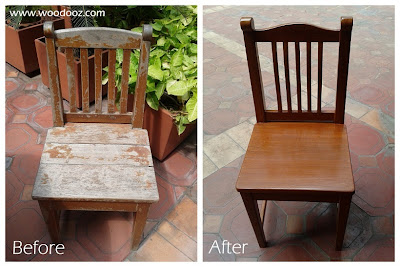
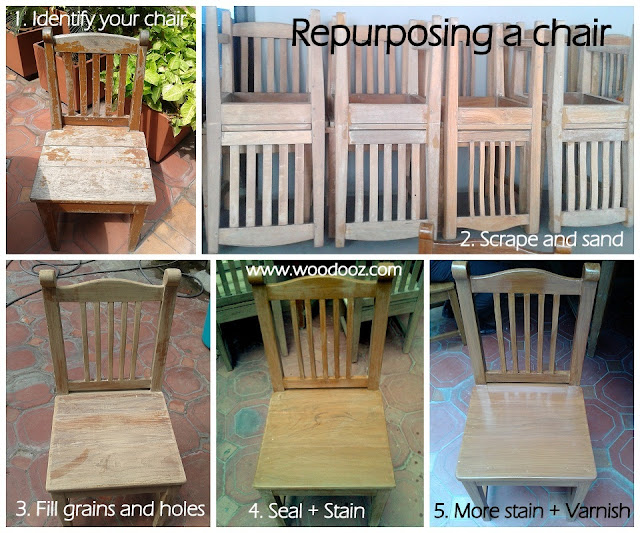
Only recently, I had the good fortune to watch a bunch of carpenters re-purpose a whole lot of chairs and tables. While this is what they had to say when I approached them with a question, they did not complain my being around and taking pictures.  As I mentioned earlier, most carpenters are hesitant about sharing trade secrets, but there is so much we can learn from mere observation.
Learn to repurpose chairs and tables
Re-purposed chair
For now, I shall leave you with pictures in the different stages of re-purposing a chair (Trust me: There may be more than many ways to do it. This is just one of them) . I shall certainly get back into working out detailed tutorials for each of these stages. Of course, you can always decide to choose between Paints and Stains for the look you desire, but all that and more in the coming days.
How to refinish your furniture
Re-finishing furniture
Meanwhile, if you have ever reworked on your home furniture, do share your comments on how you achieved that. It would certainly help me and others who would chance upon this post.

Did you like this post ? Enter your E-mail address and join our growing E-mail list

You may also be interested in

Know more about us

About Us
Reviews
Media
Our showroom location
Return and refund policy
Review us on Google

Connect with us


Mail us
Subscribe to our newsletter

Our Address :
Woodooz Home Decors,
3/371, First floor,
Metukuppam, Thoraipakkam,
Old Mahabalipuram Road (OMR),
Chennai - 600097.
Ph : +91 9884070470
Email : contact@woodooz.com
Created By SoraTemplates & MyBloggerThemes