Category : woodworking


I had not been working much on DIY for a very very long time, and I hope that changes in 2014. While there are so many that are in mind, more time is what I need to execute them all. Maybe, this year around, will allocate focused time for Woodooz. My plan for 2014 is to work on simpler, easier and cost-effective projects that add functionality around the house that everyone can build. This miniature News Desk was a requirement from someone. While I should have spent more time on it, I ended up working on it overnight. Eventually, whoever wanted it, didn’t have reasons to use it, and promptly returned it. No specific requirement was given except for the dimensions (22 inches long, 7 inches wide and 8 inches tall).
Small newsdesk
News Desk
There is not much that I want to write here. This was quite simple to do. As always used 6mm thick sticks (1.5” wide)  with a 12mm strip (12mm wide)  in the middle. Since I did it overnight, didn’t bother to take the step by step pictures.

Newsdesk
Miniature News Desk
Apart from wanting to do more projects this year, I would also want to pay more attention to quality and proficiency going forward. Probably that could be my only resolution for this year. Hope the start to 2014 has been wonderful for you and if it is not anything personal, do share your resolution for the year in the comments section.


Do it yourself is fun. The pleasure I derive from finishing a project is immensely fulfilling. The near end of one assignment almost immediately marks the beginning of the next envisioned idea. And there are countless conceived designs that are waiting to be executed. My grouse though is that most of the ideas are still only in their conception phase. I find it extremely hard to maintain the consistency with which I would like to indulge in this hobby.  And that, quite naturally, affects the frequency of posts you see here. While there are many factors, there is one main challenge that I face in being able to sustaining the DIY steadiness.

Time

There is me time, we time, free time. There is work time, travel time. And amid all this I have to squeeze in hobby time. While working on a DIY project is one thing, making a post on it is another thing altogether. My last post on building a shoe rack took 6 hours of my Sunday to make just the illustrations. And the shoe rack itself took close to 12 effective hours spread across multiple days.

The fact that woodworking is an addictive hobby, it is not difficult to understand that you would soon get sucked into it much like any other pastime. Sometimes I am glued on to it for hours together completely oblivious to the passage of time. Spending time compromising on other priorities is quite concerning right?  Though at one point, I would have easily declared “not finding time” as a made-up myth, I am coming to realize that it is an apparent truth and a reality.

It is easier to read and hear about things like, “You have to work around your obstacles if you are really passionate about something”, and other such philosophies. But in reality, it becomes quite impossible to make compromises for just a hobby, even if it means am obsessively passionate about it. Right ?

Do you relate to the situation? How do you handle it? Leave me a comment. Am sure it would make me feel better.

Linking in : Colours Dekor


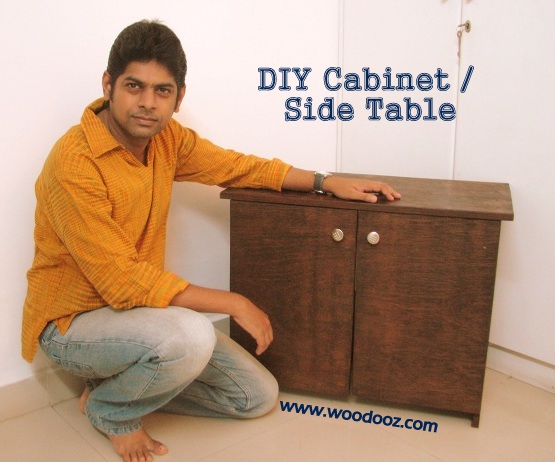
This DIY project started off as a requirement for an inverter battery case. The need was to make something that will blend in with the rest of the living room furniture and so we decided to do a side table / cabinet that will hide the out of place battery and the stabilizer. Though I started off with a very simple design  it took me close to 6-7 months to really start putting the effort to build it. Decided to pose with it to give you an idea on the size of this cabinet.
Indian DIY
Do it yourself - Side table 
While I shall come back and put up a detailed post on how this can be effectively built by you too, I was a little impatient and wanted to show off the finished product here. I will leave you, for the moment, with  some work in progress photos.
DIY Cabinet
The making of a DIY Side table / Cabinet
While I have all along been used to working with one side teak, this time around I decided to apply the finish directly on the plywood. This is something I had not done before and so I was a little skeptical. That said, I should accept that the outcome was quite satisfactory. If you have been following our "How to stain wood" series in Woodooz, you would understand how the  finish for this cabinet was achieved. 

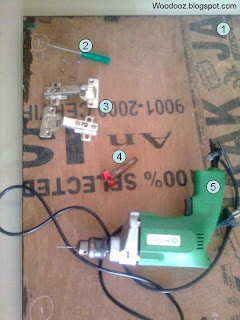
I used European cup hinges for the cabinet door. The installation procedure for a cabinet door using cup hinges has earlier been documented in this blog. I chose a very simple pair of knobs from the local store for the door. Work is still in progress as I need to apply the final coat of varnish and also install a shelf to hold the stabilizer.
Woodworking DIY
Battery Cabinet
Meanwhile, do let me know how this cabinet has turned out. Do you think I should have done some things differently ? Share your feedback.

- Somu
Linking in : Colours Dekor


Saying am not bothered about numbers would be a clich̩ and a big lie too. Numbers indicate growth and consistency and they certainly have their way of providing the necessary push. This 100 signifies one key thing РThat I have been able to hold on to Woodooz for 100 long posts. It also tells me that I have had at least one post a week in the last one year which is significant, considering how awful I am at managing my time. Just wanted to look back at those projects that gave us immense pleasure, and the required drive to keep the momentum on. Will leave you with the pictures and links to the posts that have been extremely special to us. Do visit each of these pages and leave us your words of encouragement.


          The one that started it all. The first thing that I ever made after deciding to indulge in DIY
   The first clock that I ever made for our master bedroom
The first lampshade that was actually a result of looking at ways to recycle an old kurta
Preethi's Aravind Kolapkar reproduction that adorns the living room wall
The first decoupage project and experiments with madhubani
The paper mache name board that we so proudly display in the entrance of our home
It may just seem like a filler post, but then this is a milestone and I wanted to place it on record. It does seem a little nice to sit back, go through the archives and wonder how all this started, but then reality kicks in and I realize I'd rather be working on a work in progress project. While I get back to it, do leave us a comment. Let us know what you think of Woodooz.

- Somu
Linking in : Colours Dekor


CRAFTZINERS is a growing community of very highly imaginative and talented people who create art and crafts projects in their homes and communities. Craftziners is one of the most prolific art and craft  site providing a platform for new and upcoming talents and also a resource for how to create new art and crafts.
When Madhavi, the editor of the Craftziners magazine wanted to feature Woodooz and us in the January issue, we were thrilled beyond words can explain. Here are some excerpts from the interview. For the full interview, do check out the magazine. We are on the 10th page.

I was featured on Craftziners Magazine


Tell us more about Woodooz and how it all started ?
Woodooz right now is about everything (well almost) that one can do with simple hand tools. It is also about exploring creative outlets to escape the everyday routine, through arts and crafts. When we moved in to our new home and wanted to buy a center table, our search ended in vain and we did not find the right fit. It was Preethi's brainwave that we build the table ourselves with customized dimensions. We drove straight to a hardware store, bought a cheap electric drill, and it all started from there.
How did you decide on the brand name "woodooz"?
Working extensively with wood, which was our prime medium and with fabric, handmade papers and other media that added vibrancy to our work, we wanted our “brand name” to represent all that. So we derived the name from "Voodoo” that stands for black magic, only Woodooz is about the magic that is an outcome of a spectrum of colors, functionality, and the purposefulness of our work.
  • Do you still believe "Do what you love and the money will come" ?
  • How has blogging and the internet influenced your work as an artist?
  • What are your top 5 goals that you’d like to accomplish within the next 5 years?
These are some of the questions among many others that we so loved answering. Hope you like the read.

Thanks a lot Madhavi for the opportunity to be featured in your magazine. It is indeed very motivating and we wish you all the best in bringing small crafters and bloggers into limelight through your Website.

- Somu and Preethi


2012 was an interesting year for Woodooz filled with lots of learning, sharing and showcasing. From focusing on producing helpful content to understanding the mysteries around SEO, it has been one hell of a ride. We worked with the purpose of bringing resourceful tutorials and DIY tips to whoever landed here and we hope to keep going with the same objective in mind. We built some goals around the blog and 2012 has sowed the seed for us to take baby steps towards those aspirations.  As we look back at the year that went by, and eagerly look forward to what lies ahead, here are some highlights.
Thank you note from Preethi and Somu

Some things new

Collage of paintings

Popular Posts

Number of organic hits, number of comments and number of Facebook likes were some of the indicators to what everyone loved in Woodooz this year
Woodworking DIY Projects

Featured posts

We opened the blog this year for others to feature their work and so far we have had some really wonderful projects that found their way into Woodooz
Featured posts

Tools and Accessories

Tools are the best things that we love investing in. Be it en electric drill or a small screw driver, each one has its own ways to make life easier for us.
  • The power screw driver was one such life saver that came as a gift from Indonesia.
  • We also lined up our tools for our readers to know what we owned and with what we made all our projects.

A live demonstration

For the first time ever we did a live demonstration of one of our products in front of an audience. When the Chennai Crafters team met up, it was an exciting opportunity for us to showcase and show everyone how we made, what we made. Meeting up with fellow crafters who are bestowed with varied, unique and exquisite talent by itself was an enriching experience. As we finish summarizing the highlights of Woodooz 2012, we will leave you with some pictures of the crafters meet.

Photos from Chennai crafters meet

As we set our foot into the forthcoming year, we want to come up with easy, innovative projects that everyone can make. We would like to bring to you the joy of working with wood and show you how much of a fun and useful hobby DIY can be. While we continue what we do with more focus on information and knowledge sharing, we long for your continued support, for, without you, this blog would merely be an online version of a personal journal that no one desires to read.

Please do come back for more and while you do so, have a happy, prosperous and a wonderful year ahead.


Hobby woodworking is not so much of a well-known domain in IndiaEasy access to labor, lack of readily available DIY kits, lack of awareness, absence of an active hobby community, lack of time are some of the reasons why this terrain is largely unexplored. Or so I thought. When I started my first project, I was skeptical because of these same reasons. However, it was a revelation as I moved on and have now come  to enjoy it with fervor. Here is the list of four things that created a block in my mind that I strongly believe are merely myths.

Myth 1: Tools are not available

Tools required depend on the project that one is undertaking. Hobby woodworking can also relate to smaller projects which eliminates the need for high end tools or machinery. However, knowing what tool one needs for a certain activity is essential. Unlike the western countries where you can walk through aisles in retail outlets to pick and choose your tool of choice, in India, the challenge is to specifically ask the hardware vendor what you need. From what I have seen, there is absolutely no dearth to the kind of tools that get sold in Indian hardware stores.

Myth 2:  Information is not available

In this world of Internet era, no amount of information is beyond the reach of an individual. Youtube and Google can throw millions and millions of tutorials for you to choose from. Right from how to buy a tool to how to use it to how to build a certain piece of furniture, everything you can imagine is available at a detailed level. Woodworking DIY is an established concept elsewhere and you would find what you need in every corner of the WWW.

Besides that, local carpenters carry a wealth of information with them. Though they are hesitant to share their trade secrets with hobbyists, there is so much that you can learn through observation. Also, of late, woodworking workshops for enthusiasts (will save the details for another day) have also sprung up in some cities.

Myth 3: Labor is inexpensive, so why sweat?

Hobby woodworking is most certainly not an alternative to cheap labour. It is like any other hobby. You don’t paint a canvas because buying an original Picasso is expensive. It is about being passionate and taking pleasure in your indulgences that enable you to explore your creative potential. On a different note, labour is indeed not cheap. Some of the quotes that I have received : Rs 500 for painting a 2 ft x 2ft low table, Rs 800 for installing glass doors for my TV unitRs. 1500 for erecting a frame around the cot (for mosquito netting).

Myth 4: There is no active community

I realized over a period of time that the number of Indian blogs in this niche is limited. However, that was no indication to the number of folks indulging in Woodworking. I found out that there are indeed people to whom I can reach out.
  • The DIY Woodworking India group is now becoming a very active Facebook group with hobbyists, enthusiasts and experts exchanging their WIP projects and expert tips. If you are looking to join an online community, THIS IS IT.
  • Indranil Banerjie is from Noida and manages a hardcore woodworking blog. Some of his projects are big and very very functional
  • Vinay is another blogger from Vellore and makes some really fun projects like wooden toys and Wooden Wagons for kids. 
  • Am sure at least one or two of you would now say,"Hey ! my father was never a blogger. But he was way into carpentry and did everything that he could inside our home."
  • And that is the point. There are more and more individuals who have always been into carpentry and there are many who show keen interest towards it.  Just that they never had / have a blog.
Woodworking is fulfilling and functional at the same time. If you are indeed thinking about hobby woodworking, Good luck. Start with smaller projects before you can venture into the bigger ones. Do not let these myths hold you back. Explore and experiment. India has all things in place for you to quench your thirst for DIY woodworking.

Do you agree with my views ? Do share your thoughts. I am game for a healthy debate on this topic. And think there are other myths too ? Leave a comment.


We live in an apartment. Every space outside our humble abode is common space. That means I have to do all my work inside the house.
  • To cut a piece of wood I use the center table in the living room.
  • To bore a hole into wood I use the little space in the guest room
  • To Paint or stain wood I use either of the balconies
  • And my tools are all in the service area
Clean up the mess
This is only a fraction of the mess I make
Now, here's the downside to not having a dedicated work space. There is going to be lots of scrap wood, saw dust, dirty cloth, screws, nails, sand papers and tools all strewn across every square inch of where you work. What is even worse is the spilled paint / stain or the quick bonding fevicol on the tiles that takes lot of work to remove. And trust me, tidying up is the most boring task of any woodworking project. Sanding only comes second.

Here are some useful tips that you can follow to make things easier for yourself:
  1. Try to work in one place. Makes cleaning up easier even if you generate lot of mess
  2. Move your tools closer to your place of work. Reduces moving around while in the middle of a project.  I moved most of mine into an empty shelf in the guest room wardrobe.
  3. Spread news papers across the floor. When you are done, rather than picking up the bits and pieces, you can just carefully remove the papers and dispose them off. You may also want to do it on the wall. Paints and stains on wall are quite impossible to remove.
  4. Have thinner with you all the time. Any spills can be managed immediately by wiping off the stains from the tiles using thinners
  5. Try to finish your work before the maid gets to work. The sweeping and mopping will take care of most troubles you create.
  6. Wear latex gloves while using paint. They are inexpensive and can be thrown off after use. Also reduces effort spent on cleaning up your fingers. In Chennai, you can get these gloves for Rs.3 a pair at Nilgiris.
  7. Use inexpensive containers for mixing paints, sealants etc… Again reduces clean up work as you can straight away dispose them after use.
Most importantly, make sure you wear these essential safety gears while indulging in a woodworking DIY project. Mess can be cleaned up. But a broken finger may take time to heal.

Your turn now : 
  • Do you make a lot of mess while indulging in DIY ?
  • Do you enjoy the clean up process ?
  • Do you have other clean up tips to share ?

Linking in : Colours Dekor
- Somu


DIY Laptop Stand

Working from home is turning out to be more resourceful especially considering the commute distance. The low center table  has always been where we laid the laptop while working. However, there are times during a call when we needed to work from the room, and it was not possible to move the table. And so the need to make a portable DIY laptop stand. While it was intended to be used as a laptop stand, here are other functional uses for this piece of furniture.
Make your own DIY laptop stand
DIY Laptop stand


Painter’s Masking tape is commonly used during painting of walls, particularly a feature wall. Considering the adjoining walls have a different colour, the masking tapes help prevent bleeding / dripping of paint onto the other walls on the edges and also to get that perfect much needed straight line effect. This is also used to cover wooden trims, switch panels and plug points.

Prevent bleeding of paint

The masking tape is also a very useful tool while painting wooden furniture or even small wooden crafts. It is especially useful to prevent paint or varnish from dripping onto other surfaces. Both these media are highly viscous and hence any ignored drip can form a blob which will be difficult to eliminate later.
Masking tape on wood
Painter's Masking tape - Avoid dripping / bleeding


Do you have the need to cover a cabinet with a glass door?
Do you feel your existing cabinet glass door can do with some newer look?
Or do you just wish to learn something cost effective and functional?
Then this tutorial is for you.
After three years of following up with the original vendor who built our TV floor unit, we decided to install a door for the centre cabinet .The DTH system and DVD player are remote controlled and hence installing a glass door was the obvious choice. Here’s how you can do a glass door installation.


Cost of project: Low- includes cost of the glass panels, and glass door hinges
Difficulty level: Medium to high
Time required: 2-4 hours


Installing a cabinet door is a very easy and functional activity and can be done with the help of few easy-to-use tools. While the need to install a door may not be so frequent, this tutorial will help when you have a creaking / broken door that needs replacement. Considering this is the first DIY tutorial on Woodooz, I would appreciate any comment/ feedback. Feel free to drop in your opinions. 
This tutorial is also useful if you are specifically looking for details on how to install door hinges / European cup hinges. Note: Click on the pictures for a bigger / clearer view if required

CONTENTS
1,2:Cabinet identification,Materials reqd 3. Plywood door dimension 4. The European Cup Hinge
5. Mark Points to Secure Hinge 6,7 Bore hole, Install door 8. Add more hinges


Step 1 - Identifying the Cabinet
Step 2 - Materials Required

Step 1 : Identify Cabinet Needing a door (Back to Top)
  • Identify the cabinet needing a door
  • Our TV stand turned Shoe Rack badly needed a door and was the obvious choice for this exercise. The rack is in the living room, and going by the contents in the cabinet, you can pretty much understand why this needed to be covered.
  • Measure the sides of the cabinet before buying the plywood for the door

Step 2 :Materials and Tools required


What is Sanding ? It is is a tedious, yet a necessary activity in the process of woodworking. Using a sanding block is much convenient than trying to sand with the sand paper folded. The block allows for easier application and equal distribution of pressure on the piece of wood and hence gives better results.


How to make a sanding block at home
Though sanding blocks are commercially available, you can make one at home. 
  1. You would need - A palm sized scrap piece of wooden block. If not, even a detergent bar would do. A Scorch bite (Cork is normally recommended) for the smooth underside to lighten the impact on wood. A screw / nail for a better hold.
  2. Stick the scorchbite onto the block using fevicol.  The screw / nail is drilled into the top of the block.
  3. The nail / screw is primarily for a better hold when sanding. It allows for an easier grip of the entire block between your fingers.
  4. Insert a small chunk of sponge around the nail / screw to protect your fingers from possible irritation / pain.
  5. Cut the sand paper to a width longer than the block for you to hold it during the process of sanding. While a folded sand paper serves the purpose, it can put lot of strain on your arms. You would most certainly find it easier now to sand flat surfaces using the block. 
~ Somu

P.S. Linking in : Kreative Korner

- Somu

Know more about us

About Us
Reviews
Media
Our showroom location
Return and refund policy
Review us on Google

Connect with us


Mail us
Subscribe to our newsletter

Our Address :
Woodooz Home Decors,
3/371, First floor,
Metukuppam, Thoraipakkam,
Old Mahabalipuram Road (OMR),
Chennai - 600097.
Ph : +91 9884070470
Email : contact@woodooz.com
Created By SoraTemplates & MyBloggerThemes