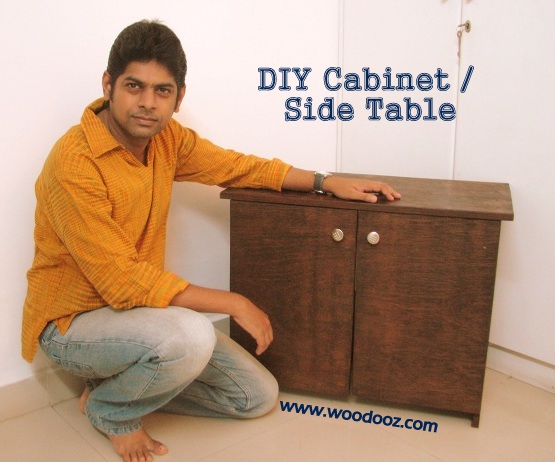
This DIY project started off as a requirement for an inverter battery case. The need was to make something that will blend in with the rest of the living room furniture and so we decided to do a side table / cabinet that will hide the out of place battery and the stabilizer. Though I started off with a very simple design it took me close to 6-7 months to really start putting the effort to build it. Decided to pose with it to give you an idea on the size of this cabinet.
While I shall come back and put up a detailed post on how this can be effectively built by you too, I was a little impatient and wanted to show off the finished product here. I will leave you, for the moment, with some work in progress photos.
 |
| Do it yourself - Side table |
 |
| The making of a DIY Side table / Cabinet |
While I have all along been used to working with one side teak, this time around I decided to apply the finish directly on the plywood. This is something I had not done before and so I was a little skeptical. That said, I should accept that the outcome was quite satisfactory. If you have been following our "How to stain wood" series in Woodooz, you would understand how the finish for this cabinet was achieved.
I used European cup hinges for the cabinet door. The installation procedure for a cabinet door using cup hinges has earlier been documented in this blog. I chose a very simple pair of knobs from the local store for the door. Work is still in progress as I need to apply the final coat of varnish and also install a shelf to hold the stabilizer.
 |
| Battery Cabinet |
Meanwhile, do let me know how this cabinet has turned out. Do you think I should have done some things differently ? Share your feedback.
Linking in : Colours Dekor


Gr8... liked the finished product.
ReplyDeletemy only suggestion.....
Since its going to hold the inverter battery,would it have been better if u had used 'wheels' or whatever u call it,to make moving it easier. (since battery is quite heavy )
Hi Suja, Awesome idea... It is as if you read our minds. This is something we discussed before starting off the project. We decided to not keep the battery on the cabinet shelf, but on a trolley that will roll in and out of the cabinet. The trolley is what we made in the first phase. Maybe I will share a picture when I have the battery placed inside the cabinet. :)
Delete:)
Deletethat reminds me of my uncle....my uncle was a "DIY' person... i remember he had made a trolley on his own to keep his suitcase under the bed in our ancestral home. he used to say that othewise the bottom of the suitcase always got damaged each time it was pulled out
You certainly have a way of showing us how easy this can be... I can't believe you at all... Any tips on how to make a fountain area for a garden??
ReplyDeleteWow, it is raining comments from Patty :)The idea is to make it seem simple, but not really sure if it is that simple. Mini fountain, yeah... but a big one, no... I once bought a submersible pump to experiment with bamboos, but it never took off.
DeleteHi,
ReplyDeleteYou written nice blog.
All the images are very clean to optimize...
I have also good collection of bedside tables cabinets.
Thanks for sharing such a nice blog..
Hey Somu Padmanabhan, thanks for such an amazing post. My only concer- is it safe to keep it under a wooden cabinet?
ReplyDeleteThere is a door for the freezer side and another door for the refrigerator side. best side by side door refrigerator in India
ReplyDelete