Category : Staining wood series


Note : Please check our Staining wood series also which uses a different staining method from what is explained in this post.

Adding color to wood is like the icing in the cake. You mess it up, and all the efforts taken to bake the cake goes waste. And so it becomes one of the most critical part of completing a project is to make sure you give it the desired color. While there are many methods used in giving color to wood, and we have also seen a few in Woodooz, one of the common methods is to use wood stains.  

When I started looking for means to stain my first ever project, I was clueless. And it was a professional carpenter who taught me how to use sealant and stain.We have already seen in detail the procedure for applying stains using sanding sealers as base coat. Another variant which I was taught by another carpenter was using wood fillers and stains to give that much needed color to wood. I made a short video to explain the process. I hope you find it useful. 

Staining requires surface preparation by way of sanding and smoothening the wooden surface. I am also posting the sanding basics video which would even otherwise be useful for folks looking at making smaller projects. Remember to leave a comment and let me know what you think.


Click here
Subscribe to my videos in YouTube
I am working on more video tutorials and you can expect to see more of these in the coming days. Meanwhile, it would be great if you can subscribe to TheWoodooz Youtube Channel. Until next time, Happy Woodworking :)


Over the last few months, we have been looking at the various preparatory steps involved in applying stain to wood. Today, we come to the conclusion of this series as we look at how to apply stain. While I have been mentioning this in most of my earlier posts, I would like to reiterate that stains help augment the grain patterns and give them a more enhanced look. If you landed here directly, do consider checking all the other posts in the staining series.
Complete guide to wood staining
Applying wood stain technique
How to apply stain
The application of stain is much like how we applied sealant in the last tutorial. The following are the materials required :
  • A bottle of stain (Asian paints / MRF / Wudfin / Sheenlac )
  • Gada Cloth
  • Thinner (If you need the color to be lighter)

Application procedure

  • Pour the stain into a bowl
  • Mix thinner only if you want the shade to be lighter
  • Dip the gada cloth in the bowl of stain
  • Dab it to squeeze the excess stain
  • Apply the stain along the grains covering a small area
  • Allow a minute or two for the stain to be absorbed by the wooden surface
  • Before the stain is dry, wipe of the excess stain off the surface (using a dry piece of gada cloth)
Applying wood stain - How to
How to apply wood stain
  • Repeat the procedure until you have covered the entire surface area of the wood
  • Give it about 30 minutes drying time before you apply the subsequent coats
  • Apply multiple coats as desired
  • Remember to apply varnish or other top coats for long term durability
And that is about it. Just one thing though. Much like any other activity, achieving perfection in staining takes lot of patience and practice. You may probably not get it the first time. But it is not rocket science and with little repeat effort, you will be happy with what you can do to your small furniture and other craft projects.

Follow these steps and let me know how you fared in staining. If you think I missed something or something can be done in a better way, leave me your comments.
Linking in : Colours Dekor


Before looking at how to use the sanding sealer, do understand three important things :
Complete guide to wood staining

Materials required 

  • Sanding sealer
  • NC Thinner
  • Gada Cloth (for applying the sealer)
  • Sand paper (220 grit)
All the above materials are easily available in the local hardware store.

Sealing wood
Materials required - Sealing Wood

Procedure

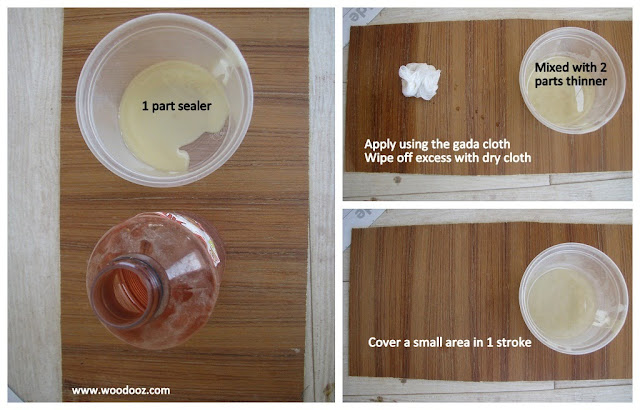
  • Pour 1 part of sanding sealer in a bowl
  • Mix 2 parts of NC thinner to the sealer
  • Stir thoroughly to ensure the mix is consistent
  • Dab the gada cloth in the mix and apply it on the surface of the wood
  • Cover a small area in one stroke
  • Before the layer dries, wipe off the excess sealer using a dry cloth
  • Using the same method, apply the sealer across the entire surface area of the wood
  • Allow it about 1-2 hours of drying
  • Lightly sand the dried surface of the wood (Remember ? It is a sanding sealer)
  • Apply two to three coats of the sealer to achieve a really smooth surface. Remember to sand in between coats.
How to seal wood
How to seal wood
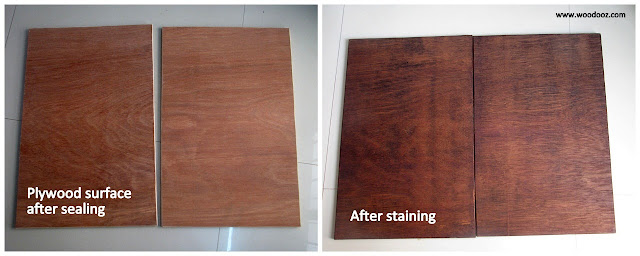
This sets the surface ready for the stain to be applied. The application of stain on the surface of the wood is very similar to that of how the sealer is applied. Will very soon post the stain application procedure. Meanwhile, do leave us a feedback in the comments section. If you think, staining can be done in a different and easier way, feel free to leave me a comment.


The sanded surface of the wood looks very smooth. But in reality, if you inspect closely, the wooden surface will have minute pores and jagged valleys. Application of stain directly on top of the sanded surface may, and I repeat, may result in uneven absorption of the stain. While the color is taken in well by most portion of the wooden surface, some portions may look patchy because of poor absorption of the applied stain.
Complete guide to wood staining
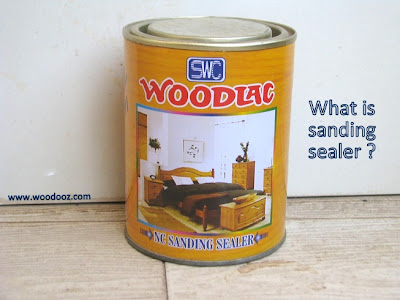
NC Sanding sealer
Sanding Sealer
Other posts in the staining wood series
1. Introduction to stains
2. Steps in staining wood
3. How to sand wood 
4. Wood sealers explained
5. How to seal wood
6. How to stain wood

Secondly, while sanding results in desired smoothness, it does not necessarily make the surface completely flat, and this you would notice when you run your palm / fingers along the sanded surface.

Sanding sealers help in overcoming the above two issues. Here's what sealers do when applied on a wooden surface:
  1. They fill the pores along the wooden surface and make it smooth to the touch 
  2. The allow for consistent absorption of stain coat preventing patchiness
  3. They also bring out the splendor of the grain pattern when stain is applied
  4. Each layer of sealer can be sanded with fine grit sand paper (hence the name sanding sealer) adding increasing levels of evenness to the surface
There is also an opinion that sealers should actually go on top of the stain and is not an equivalent of pre-stain conditioners. However, in my personal experience, since sealers are used with thinners, I have seen the thinner removing the stained color from off the surface. Most carpenters I have had a word with state that they actually mix the stain and sealer and apply it in one go. I have not tried it and hence not able to comment on it.

For now, we have already seen how sanding is a mandatory surface preparation step in the staining process. The next post is all about sealers and how they can be applied on wooden surface. Have you stained furniture before? Did you have to work with sealers? Leave me a comment and share your experience.
Linking in : Colours Dekor


Having a really smooth surface is critical to achieving highly attractive finish and sanding helps achieving that.  Sand papers are available in all Indian hardware stores and will cost anywhere between Rs.5 and 10/-.
Complete guide to wood staining

Choose your sand papers

Sand papers are available in different grades. The grade mentioned in the rear of the sand paper refers to the number of sand grit particles per square inch. So, lower the grits, more is the roughness of the sand paper. Ideally, you have to start sanding with a lower grit sand paper and move upwards towards the higher grit papers. In essence, you need to have 4-5 levels of sanding before you can achieve that perfect smooth finish.

I normally use 80, 100, 120, 150 and 220 grit sand papers. Depending on the initial level of smoothness of the surface you need to choose the following :
  • Whether to start with 80, 100 or 120 grit papers and
  • How many levels of sanding is required
Each level of sanding would increase the degree of smoothness and will also reduce the scratches that were a result of the previous sanding level.

How to sand wood
Basics of sanding wood

3 key rules to follow

  • Always sand along the direction of the grains. Never sand across the grain direction.
  • Apply gentle and even pressure as you sand along the surface, Overdoing it might damage the surface.
  • Wipe off the leftover dust particles using a rag cloth after every level of sanding.
  • The not-so-key rule is to use a sanding block if required. It will ease the stress on the arms and will help evenly distribute the pressure.
For staining wood, surface preparation and in turn sanding is one of the most critical activities. Any blemish, or scratch on the surface will be distinctly visible making the whole staining process a failure. While it is a really tedious task, it would make sense for you to go through the inconvenience of sanding rather than to repent as you start staining.

Besides sanding, sealing is the other important surface preparation step which we shall look in the next post. Meanwhile, remember to enter your email address below just so you do not miss the rest of the posts.

Linking in : Colours Dekor


In one of the previous posts, we did look at an introduction to wood stains, the different brands available, cost and the basic application procedures. From this post on, we will look at, in detail, how to approach applying wood stains to your wooden substrate. We will delve into the various materials and supplies required, surface preparation techniques, the actual application procedure of stain and the top coat.
Complete guide to wood staining

For the purpose of demonstration, I will use a spare sheet of One Side Teak. I will use both sides of the sheet to lay bare how stains work and enhance the look of the substrate.
Staining wood tutorial
How to stain wood - A beginner's guide
The following are the topics that I will discuss in detail in the forthcoming posts. Each of these steps is important and critical to the effectiveness of the staining process.
  • Step 1 : Sanding the wooden surface
  • Step 2 : Understanding sealers and why they are required
  • Step 3 : Applying Sealer as a pre-conditioner
  • Step 4 : Applying the wood stain
  • Step 5 : Applying a top coat (Varnish)

Materials / Supplies required

  • Sand papers (Grit 80, 100, 120, 150, 220)
  • Muslin cloth (Ask for Gada Thuni if you are in Chennai) 1 meter
  • Thinner 500ml
  • Sanding Sealer 500 ml
  • Wood stain 100ml
  • Rag Cloth
  • Wood Polish 
The details of the brands, cost etc… , I shall discuss in the individual posts.

Wood staining in India
Materials required for staining wood

Some safety precautions

  • Using a mask is mandatory. Sanding can send in dust particles and staining can send strong fumes through your nostrils.
  • Cover your eyes to protect from the dust irritating your eyes.
  • Use gloves because it is very difficult to remove stain off your fingers.
  • Work in an open, well ventilated space
That said, shall come back and take you through each of these individual steps in the coming days / weeks. Meanwhile, do remember to leave a comment and enter your e-mail address below just so you do not miss the rest of the posts in this series.

- Somu


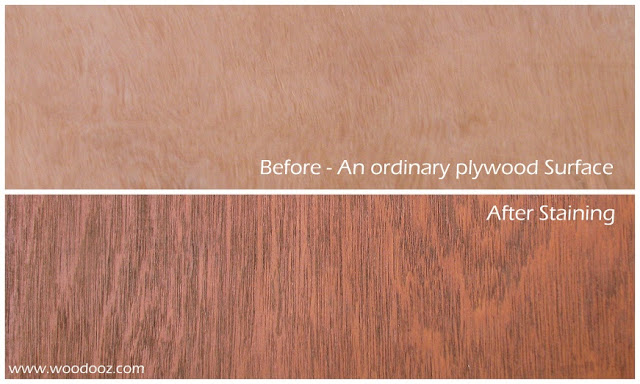
Ever wondered how the dull and boring surface of an ordinary plywood can be made vibrant with colours that enhance the surface patterns ? Enter Wood stains (Click on link for the beginner's guide to using wood stains). Wood stains are finishing media that allow for adding color to a wooden substrate. Staining the wood results in the wooden grains / patterns being enhanced resulting in a finish appealing to the eyes. Now, wood stains is a topic that I have been deliberately avoiding because of my inadequacy in the skill. However, over the last few years, I believe that I have gained enough practice and expertise to discuss it here.
Complete guide to wood staining
Walnut wood stain
Wood stain - Before and After
The surface preparation required and the method of stain application may make the whole staining process look very complicated. The idea behind this post and the subsequent posts (COMING UP) is to detail the process of staining for all to benefit. This will be a series of 5-6 posts explaining the individual steps involved in achieving the desired look using stains.

Wood Stains in India

I don’t claim to be an expert and I am not offering to elaborate on all the different types of stains that are there in the market. This blog is brand agnostic, and so am not endorsing any particular brand either. Following are some of the Wood stains that I have worked and have seen fulfilling results with.
  • Asian Paints
  • Wudfin (by Pidilite)
  • MRF Wood Stains
  • Sheenlac
All these stains come in a 100 ml bottle and will cost anywhere between Rs.33-Rs.40/-.
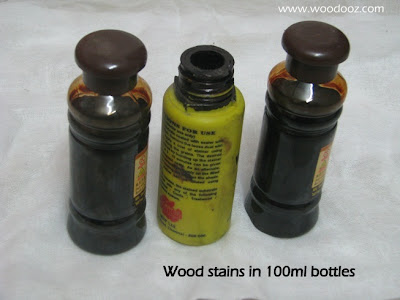
Wood Stains available in India
Different wood stains - 100 ml bottles

Colour options in Wood Stains

Wood stains come in various colors that suits your needs. These are available in most hardware stores that also sell paints. Unfortunately, not all colours may be available at the local store as they stock only fast moving colours. The following is the shade range that I picked from the MRF Paints website. Other brands also have similar colour ranges.

Wood Stain colour options
Wood Stain colour ranges
Image Courtesy : MRF Paints

Stained Wood Finish

As I mentioned earlier, the stained finish will enhance the wooden patterns on the surface and make the grains noticeable more prominently. Unlike in paints, where the surface finish is one uniform opaque layer, stains will make the surface grains visible. Stained finish is certainly my favorite and I have shown few projects below that I did using wood stain.
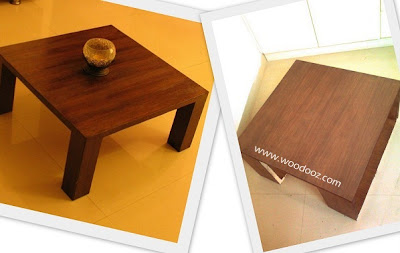
Stain wood finish
Stained wood look

Application procedure

Though I am going to elaborate each of the steps involved in staining wood in individual posts, it makes sense to mention the steps involved in staining wood:
  • Sanding. Stains fill the grains and other dents in the wooden surface giving it a different color. And so this becomes a very important step. Staining requires a very smooth surface
  • Sealing. Sealants prevent uneven distribution of the stain and helps in achieving a uniform color across the surface
  • Staining
  • Varnishing
While there are certainly other types of wood stains, I have only mentioned those that I have worked with. The composition of these stains is beyond the scope of my understanding. That said, I should warn you that working with sealants and stains may result in inhalation of fumes and hence warrants the need to follow safety precautions. 

More later in the subsequent posts. Meanwhile, do leave a comment and let me know if there is anything specific you need me to cover in this series.

- Somu


Wood stains and paints are similar in one sense that they help add rich color to wood. However, there are quite some differences that exist in the look and feel they offer and the application procedure.

Complete guide to wood staining

Paint forms a thin film on top of the wood on which it is being applied. Because of the formation of the even layer, the wooden piece gets a consistent look across its surface. This layer helps hide the blemishes on the wooden surface, which in turn eliminates the need to sand the wood with multiple grades of sand paper. Since the wood may not take in paint homogeneously across its surface, it is recommended to use a layer or two of primer before application of paint. The primer allows for uniform absorption of paint thereby giving the wood surface a smooth unvarying finish. Paints and primers normally have high drying time (close to 8 hrs or more) and are usually applied using brushes. Here is a short tutorial on how to use primer and paint on wood.
Wood stain vs paint

Wood stains, on the contrary, allow for the grain patterns on the wooden surface to be visible and enhanced on application. They fill in the pores and grooves on the wood thereby taking in the shape of the stained material. Since stains make the grains (and also the scratches) visible, it is necessary to sand the wooden surface to ensure there is absolutely no scratch / blemish on it. Stains may be directly applied on the wooden surface using a sponge or a clean rag cloth. However, as in the case of paints, the wood may not absorb the stain equally along its entire surface and hence the use of sealers is recommended before the application of stain. Sealers form an invisible film on the wood thereby allowing for equal absorption of stain. Stains have a quick drying time, somewhere between 10 to 30 minutes.

Paint / stain only add color to wood and does not protect wood. A final coating of varnish is usually recommended. Paint / stain is a personal choice and depends on the kind of look and feel one desires.

- Somu

Know more about us

About Us
Reviews
Media
Our showroom location
Return and refund policy
Review us on Google

Connect with us


Mail us
Subscribe to our newsletter

Our Address :
Woodooz Home Decors,
3/371, First floor,
Metukuppam, Thoraipakkam,
Old Mahabalipuram Road (OMR),
Chennai - 600097.
Ph : +91 9884070470
Email : contact@woodooz.com
Created By SoraTemplates & MyBloggerThemes