Category : DIY tools


Note : Updated with video and a note on ease of use of the tool (4th Feb, 2016)

"For drilling hole into a wall all by ourselves, do you use the local drill or any other branded one? When I checked the nearby hardware shop, they all had drill above 2k+ nothing for 700 or 1k. Any latest updates on which drill to use? Does it really need strength or can I handle it myself without disturbing my husband?" - A reader's query in Facebook

Before getting into the electric drill itself, it is important to understand what is it that makes drilling into wall seemingly difficult. The most common composition of a wall in our homes is an underlying brick wall covered by a certain thickness of concrete. It is drilling into the concrete layer that is quite a task, and once we penetrate that, eating into the brick level is cake walk. The choice of drill is primarily based on the application and your day to day needs. Based on my own experience in using an electric drill, the following are the major two categories that I would recommend for your home use. There are various brands, and these drills are available at various costs, and that is out of scope of this post.


Rotary Drills

    This is the basic form of electric drill. When turned on, the chuck to which the drill bit is attached rotates. The rotating bit then has to be placed on the spot where a hole needs to be drilled. As the bit cuts into its target, it is completely up to the user to apply the necessary pressure to provide the thrust to dig deep into the surface. 
    I use a very basic rotary drill that rotates in the clockwise direction and in a single speed. Because the force to drive the drill bit into the surface comes from the user, it is really not suited for thick concrete walls, particularly the external nine inch walls. It has been perfect for all my internal needs, especially for all the wall hanging work at home. I have tried using this drill on "certain" walls, miserably failed and then sought professional help. The rotary drill is ideal for basic masonry drilling (not so thick concrete layers), your DIY projects and other woodworking needs, particularly for drilling pilot holes, counter sinking etc…

Impact Drills

    The only difference here is that the thrust for breaking into the surface does not come from the user, but from the impact of a built in hammering action. It relatively eases the effort on the user by eliminating the need for him / her to apply pressure while the drilling is on. These drills are also called hammer drills. While they easily serve your DIY / Woodworking needs, they are ideal for all your masonry requirements, particularly drilling into concrete walls.
If you need these drills to drive screws, you will have to look for features like multiple speed options, clockwise and counter-clock wise (from removing a screw) rotating capabilities. The other varieties of drills I feel are high end and are more suited for industrial and professional uses. And to answer the question whether one can use it without disturbing ones husband, I would like to inform you that a teenager, with adult supervision, can easily get around to master using this tool. And so, if you are an adult yourself, man or a woman, this is your tool as much as it is anyone else's. So go ahead and get yourself one and kick start your DIY journey.

Do you own an electric drill at home ? What brand ? What are its features ? What do you use it for ? And most importantly, do you think women can use it without disturbing their husbands ? Leave me your comments.
Meanwhile, here is an external link to Vinay's blog post that explains how to hammer a nail into concrete
- Somu 
Did you like this post ? Enter your E-mail address and join our growing E-mail list


You may also be interested in


Honestly speaking, not much DIY is happening at home. Chennai is at its hottest best and sadly the worst is yet to come. Locking ourselves up in an air conditioned room is the most popular activity that is going on for some time and that gave us the chance to catch up with few horror movies we always enjoy watching together. Meanwhile, Bosch India invited entries from DIY enthusiasts to showcase their DIY works. And considering it was very relevant to what we do here, I sent a load of entries to them. Not that I am indulging in any vanity here, but the contest rule clearly stated that I have to be posing alongside my project.
My Woodworking projects
Posing with my DIY projects
In fact, I sent few more entries too. But, only the following were shortlisted.
There were other entries too from other hobbyists and it was wonderful that one of our entries was chosen as a winner.  And here’s what they had to say about the entries:

“We are delighted to see the kind of DIY skills our participants showcased through their #DIYProjects. With so many amazing #DIYProject entries it was hard to narrow down to three winners. Hence we decided to announce not three but four winners. Congratulations to all the winning entries!”
Winnders of MyDiyProject Contest
The #MyDiyProject winners
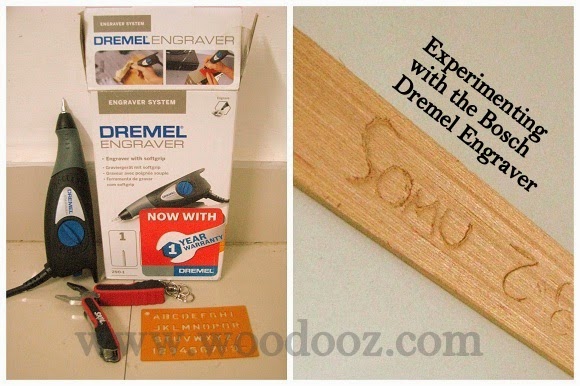
If you have been following Bosch India, you would by now be aware of their DIY Square in Bangalore. While I have only had the opportunity to read about it, it does seem like a go to place (And I have it in my agenda during my next Bangalore visit) for folks who want to try their hand at power tools and get some first-hand do it yourself experience. Not surprisingly, I received a Dremel Engraver as a gift couple of days after the winners were announced. Not surprising because there have been lots of workshops happening over the last few months at their DIY Square and the Dremel has extensively been the product of attraction.

The Dremel Engraver in their own words - "An engraving tool with variable depth control, for engraving on a wide variety of materials like metal, glass, wood, plastics, ceramics, etc. This kit also includes a letter & number template for easy engraving of letters & numbers."
Engraving tool - Dremel
Bosch Dremel Engraver and my experiment with it
I have been playing with the Dremel over the weekend and I am yet to get the hang of it. I still don’t know what kind of projects I would be using it on, but I intend to experiment with it more and put it to best possible use. I do have some thoughts, but need to gain more expertise in using the tool before I can even start executing the project. Will share it here as soon as I start giving life to those unexplored ideas. Meanwhile, it has been a long time and a comment from you would be really nice. :-)

Disclaimer : Do note that I received the Dremel as a gift for winning the contest hosted by Bosch India.This is not a tool review or a sponsored post. I was not contacted by Bosch to write this post.This is part of the series where I write about the tools that I use (/intend to use) for my home DIY projects. You can read about the other tools that I use by clicking this link here


Disclaimer 1 : This is neither a tool review nor a sponsored post. I have not been contacted by anyone to write this post. This is part of the series where I write about the tools that I use for my home DIY projects. You can read about the other tools that I use by clicking this link here.

Owning a tool or not having the skill to use one is probably one of the hurdles in DIY in India, and am sure many of you would agree. This is a reason why I invariably outsource the cutting wood activity to someone at the timber store.  It has always been easy that way. Give the dimensions and be done with it. But, with my side table, I was left with a challenge. I needed to have the plywood top cut to the exact dimensions as the frame inset measurement. The challenge though was that the frame was not fixed exactly at 90 degrees, which meant, giving the dimensions to have the plywood cut may not really work.

This is when I decided to take the task upon myself, and took out a tool gift that I received couple of years back – The oscillating multifunction power tool. I have used the tool earlier but I was not ready to write about it here until I was fully convinced that I could use it for a real project. Before I put it up here, I wanted to be sure that I am able to use the tool to suit my DIY needs at home. So, finally I braced myself and cut the plywood (12mm thick and 18 inches in length) in less than 5 minutes and the result is here for all to see.
Another DIY tool for home woodworking
Oscillating multi-function power tool
The concept behind the tool is quite simple. It comes with a spindle to which you can attach the required cutter / blade / other attachments. When powered on, the spindle oscillates back and forth at an astounding speed of 21k oscillations per minute (may vary from product to product). Imagine using a saw to cut wood and your one up and down manual motion of the saw as one oscillation. This tool can do 21,000 of those in just a minute. With the right angle, and the right pressure applied onto the wooden surface, getting your work done is a piece of cake. The plywood cut came out so perfect that I was kicking myself for not using the tool earlier.

Recommend reading : Some basic things to take care of before you start using a tool or even a kitchen accessory from the United States of America
Home DIY woodworking tool
Oscillating tool and the blade accessory
The accessories / blade attachments are sold separately and there are quite a few attachments available for various activities like cutting wood, pipes, removing grouts, sanding etc… (hence the name multi-function)  I only have an angled cutter that is now coming in handy for my DIY cutting needs. This now gives me the confidence to move from smaller projects to medium sized projects.  But the biggest advantage I see is that I can eliminate the dependence on timber stores for my home needs. I would have loved to do a video. Nonetheless, I am leaving you with a link to Youtube videos that talk about the tool’s versatility.
home based woodworking hobby
Trying the oscillating multi-function power tool
I would like to thank my cousin Raji for this gift and want to tell her that I have started fully using the tool. The official site claims that this is a tool suited for home DIY and hobbies and I fully agree. This is certainly a valuable addition to my tool kit which is mostly only hand tools, barring my electric drill and I highly recommend it for a budding home DIYer like me.

Disclaimer 2 : I am merely posing for the photo. Please exercise caution and ensure you read the user manual for the correct way to hold and use the tool. Also ensure you take precautionary safety measures before you start working on a DIY project using the tool.


The biggest issue for me while working on a DIY is that I keep wasting time looking for things. I would have no clue where I kept my small screw driver or where the 220 grit sand paper is. The other issue is taking them out of their storage cabinet. If I need something, there is every bit possibility that I might have to dig deep into the cabinet, maybe even pull some things out, before I can find what I want. Considering I was not working on any projects for a long time,  thought will use the time to put an end to all these issues.

Does it partially remind you of your spice rack in the kitchen ? :) I had a spare 12 mm plywood which I hung in a non-intrusive space in the service area. May look clumsy, but trust me, very convenient. The reason for putting this up was twofold:
  1. Clear up space in the service area cabinet and find more functional uses for it
  2. Designate space for every tool and make it easily accessible (for me)
Now I have designated holders and space for:
  • My 3 inch screws (notice the upcycled green Vaseline bottle ?)
  • Smaller screws
  • Headless nails
  • Drill bits
  • Some of my tools
  • And even sand papers
While I have been wanting to do this for a long time, I have to agree that I was inspired by this post of Vinay to get this done really quick. I still have lot of space left on the plywood (as you can see) and will probably spend sometime this week hanging up the rest of the items in my list. Meanwhile, if you can guess what the blue file holder is for, leave me a comment. Leave me a comment otherwise too. :) 


When we worked on our first ever center table (which is also our first ever project), we had to stick a 4 mm sheet of One Side Team onto a plywood using synthetic resin glue. Because we had no means to hold the OST sheet in place and the glue required some drying time, we literally had to sit on either side of the table for a good 15 minutes. And we did this for the next few projects too. When it was a smaller work, like a DIY photo frame, I had to hold the sticks tightly together for a while before I was convinced that the glue has dried.
That is when I thought I should get my hands on C-Clamps (also called G-Clamps), purely for my gluing needs.
G Clamps
C-Clamps / G-Clamps
Clamps are wonderful tools for holding things together steadily in place while you are trying to work on them.  Whether it is for gluing two surfaces together or to nail them, the clamps come in handy to provide that firm grip which might otherwise not come from even steady hands. The clamps come in different sizes and it is important that you choose those that fit your needs.

I went for the smallest of ones that can open as wide as 1 inch and not more. Highly suited for surfaces of lesser thickness. I have ever since used these clamps successfully for making a wall clock and for laminating wooden surfaces.
Use for C Clamps
C Clamps for basic woodworking and DIY needs
I bought these clamps at Home Depot during my short visit to the US last year. I have also inquired here and these are available in hardware stores and tools shops. There are different types of clamps that are available and C-Clamps are just one of those. It has been an important accessory in my tool kit that has helped reduce the pressure on my fingers and deserved a special mention here.

Do you use clamps for your projects ? I believe they are extensively used even outside of woodworking. If you do use them for your crafting needs, share the details in the comments section. Will certainly love to hear about it.

- Somu


A cordless screwdriver was a perfect gift from my brother-in-law who just returned from Indonesia and is the latest addition to my tool kit.  I thought I was fine with the set of screw drivers that I had, but I was completely wrong. I just realized how much more convenient a power tool like this can make my life. I have been playing with it for the last couple of days and the  tool is really handy. I tried using it in place of the allen key wrench and it works like a charm. What I love is that it has driver bits for all possible screw heads and that means I do not need to keep track of each of the wrenches and hand drivers. I still feel that pre-drilling a pilot hole is essential as I was not able to generate enough power to directly drill the screw in. Maybe I need a self-drilling screw for that.
electric Cordless screwdriver
Cordless screwdriver, with the drill bit set
That said, it certainly eases the effort required by at least a good 40-50% and now am eagerly looking forward to work on my next project.

Here are some facts about this cordless screwdriver :
  • Rotates slower (180 RPMs) than the usual electric drill
  • The tool is strictly for running screws and bolts. It is not a drill
  • This one is single speed and rotates in both clockwise and anti-clockwise direction
  • Completely a DIY tool and unsuitable for professional and everyday prolonged use
  • It is not bulky. It is just as big as the size of my outstretched palm
  • Very easy on the hands and is completely safe to use, considering its lower RPM
  • It is battery operated and the power cord is for only charging the battery
  • Operates at 240V eliminating the need for a voltage step down transformer
  • Comes with 6 twist bits and 17 screwdriver bits 
Don't you think gifting something related to your hobby is a very thoughtful act ? I always ask for a tool when someone asks me what I need as a gift. What do you ask for ? Share your thoughts.

Did you like this post ? Enter your E-mail address and join our growing E-mail list

You may also be interested in


All these tools were bought on a need basis as and when I required them for a specific purpose. These tools largely serve your basic DIY woodworking needs and will certainly help you make those little projects around the house. (Note: This is a repost)
Safety is of prime concern and so you should take necessary precautions. If certain tools need supervision or you are not sure of their application, try to get it done through professionals. Better safe than sorry.
Woodworking hobby tools
Woodworking hobby tools - Electric Drill

Electric Drill

This is certainly a must have tool in the house if you are a DIY lover. It helps serve multiple needs. Be it hanging a painting on the wall, or making a center table, it is the electric drill that paves way by creating that much needed pilot hole. I have used this to install cabinet doors too. The one I use costed me about Rs.700 and comes with very basic features of single speed and clockwise rotation.

Associated Drill bits

The following are the drill bits that I bought over a period of time. All of these cost between Rs.10 to Rs.30 if you buy them separately.
·  Masonry bit for drilling into concrete / brick walls
·  Twist bits for drilling pilot holes
·  Flat wood bit which I used as a counter sink bit
·  Forstner bit for installing European style hinges for cabinets
Tools for DIY
DIY Woodworking tools

Claw Hammer

The use of a hammer is quite obvious. Since the only nails I use are the headless nails, I use the hammer mostly for pounding them into the piece of wood. You can use the claw to pull out any nail or screw.
Oh ! Did I tell you that it doubles up as a kitchen accessory? I use it to break coconuts.

Cutting pliers

I use them for holding the nails in place when I am hammering them into wood. Helps protect my fingers from being smashed.  I also use them to strip off the plastic sheath from the wires while installing my DIY lampshades.

Screw Driver Set

Again another useful tool to have inside the house. Not just for the purpose of woodworking, but also for other requirements at home, these are very helpful. A kitchen hinge that is loose, a glass door that needs installation or a key holder that is not in place can be easily fixed. The entire set costed me only Rs.80.
Essential woodworking hand tools
More tools

Wood Rasp

I remove all the sharp edges in my work using the Rasp. It helps give a slight curve to the edges. For the cabinet door that I installed, I used the rasp to give the edge a half round shape.

Measuring tape

Your projects will never have the symmetry you desire if not for the measuring tape. Sometimes even a couple of mm offset can make your project look awkward and so it is essential you get used to using the tape accurately. Sometimes it is also needed that you are able to quickly shift between mm and inches as the unit of measurement depending on the situation.

L Square

Perfect tool for drawing right angled vertical and horizontal lines.

Hacksaw blade

Serves all my cutting purposes. Again, the wood that I decide to cut is always of minimal thickness for which the hacksaw is very ideal. Not really suited for cutting wood that is beyond 6 mm in thickness. Not that it is impossible, but really makes it difficult to get that clean cut.

Mica / Laminate cutter

If you work regularly with Mica or laminate, this is a very useful tool. I also use it extensively for cutting 4mm One Side Teak sheet. Beyond 4 mm, this tool is ineffective for cutting.
So that’s about the handtools (with the exception of power drill) that I use. All my projects have been built using these basic tools. Will keep adding more tools and accessories to this list in due course.

What are your favorite tools ? I am not referring to just the ones you use for Woodworking. What are the tools that you use for your arts and crafts projects too ? Share your thoughts.

Did you like this post ? Enter your E-mail address and join our growing E-mail list
Linking in : Colours Dekor


Hobby woodworking with limited set of tools can make you believe you need to take lesser precautionary measures. However, it is  true when they say safety should be given prime importance irrespective of the size of any woodworking project. Working with fumes, dust and wood chips may be seemingly harmless, but they can have radical outcomes if necessary caution is not exercised. So, here’s a list of three safety gears that I feel are essential and important for a hobby woodworker:

Safety Eye gear / glass 

Using a power drill for drilling a hole in concrete walls or wooden planks can be potentially dangerous if the bit were to break off during the process. Protect your eyes unless you want a flying piece of bit piercing right through your eyes. Saw dust and wooden chips also need to be kept away from the eyes. I don’t work with flames, but then if you are the types that uses gas welds, you know what I am talking about. Wearing an eye gear may seem unnecessary and also obstructive to the task at hand, but goes a long way in ensuring your safety. Do save your eyes. You may want to give them to someone later.
Safety Glass / Eye gear

Safety gloves

Wood chips’ getting into my skin is a common issue that I used to face, especially while sanding plywood. Just one slip is all it takes for a chip to prick through your finger. The sore palm is another experience that I had to go through before I learnt wearing gloves is important. Not only does it prevent minor mishaps, it also provides for a firm grip while handling tools. The hammer falling on your feet is the last thing you would want. And unlike the eye gears, gloves are comfortable to use and really aid in handling tools better. Use of latex gloves (Available at Rs.3/- a pair at Nilgiris) while painting / staining / varnishing is also recommended.
Safety Gloves

Respirator

Stains exude invisible fumes, paints and primers smell bad, and saw dusts usually fly all over the place. When it comes to matters of the lungs, it is always and always critical to be safe. Just as smoking is, inhaling fumes and dust are health hazards too that you would want to stay clear of. Working in a highly ventilated area is probably the best tip you can get as far as using stains or varnishes. But like me, if you work in the confines of your home, BEWARE. Fumes have a wider reach and they can very quickly spread through the entire house. I sometimes have to insist that my wife wears a respirator too. Your safety and your family's, they go hand in hand. The least you can do - Cover your nose with a hanky at all times.
Respirator / Face Mask

There are other safety equipments and gears that one may need to use depending on how heavy duty their work is. But for a hobby woodworker that uses minimal power tools, I feel glasses, gloves and masks are mandatory. Here are few other safety tips that should follow:
  • Wear appropriate and tight clothing. You may not want a Power drill to accidentally get caught in your loose outfit. Just imagine a dupatta getting caught in a motorcycle wheel. It is kinda exaggerated, but am sure you get the point.
  • Wear shoes if you can. Hammers, wooden planks, Paint cans and other heavy tools – All of them have the potential to break your feet, crack a bone or at least to give you one painful moment.
Safety before all else. Always remember that and have fun with your creations !

Show your awesomeness. Click here to leave  us a comment.


Have you ever had an "If-only-I-had" moment while working on a project ? It could be as simple as acrylic paint spilling on your dress or a hammer almost crushing your thumb... What is your take on safety while working on simple DIY projects. Share your thoughts. Leave a comment.

Linking in : Lines Across My Face
- Somu

Know more about us

About Us
Reviews
Media
Our showroom location
Return and refund policy
Review us on Google

Connect with us


Mail us
Subscribe to our newsletter

Our Address :
Woodooz Home Decors,
3/371, First floor,
Metukuppam, Thoraipakkam,
Old Mahabalipuram Road (OMR),
Chennai - 600097.
Ph : +91 9884070470
Email : contact@woodooz.com
Created By SoraTemplates & MyBloggerThemes