Category : How tos


Furniture forms the major part of the entire home décor. There are many other decorative pieces and furnishing that add to the look, but the furniture pieces always dominate them all. The design of furniture has evolved over years. The bulky furniture is slowly replaced by sleek designs. Similarly, many replacements for wood are also entering the market. Though there are many new entrants in the furniture designing, the one on the top is definitely “WOOD”! Wood is graceful, durable, and easy on maintenance, hence it is mostly found in furniture designing. However, designing experts have also explored more options to complement the popular wooden furniture with style. 

Here are the 5 popular materials usually used in furniture making and the ways to care for them.

1.Wood 

As already mentioned, wood is one of the majorly used materials in furniture making. Wood has been the primary material in furniture making from the royal times. The main advantage of using wood in furniture manufacturing is that it can be used in creating different designs by using it alone or in combination with other materials. It is neutral and goes well with all other colors and décor. There are different types of wood like Redwood, Teakwood, Mahogany, Cane, Mango wood, and various other varieties used in manufacturing durable furniture. 

Care Tips 
  1. Avoid direct sunlight and moisture contact. 
  2. Apply wax coating to keep the surface scratch proof and shiny. 
  3. Carry out regular cleaning with dry cloth.


2.Plastic

Plastic furniture is the best option for outdoors. It is lightweight and can be moved as required without any hassles. It is quite durable and can be used even in rain. Plastic furniture is available in various colors to get the vibrant décor, but over exposure to sunlight and other weather conditions would result into fading of color. Continuous sunlight would also make plastic furniture brittle. 

Care Tips
  1. Can be cleaned with water and mild cleaning agent. Dry it completely after cleaning to avoid water marks.
  2. Avoid constant sunlight to increase the life of the piece of furniture.
  3. Indulge into frequent cleaning as more you let the dust to accumulate, more it would be tough to clean.

3.Stainless Steel or Other Metal

Metal furniture is slowly taking the front stage due to its cost effective nature, malleability and durability. Stainless steel has found a major place in outdoor furniture designs as it withstands all weather impacts well. Steel furniture stays new even when exposed to sunlight and rain. Other metal furniture types include wrought iron and aluminum furniture. Aluminum is again quite durable as steel, while wrought iron furniture may undergo corrosion if its paint coating is damaged. 

Care Tips
  1. Wash with mild soap and water. Dry it properly to avoid water marks on steel and aluminum, while corrosion in case of wrought iron furniture.
  2. Apply automotive wax and mineral oils on wrought iron furniture pieces.

4.Glass

It is rare to find a furniture piece made of only glass, but it is very natural to find glass in combination with other materials. The transparency of the glass is main reason for using this material more in wardrobes, showcase, book shelf and crockery unit. Glass can be cut in any shape and size, which makes it ideal for shelves in cupboards. Use of glass is also found in tables and other decorative furniture pieces, as glass is not bulky and may not obstruct the vision due to its transparent nature.

Care Tips
  1. Glass is fragile, so handle it with care.
  2. It can be cleaned with mild soap solution and water. Use paper to wipe the glass for keeping it free of stains.
  3. Don’t put very heavy, hot, or sharp objects on glass table. You can use a mat to stay safe.

5.Cane

Looking for the furniture that takes you near to nature then cane is the solution. This is one of the most durable and natural form of furniture materials. The main advantage of cane is that it can be used to make varied designs due to easy bending into different shapes. Cane is affordable, easy to maintain, and good on looks. It will offer an instant makeover to your interiors and exteriors both.

Care Tips
  1. Clean regularly with dry cloth.
  2. For cane seats, put a cushion over it for even load distribution.
  3. Use glass top on cane tables.
Decorate your home with furniture made out of different materials and ensure that you take proper care of the same to have longer life and better utility.


Author Bio
Worldcraft Industries is a furniture manufacturing company based in United States. They are known for distinct Indian designs and styles. They have different collections of products like bedroom furniture, curtains, pillows and decorative artifacts.


I am back with another video. But before that, wanted to take a moment to share a wonderful news that can do loads of wonders for whatever I am trying to do here on the blog. Social Samosa along with Asian Paints opens the gates for the first ever India’s Décor Influencer Awards (IDIA) – an initiative sculpted to accost the contribution of influencers in the digital hemisphere. And guess what !!! Woodooz.com has been nominated in 5 distinct categories. Fortunately or unfortunately, it boils down to the number of votes the blog can garner for the jury to come to a conclusion on the winners. And hence this request.

VOTE FOR ME and WOODOOZ.COM. Help us win. All I need you to do is follow the links below and cast your vote for Somu Padmanabhan. Here’s the link to my profile that has all the nominations. If you are not interested, you can skip and get to the post below. 
Click to go to my profiles page

We have always been driven by our passion to do what we do here. Sometimes, a little motivation and push from you can help fuel that passion. Please do consider voting for us before you head to the post below. You can use your FB login to cast your vote. Thanks 

Meanwhile, here’s what we have been up to. We have been wanting a paper towel holder for a while now.  The little one is still not 100% potty trained and we have been using up loads of these papers on and off. So having it readily available on the kitchen counter became the need of the hour. Please do watch this video on the step by step procedure on how this was made.


Our Kitchen cabinets have a combination of bright red and white. And so when it came to matching up with the existing scheme, the choice of colors was evident.  Furthermore, we are also working on an overall traditional decor for the home, which made the design on the holder even more evident. The design, the color scheme and the execution – All Preethi’s handiwork. All I had to do was to give her the holder made in Plywood.

Do it yourself decor

DIY project
Traditional finish to a DIY stand
While the video explains how this was made, I shall leave you with some progress shots of the project. Meanwhile, it would be great if you can reconsider voting for me, just in case you came until this point without casting your votes. I shall meet you soon with another project and I expect feedback from you that can help me improve the quality of my next video. Please leave me a comment.
Make your own DIY Stand
Progress shots


Note : Please check our Staining wood series also which uses a different staining method from what is explained in this post.

Adding color to wood is like the icing in the cake. You mess it up, and all the efforts taken to bake the cake goes waste. And so it becomes one of the most critical part of completing a project is to make sure you give it the desired color. While there are many methods used in giving color to wood, and we have also seen a few in Woodooz, one of the common methods is to use wood stains.  

When I started looking for means to stain my first ever project, I was clueless. And it was a professional carpenter who taught me how to use sealant and stain.We have already seen in detail the procedure for applying stains using sanding sealers as base coat. Another variant which I was taught by another carpenter was using wood fillers and stains to give that much needed color to wood. I made a short video to explain the process. I hope you find it useful. 

Staining requires surface preparation by way of sanding and smoothening the wooden surface. I am also posting the sanding basics video which would even otherwise be useful for folks looking at making smaller projects. Remember to leave a comment and let me know what you think.


Click here
Subscribe to my videos in YouTube
I am working on more video tutorials and you can expect to see more of these in the coming days. Meanwhile, it would be great if you can subscribe to TheWoodooz Youtube Channel. Until next time, Happy Woodworking :)


Last week, we had two major events in Woodooz:
  1. We announced the starting of the DIY Woodworking group on Facebook. Interestingly, we received good response and we are getting to consolidate the group with woodworking enthusiasts and aspirants. Already, there are useful threads around how to prepare chalk putty, and what should be the essential tools in a beginner's list. I strongly urge you to join as I foresee interesting DIY shares from folks around the world.
  2. We had our first DIY woodworking tip published in the honorable Hindu Melange Metroplus Edition (17th Oct, 2015). I chose a small, beginner level project that can be made around Navratri / Diwali when we have guests coming home. A DIY tray can carry a good show-off value as you can show it around casually and subtley without trumpeting about your new found hobby. This week, I wanted to elaborate on the project - The basic serving tray you can make.
Basic level carpentry
Easy Diwali DIY - Basic woodworking project
The step by step procedure is already in the published content (Check image below), and so I want to focus on the photos (Published and unpublished) that by themselves explain the procedure. Do take a look and let me know if this is something that you would love to make sometime.
Click here to enlarge image
Hindu Melange Metroplus - 17th Oct, 2015
Used simple materials like plywood reapers, OST / Plywood sheet for this project. Made it easier as no power tools are required. Just a hacksaw blade did all the trick for me.

Materials - tools required
Plywood reapers, OST / Plywood, hacksaw blade, wood adhessive
The size of the tray is based on your requirement. Mine is a square tray and it is 12 inches on all sides. You can make a smaller, bigger or even a rectangle tray - Just customize the size to you needs.

Tray frame
Cut using hacksaw blade
6mm plywood or a 4mm OST sheet (One Side Teak) - Both would serve the purpose. Just walk into a plywood store and ask them if they will be able to spare a sheet that was cut from a bigger sheet. Such sheets normally never sell and the vendors would be happy to give it to you for a small cost.

Tray base cut to fit the frame
Glue on both surface

Apart from the glue, you can use small headless nails to secure the base to the frame. For making sure the glue bond is strong, use masking tape, clamps or just overturn the tray and place something heavy to hold the base and the frame. I use a vessel filled with water if I cannot find my tape.

Masking tape on tray
Masking tape or heavy weight. Both can help to hold the surfaces together
After the base and the frame have bonded well, I used hammered in headless nails (Optional). This is your basic tray. You can even use it without a handle. However, you need to apply the required finish for the tray to be functional. Remember, you are going to serve coffee and tea and you need means to handle the spill.

Serving tray tutorial
The tray - Before

Until now, whatever you see is my handiwork. I promptly handed over the tray to Preethi and left it to her to finish it up. I was awed by the outcome and I realized it is good to have an art expert at home. After all, art is not my forte.

Serving tray tutorial

The tray - After
I will detail the finishing process as a separate post as this one is already getting photo heavy. It will also help break down the process without having to stuff you with too much information in one go. 

As a parting note, I want to tell you this. Working with wood opens up options for you to make small functional items for your home. If you are hesitant, working on this DIY is an ideal first step to gain confidence. You can make your DIY a talking point among guests and items like your own tray can become conversation starters Now that Navaratri is over, try this out for Diwali. Go DIY and leave us your feedback as a comment.


It took me more than 8 months to make the display case project. Not just because of other things that kept me busy, but also because of my own faults. I still remember how many times I changed the plan either because I did not like the output, or because I did not have the required tools, or plainly because I had messed it up. Most of this tremendously increased my trips to the plywood store. Something as simple as buying a white sheet of laminate only to come back home and realize I have been using oft-white all along. Some of these mistakes added to cost, and the rest of it added to the time and effort involved. By the end of it, all I could muster was a heavy sigh of relief. 

So here I am documenting the lessons from this project just so I keep coming back to this before I start all my newer projects.
Before and after - Plywood to functional shelf
Before and after - Display unit built entirely with plywood

Working with laminates

  • I should have decided to use a laminate for the outer surface of the shelf. I first decided to stain directly on the plywood. Somehow it did not appeal to me, and so I decided to add a layer of OST and then stain. Somehow, that did not seem appealing and I finally ended up using a laminate.  Effect : Loads of wasted time and effort. I could have saved more than 10 days had I decided to directly go with laminate on plywood top.
Staining
Wrong choice of finishing resulting in waste of time and effort
  • I should have decided to use a laminate for the insides of the shelf. I first attempted priming the base and then applying white paint. Total failure. Then I shifted to multiple layers of Gesso and white acrylic paint. Effect : Awesome outcome despite the wasted time and effort.  But then when I started applying varnish, the whole output collapsed. Finally, went with oft-white laminate which worked in my favor. I could have easily spent about 15-20 days adding layers and layers of primer and waiting for it to dry.
  • I should have stuck the oft-laminate first before fixing the sides of the shelf. The shelf was built and then the laminate was stuck. The first time I tried to stick the laminate to the inside back of the shelf, the measurement was slightly off track and when I tried to remove the laminate, it cracked. AIYO !
Laminate on wood
Laminates can crack easily. I learnt it the difficult way
  • I should have known what laminate I was using. Despite the plywood vendor telling me that I bought only oft-white the previous day, I insisted he give me white laminate as a replacement to the broken one. I came home and realized he was right. PHEW !
Finally the wooden shelf was built to my satisfaction and it was now time to fix the glass shelf and the glass doors. YAY !

Working with glass

  • I should have known that the glass door will rub with the glass shelf if the shelf depth was not correct. Much to my dismay, I noticed it after all the installment was done. I had to take the glass sheet to the store to cut the edges off to ensure smooth opening and closing of the door. URGH !
  • I should have known the glass is fragile and is likely to break when something falls on it.I was installing the door and the hinge on top slipped and fell on the shelf chipping a piece of it. Another visit to the store to shorten the depth to remove the crack. WHEW !
Chipped glass
Chipped off glass and the rounded corner - Something to think of next time

Working with LEDs

  • Finally, I bought a good looking LED focus light for the shelf. I should have known that I did not have the tools to drill a hole that big and that the drill bit was very expensive. I decided to tone down the size of the focus light (now a single LED), just so I can complete the task. Major BULB !
    Install fOcus lights
    Working with LED lights - Choose those for which you have the tools

In a nutshell - Plan, plan and plan

If you re-look at each of the points all of it point towards lack of planning which was a result of either lack of knowledge or blatant oversight from my side. While the lapses did add to cost, they have also given me a better understanding of the aspects to take care of in the future. Have to plan so that no time, material, effort or money is wasted. I am sure I will still get some of the things wrong the next time too, but with experience I will reduce the number of these mistakes. And the goal is to eventually master the art of planning before commencing projects. This post is a reminder that I should consciously work towards that. Do wish me luck and let me know if you have had your own time / effort wasting tactics in doing a project.


  • Want a dismantleable Golu Padi for this Navaratri ?
  • Feel the ones in the market are very expensive ?
  • Had trouble trying to find a carpenter to get it done for you ?
  • Did you land up here looking for means to build your own DIY Golu Padi right from scratch and at a much lower price ? 
Well, you have come to the right place. Just browse through the 3 posts from the drop down below and learn about the basic design, materials required and cost, and the assembly procedure (a video).
Check Out ! Complete guide to build your own Golu steps
Preethi had started the Golu display at our new home with make shift Golu steps. This year, we wanted something that is more permanent and easy to store and assemble. And so started the Golu padi project. Before that, I would like to thank Love and Lentil for their tutorial from which I took the design with minor additions.

Golu steps how to build one yourself
Basic design of the Golu Padi
So, what do you need to get your basic 5 step Golu padi up and running (Well ! Not literally)
  • 2 side steps that will support your Golu padis
  • The actual steps (5 of them)
  • Vertical support for the side steps
  • Horizontal support
The focus of this post would be to explain how to arrive at the measurement for the side steps based on the width of each of the Golu padi. And in turn, arrive at your total amount of wood that you need to purchase.

Key Decisions

First decide on the following : What should be the height between two steps ? What should be the width (depth) of the steps ? What should be the length of the steps ? All these three decisions will be completely based on your own collection of dolls / idols. For convenience, choose the height and width (depth) to be same.  In our case, we chose 8.5 inches as the height and depth.

Golu step DIY
Choose the width, height and length of your steps

Dimensions for the side step support

Here is where Pythagoras Theorem comes in handy. Don't really remember using it for anything functional in the last so many years. Your padi width / height (indicated by 'a') being the sides of a square, you will need a plank that is 5 times the diagonal of that square. The below illustration will help you decide how much of side step support plank that you would need based on your choice of width and height.

golu padi - Do it yourself
How to arrive at the dimension required for Side step support
For 8 inches wide step, you would need just one board of 4 feet x 7 feet plywood. This will suffice for a 5 step golu padi. If you keep increasing the width dimension or increase the number of padis, the total requirement would change. However, the same logic as explained above can be used to calculate your total plank requirement. Again, the below illustration is self explanatory :
golu padi tutorial
Total (ply)wood requirement for an 8in x 8in step (4 feet long)

Horizontal and vertical support

The vertical support is required to hold the structure in place without falling down. And the horizontal support is required to prevent the structure from falling sideways. Both these supports are critical to the stability of your entire structure. You can either use the left over wood (as indicated by the wooden texture in the above photo), or buy the required amount in addition to the 4ft x 7 ft board. The length of these supporting pieces are not provided as they are straightforward and can be derived by merely measuring using an inch tape.

Vertical and horizontal support
Vertical and side support for the overall structure
To summarize, we saw :
  • What is the basic design of the steps
  • How much wood is required depending on your choice of width dimension
  • How the vertical and horizontal supports help holding the golu steps in place
I will shortly (In 2-3 days time) follow up this post with what I have used for making the steps and the cost involved. Meanwhile, you will have to tell me if this DIY will be of any use to you at all ? Would you be prompted to go ahead and try this out for this festive season ? Let me know in the comments section.


The earlier two weeks, we looked at how to build the side table frame. Today, we look at how the frame can be finished to get the desired look as well as fixing the table top. Before you read any further, I suggest that you look at the below three posts to ensure continuity:
  1. Starting a Side Table project
  2. Side Table – Design, dimensions and materials required
  3. How to build the table frame using teak wood legs
Building a side table
DIY Side Table
At this point, it makes complete sense to go back and look at how staining can be done on a wooden surface. While this has been extensively covered, a little reiteration will certainly help you get a hold of the methods used. The first step is to sand the wooden surface. Sanding provides the necessary level of smoothness that is required for you to achieve the stained finish that you are looking for.

Recommended reading : The basics of sanding explained through a simple video
Sanding
Sanding and staining
The next logical step in the sequence is to apply sanding sealant. However, considering I already had an exceptionally even surface, and the teak wood was absorbing the stain very well, I decided to skip the sealing process. Sometimes, even when there is an established method, it does not hurt to experiment and resort to methods that work well for a particular project. I used gada cloth to apply the stain, and used another piece of the same cloth to immediately wipe off the excess stain.

Recommended reading : How to apply wood stain for your DIY projects
How to stain wood
Staining process continued
Finally, the frame is built and wood stain has been applied. Now the next step is to fix the top and middle layer. I used a 12mm plywood for both the layers. To fix the plywood on the frame, you can nail wooden reapers along the inner sides of the frame. Considering the plywood top is 12mm in thickness, the reaper should be nailed 12 mm below the top of the frame to ensure the plywood is in line with the frame top.
Wooden reaper
Using a wooden reaper to support the plywood top
What you see above is the reapers nailed on the inner side of the frame for the top layer. Similarly, I have nailed 4 more for the middle layer (not shown in the picture). The plywood needs to be neatly cut with the dimensions being almost equal to the inner dimension of the frame - In this case, about 14 inches x 14 inches. Once the reaper is in place, and the plywood is cut, all you need to do is merely place the plywood on top of the reapers. And your side table is ready to be used.

Do it yourself
A Do-it-yourself sidetable
We are still debating on how I should finish the table top. Right now, it is just the plywood surface. We are considering doing an art work on the top to give the side table an ethnic look. What do you think ? Should we consider other options. Let us know.


Last week we looked at the first step in making our bedside table – getting the dimensions, design right and cutting the Teak wood legs to the desired measurement. This week, we will look at fixing the legs together to form the table frame. I have not used any specific joint to fix up the legs. All that I have used are just screws and adhesive to strengthen the joint a little bit more. 
Building the frame for side table
Side Table Frame

Tools / Accessories used

  • Star head screws (2 inches length). The screws need to be long enough to go deep into both sections of the legs being joined
  • Star head screwdriver
  • Fevicol SH
  • Electric drill. At this point, I would want to reiterate that having an electric drill at home will come in handy both from a DIY standpoint and also in getting some minor repairs done. If you want to get into DIY, you need to grab one drill immediately.
Required tools
Tools required
As I mentioned, I have used only the screws to join the legs together. Before driving the screws in, it is ALWAYS recommended that you drill a pilot hole.This will enable you to easily drive the screws in, prevent splitting of wood, and will act as a guiding hole for precisely driving the screws. The hole is drilled across both the surfaces that are being joined. The cumulative depth of the hole should be slightly smaller than the length of the screw. With the pilot holes in place, ensure that you screw both the wooden legs together. To add more bond, smear the surfaces with adhesive.

How to drive screws in
Drill pilot holes
I used two screws to secure each of the joints. Considering I had 4 vertical legs, and 8 horizontal ones (or 8 joints requiring 4 screws each), I required a total of 32 screws to complete the job. The below pictures are the work in progress snapshots of the legs being fixed. You may want to go back to the first photo on top to visibly see how the two screws are used to join the pieces. The screw heads are visible which may be a downside to it. However, the darker shade of stain that I intend to use will eventually blend the screws with the background.
Work In Progress - Side Table
Work in Progress
So, here it is - The Side Table frame. The next step is for me to stain the legs and look at how I would want the top to be covered. Glass, laminated plywood, decoupaged plywood, or painted (I mean the art kind of painting) plywood are some of the options. You can also throw in your ideas and I will see how that can be implemented too.
Side table do it yourself
The side table, almost ready to be used
I am going to be spending most of this week staining the wooden legs. And of course there is this long, boring and tedious task of sanding the surface. Most probably it will be a busy weekend and so I plan to use up the weekday early mornings to try and complete it. And I hope I will be able to put up the details of the staining process for you to see next Monday. Do leave a comment on what you think about how this project is progressing.


I had started the project on bedside table last week and had decided to put up the step by step process of the progress.  The first step towards making any piece of furniture is to get the design in place. This enables you to fix the dimensions, which in turn provides you the input on the amount of materials that you need to buy.  This being DIY, you can choose to have your own design and dimensions. We wanted the table to be in line with the mattress which fixed the height at 20 inches.

Measurement for table
Dimensions for the table

Materials and tools required

  • The Wooden legs : I wanted the legs to be 1 inch x 1 inch and required them to provide stability to the whole structure. Based on the above design, I needed the following:
    • 4 x 20 inches long legs (Vertically placed)
    • 8 x 14 inches long legs (Horizontally placed - 4 on top and 4 in the middle )
  • At the plywood store, I was shown 1 inch x 1 inch teak wood legs which was just perfect. They come in 8 feet length and costed Rs.25 per foot.
  • Based on the dimensions, I needed 192 inches (exactly 16 feet). To allow for minimal wastage, I bought 2 x 8 feet and 1 x 2 feet of the teak wood
  • A hacksaw blade for the cutting needs
Teak wood for table legs
Teak Wood Legs for the Side table

Cutting the wooden legs to required dimension

I have always maintained that it is fine to outsource your cutting needs should you have constraints in terms of space, non-availability of tools / skills. While it is quite a task to cut sheets of wood above 12mm in thickness and one may need a handsaw or a circular saw, for some of the requirements (as in this case), hacksaw blades would do the job neat and clean. It is easy to use, easily available and will not cost you more than Rs.15. I used a hacksaw blade to cut the teak wood legs.

Hacksaw blade
Cutting the wooden legs using hacksaw blade

Fixing the wooden legs

With the legs cut to the required dimension, the next step naturally is to fix the legs. Considering I am getting only limited time during the weekends, this will be the next step in the process. I still have not decided whether to use screws or a cross dowel to fix this up. Whatever might be the case, I will be using only butt joint to join the wooden legs together

Teak wood legs
Wooden legs cut and ready to be fixed

Do watch this space next Monday for the next step in the process. Hopefully, I should be ready with the basic structure of the table by this week. I am thinking of putting up a video post (at a later time) on this entire project subject to availability of time.  Do leave your feedback and share your thoughts on this project. 


It is exciting when the desire to DIY is fueled by an actual requirement at home. There is now the need for a bedside table in our guest bedroom that is bare with only a cot and no other piece of furniture. The broadband modem, mobiles/other accessories have no designated space while in the room. As always, I want to explore the DIY route before looking at readily available products. Another functional necessity and am already so pepped up.
Recommended Reading : Using Google Sketchup to create 3D designs
The plan for the table is based on a simple thought process. Avoid perception of taking up space in an already small room by keeping all sides open. The design is not anything original and you can find similar ones on the internet.
DIY bedside table
Simple Side Table plan designed with Google Sketchup
For now, I have only bought the wooden legs from the local shop. My initial plan was to keep the budget low (less than Rs.300) and build a low cost table. On second thoughts, want to build a really sturdy one and so stretched it a bit. The teak wood legs you see below cost about Rs.25 per foot. 
Recommended Reading : Easiest DIY Center Table you can ever build
The design has the necessary approval at home. While I am starting with what you are seeing above, during the course of building it, I may improvise and deviate from the basic plan. The cot is brown and the wardrobe / wall is white which should explain the color combination. The dimensions are not frozen as yet.
Side table for bedroom
Guest bedroom and the designated space for the side table
I will be making this as yet another simple and everyone-can-make-at-home kind of a project. I plan to put up the progress (dimensions, materials used, and the step by step process) of this DIY in a series of posts. So, watch this space if you think this assignment will be of interest to you.  


[Guest Post by Subbu Padmanabhan]
The delight in seeing one’s own near-perfect handiwork come to life is quite unparalleled by the satisfaction induced by the picture perfect outcome of a qualified expert. This joy provides everyone with unfailing inspiration and so when I experience the same elation, I want to share it. Adding life to walls with cartoon characters may not seem new. But doing it yourself brings in the needed novelty that is a result of your own unique creative skills. I decided to give my son Sharan's room a little transformation with his favorite animation characters and have now been doing it on request from other mothers too. Here's some tips on decorating your kid's room wall  with his / her favorite cartoon characters:

Wall decoration idea
Add life to your kid's room wall with cartoon characters
First and foremost, before you start doing anything with the wall, understand that the result has to interest your kid in the long run. Kids appreciate everything with a fancy value, but tend to move from one interest to the other quickly. Involve your kid in understanding what he / she would like to see on his / her wall for the next few years. You certainly don’t want him / her saying, “Mmmm, I like Chota Bheem better”, after two days of your hard work.

How to paint your kids room wall
DIY Wall Decoration

Materials you can use

From my experience, acrylic colors seem to be the best fit for adding splash of colors on the wall. I have used it on many walls with ease and have seen it give a striking finish to my works.
Wall painting materials
Acrylics for the wall
I use cartoon images from the internet for reference and mark the outline on the wall using a pencil. Once the outline is in place, just paint the colors without letting them spill out of the outline. Cartoon characters look good in solid colors and so you don't need to give any gradient effect to your paintings. In short, very basic painting skill is required to indulge in this DIY fun.
Chota Bheem on the wall
Chota Bheem on the bedroom door
You don’t have to use the whole wall area. Choose a portion of the wall space and make it your canvas. Don’t be scared to alter and give it a makeover.  If your kid would love it, give him / her sections that he / she can complete.  That would add to the fun, right ?

Tips for painting the wall

Wall painting using acrylic colors
The feature wall of the kid's room
It is as simple as that. Take your time. Don’t get bogged down by setting yourself timelines. Get it right and then move to the next step. Enjoy the process. And most importantly, relish the product of your own efforts.  Take pride and show it off to family and friends. I would love to hear your thoughts on designs that you have executed in your own rooms. Maybe, next time I do something like this, I will incorporate your ideas.  Do leave me a comment.

~ Subbu Padmanabhan

About the contributor
Subbu Padmanabhan is a mom to a 4 something year old boy, and works as faculty in a premier play school. She likes to indulge in mini crafts projects, for the school and her home, during her spare time. The wall art that you see in the backdrop of this bedside lamp is her handiwork too. She lives in Bangalore.


I have been trying to see what I can put down here that can be of use and my recent conversation with a friend prompted this post. She was wanting to get shelves installed in her kitchen and had been coordinating with professionals to get it done. One of the many needs in any kitchen is the requirement for additional shelves at some point or the other. And it was mere coincidence that I was working on completing an earlier project of mine which involved installing a glass shelf to the cabinet. My camera is giving us big trouble, and I could only manage the below pictures. Hoping that they serve the purpose. So, here’s how you can install a glass shelf to a cabinet without professional help.

Materials and tools required:

  • The glass shelf. The process holds well even if you use a wooden shelf. The length of the shelf needs to be 1 or 2 mm lesser than the length of the cabinet. I got mine for Rs.90/-
  • Shelf brackets or bats (The ones you see in the picture are called shelf bats) - Rs 35/- a pair
  • Drilling machine (Do remember that this is a must have tool for even some of the small requirements at home)
  • Adhesive (if required)
Shelf brackets - Glass shelf support
Shelf Brackets
I went to my regular plywood store and gave the dimensions of the glass and got it cut from the store. Since my size was small, he could give it to me from a spare piece and that saved me some cost.
Shelf glass
Glass panel for the shelf

Step 1 : Mark the height and drill holes

Mark the height on both sides of the cabinet where you want to install the shelf. Ensure that the height is same on both the sides.

Drill two holes along the line marked. This by far may seen as the most cumbersome activity in the whole process. Get yourself a drilling machine and you would realize it is not a big deal after all.The hole size should not be bigger than the bat / bracket cylindrical protrusion (refer photo). The depth of the hole should be just enough for the entire bracket to be comfortably inserted into the hole. Drill a bit and insert the bracket to test. Keep drilling (with intermittent testing with the bracket) until you are able to comfortably place the shelf support into the drilled hole.
Drill holes
Drill holes for the bat insertion

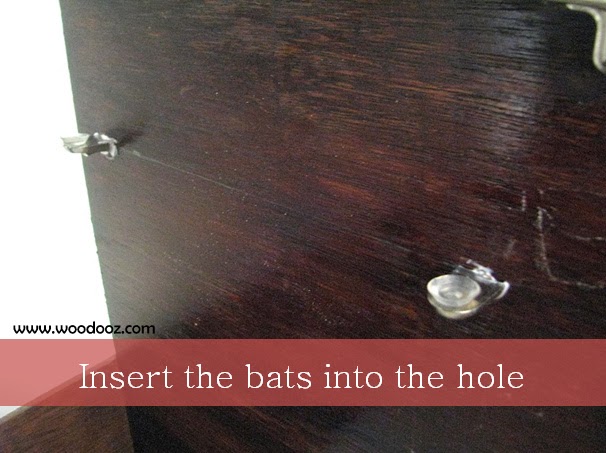
Step 2 : Insert the shelf bats into the hole

Insert the shelf bats into the holes drilled and secure them in place. If the hole diameter is small, the bat cannot be inserted. If it is bigger, the bat will not be secure in its position. To avoid any loose insertion, I added loads of Fevicol and then inserted the bats in place.

Install shelf bats
Insert the shelf brackets

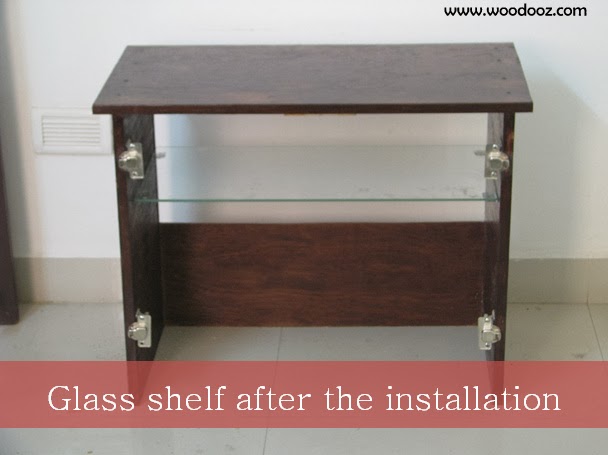
Step 3 : Place the shelf on the bats

The final step is to place the shelf on the bats. Notice that the bats have a cup shaped top ? With little pressure applied the glass shelf is held together by vaccum suction. Just same as any vaccum suction hooks that you would have seen.

How to install glass shelf
Learn to install a glass shelf
And it is as simple as that. With just a little bit of practice with an electric drill, you can pretty much take care of some of your woodworking needs all by yourself. Installing a glass shelf, getting a cabinet door installed, installing a glass door are among some of the requirements that you can fulfill with this skill. Comes in quite handy at the most vital situations. Share your thoughts. Let me know if you found this post useful.
- Somu

Know more about us

About Us
Reviews
Media
Our showroom location
Return and refund policy
Review us on Google

Connect with us


Mail us
Subscribe to our newsletter

Our Address :
Woodooz Home Decors,
3/371, First floor,
Metukuppam, Thoraipakkam,
Old Mahabalipuram Road (OMR),
Chennai - 600097.
Ph : +91 9884070470
Email : contact@woodooz.com
Created By SoraTemplates & MyBloggerThemes