Category : Golu padi


This is the final post in the golu padi series. This one will be about the assembly of the golu steps. Do ensure you check out the two earlier posts. I am a bit relieved that we don't have to go in search of bricks, card boards, or left over planks to build the steps like we did the last two years.
Before you read the rest of the post, do spend some time to understand what a pilot hole is and what is a cross dowel. These two concepts are essential to get a better grip of the post / video.

Since the video is a little elaborate, I will write only a bit about what needs to be done with pictures.

Check Out ! Complete guide to build your own Golu steps
Disclaimer : Materials used and measurements depicted are suited for the collection of dolls we have. Kindly assess your collection and accordingly choose 12mm / 19 mm ply for your steps.


Navaratri Steps DIY
The Golu Padi - Final look

Step 1

Join the vertical teak wood support with the horizontal strip of wood. Drive pilot holes and use the nuts and bolts to tighten the wooden pieces.

Do this on both sides of the plywood strip to get the basic support structure in place. (Watch video to know how this is done)

Horizontal and vertical support
Vertical supports joined at the bottom using a horizontal wooden strip

Step 2

Join the side risers with the vertical teak wood support. Make sure the top rear of the side step is aligned with the wall, and the bottom is parallel and placed on the floor. This is critical to get the required stability. Again, use pilot holes, nuts and bolts. (Watch video to know how this is done)

Side Riser 1
Side riser joined to the vertical support
Attach the other side riser to the other side of the support structure. Notice how the side steps are balanced without any further support?

Side riser 2
Other side riser attached to the 2nd vertical stem

Step 3

With side risers in place, start joining the steps (padis) to the sides. You can screw the step planks to the side steps, but then, it would make assembling and dismantling on a regular basis a pain. To overcome this, use nuts and bolts the way cross dowels are used in the flat pack furniture industry (Watch video to know how this is done).

Start with the top step. Use two bolts on both sides of the planks.

top plank
Start adding the step planks - Top one added

Keep adding all the other steps in sequence. For the 2nd, 3rd and 4th padis, it is enough you use only one bolt on both sides.

For the bottom step, use two bolts on both sides. This will ensure the steps do not split at the bottom.

Padi completed
All the step planks joined with the side risers
Finally, evaluate your outcome. Think the steps are wobbly ? Check if the bolts are sufficiently tight. If required include an additional horizontal support connecting the two teak wood vertical stems on the top. And most important : If you know someone who would benefit from this post, do remember to share it. Just click on one of the share options at the end of this post :)

Happy Navaratri 


I started this project with a budget of Rs 700-800/-. And with that, I set out to look for light weight wood at the timber store. They are sold for Rs.30/- per kg. Sounds good right? It was not as rosy as it seemed. I visited few places and unfortunately no one saw my requirement as giving them good business. And so, no one offered to help and I was left to pick up what I needed from the huge pile of wooden planks. Bugged after a while, I left the place and came back to my favorite raw material – Plywood. Thought there will be no hassle of wading through at the timber yard.

Before I move on, let me remind you that this is a series post about how you can build your own Navratri steps. Here's the list of post in this series :
Check Out ! Complete guide to build your own Golu steps

Materials Required and cost :

So, here is what I ended up buying for my Golu Padi :

  • A 4 ft x 7ft plywood (12 inches thick) board – Rs. 37 per square feet
  • I got the strips of Wood (for the Padi and the side step) cut at the Plywood store
  • To save the trouble of explaining, I decided to cut the side step (The stairs) myself
Plywood - DIY woodworking
12 mm plywood planks for the side riser and the steps

  • I bought two 1 inch thick teak wood (4 ft in length) for the vertical support – Rs. 25 per foot (Rs. 200 in total)
  • I had left over wood from earlier projects which I decided to use for the horizontal support
Wooden strips
Left over wood - Support for the steps
  • Additionally, I had to buy nuts and bolts for this project which costed Rs.73/-
For joining the wooden planks
Nuts and bolts
Total Cost = Materials + Joining accessories = Rs. 1309 /-

The only major effort in this case is for you to cut the side step stairs pattern (you can also get it done at the plywood store for a cost). Considering thickness is only 12mm, you can very well saw the pattern using a hand saw. If you have a power saw at home, that would be an advantage. I used my oscillating multi-function power tool. In the next post we will look at the actual assembly of the steps.

Cutting wood at home
And that's me using the oscillating multi-function tool to cut the stair pattern
Related reading (External video link) : Watch Indranil Bannerjee explain how easy it is to use general purpose hand saw and cut wood. Of course, little bit of practice is required to master the skill. I am still trying to get a grip of it.

We have seen the basic design so far and also the materials required for making the padi. I will come back and write about the assembly for get the steps in place. Until then, leave me a comment and let me know what you think of this project. 


  • Want a dismantleable Golu Padi for this Navaratri ?
  • Feel the ones in the market are very expensive ?
  • Had trouble trying to find a carpenter to get it done for you ?
  • Did you land up here looking for means to build your own DIY Golu Padi right from scratch and at a much lower price ? 
Well, you have come to the right place. Just browse through the 3 posts from the drop down below and learn about the basic design, materials required and cost, and the assembly procedure (a video).
Check Out ! Complete guide to build your own Golu steps
Preethi had started the Golu display at our new home with make shift Golu steps. This year, we wanted something that is more permanent and easy to store and assemble. And so started the Golu padi project. Before that, I would like to thank Love and Lentil for their tutorial from which I took the design with minor additions.

Golu steps how to build one yourself
Basic design of the Golu Padi
So, what do you need to get your basic 5 step Golu padi up and running (Well ! Not literally)
  • 2 side steps that will support your Golu padis
  • The actual steps (5 of them)
  • Vertical support for the side steps
  • Horizontal support
The focus of this post would be to explain how to arrive at the measurement for the side steps based on the width of each of the Golu padi. And in turn, arrive at your total amount of wood that you need to purchase.

Key Decisions

First decide on the following : What should be the height between two steps ? What should be the width (depth) of the steps ? What should be the length of the steps ? All these three decisions will be completely based on your own collection of dolls / idols. For convenience, choose the height and width (depth) to be same.  In our case, we chose 8.5 inches as the height and depth.

Golu step DIY
Choose the width, height and length of your steps

Dimensions for the side step support

Here is where Pythagoras Theorem comes in handy. Don't really remember using it for anything functional in the last so many years. Your padi width / height (indicated by 'a') being the sides of a square, you will need a plank that is 5 times the diagonal of that square. The below illustration will help you decide how much of side step support plank that you would need based on your choice of width and height.

golu padi - Do it yourself
How to arrive at the dimension required for Side step support
For 8 inches wide step, you would need just one board of 4 feet x 7 feet plywood. This will suffice for a 5 step golu padi. If you keep increasing the width dimension or increase the number of padis, the total requirement would change. However, the same logic as explained above can be used to calculate your total plank requirement. Again, the below illustration is self explanatory :
golu padi tutorial
Total (ply)wood requirement for an 8in x 8in step (4 feet long)

Horizontal and vertical support

The vertical support is required to hold the structure in place without falling down. And the horizontal support is required to prevent the structure from falling sideways. Both these supports are critical to the stability of your entire structure. You can either use the left over wood (as indicated by the wooden texture in the above photo), or buy the required amount in addition to the 4ft x 7 ft board. The length of these supporting pieces are not provided as they are straightforward and can be derived by merely measuring using an inch tape.

Vertical and horizontal support
Vertical and side support for the overall structure
To summarize, we saw :
  • What is the basic design of the steps
  • How much wood is required depending on your choice of width dimension
  • How the vertical and horizontal supports help holding the golu steps in place
I will shortly (In 2-3 days time) follow up this post with what I have used for making the steps and the cost involved. Meanwhile, you will have to tell me if this DIY will be of any use to you at all ? Would you be prompted to go ahead and try this out for this festive season ? Let me know in the comments section.


(Note : I have started a new series on how to make a Golu Padi. I explain the process in three steps. Do check out the 1st post in the series for a better understanding)

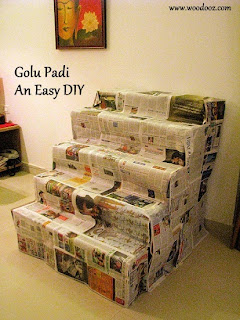
This time of the year, with everyone being busy with arrangements for Navarathri, one of the major task at almost every household is setting up the steps for arranging the dolls. If you have been setting up Golu for years together, am sure you would not have much of an issue with the steps. However, if you are doing it anew (like us) and have no major time at your disposal, here is a 5 step padi that you can build with planks, cardboards and everyday furniture around the house. 

We had leftover planks and card boards and the idea was to not spend time and money on Padi. Last year was the first time we kept Golu in our new home and maybe as we collect more dolls, we will look at a more permanent step arrangement. For now, the make shift one works good for us. Do share your thoughts in the comments section.

Golu  Padi Make it yourself
Make your own Golu Steps
Golu Padi - An Easy DIY
DIY Golu steps / Padi

1. Materials used for the steps

  • Bottom step - Center table
  • Step number 1 - Card board sheets (The ones I used for demo for my Clock DIY video)
  • Step number 2 - 6mm Plywood planks
  • Step number 3 - 19 mm Plywood planks
  • Top most step - OST sheets

2. Mounting the planks 

  • Bottom step - The center table itself formed the bottom most step
  • Step number 1 - Used two cardboard boxes (placed on the center table) on the corners and piles of papers to support the Carb board sheets
  • Step number 2 - Stacked up bricks (on the center table) on which the 6mm plywood planks were placed
  • Step number 3 - Placed dining chairs on opposite ends and supported the 19mm plank on the back rest
  • Top most step - Placed two modas on the dining chairs, added shoe boxes and books for height and for holding the OST sheets
Do it yourself Golu steps
Make your own Golu steps using planks and everyday furniture
The idea here was not to showcase any carpentry skills. The purpose was to build the steps with whatever we already had in ways that anyone can do. I know it doesn't look great on the inside. But it certainly serves the purpose after appropriately covering it up. We have for now covered the setup with news papers and we will soon use the traditional white dhoti on top. Work is still in progress and thought there is no better time than now to post this. 

How do you do your Golu steps ? Already have a knockdown setup ? Plan to get it done for the first time ? Leave us a comment.

Here is two DIY projects on Golu steps that we loved while browsing the net for ideas :

Know more about us

About Us
Reviews
Media
Our showroom location
Return and refund policy
Review us on Google

Connect with us


Mail us
Subscribe to our newsletter

Our Address :
Woodooz Home Decors,
3/371, First floor,
Metukuppam, Thoraipakkam,
Old Mahabalipuram Road (OMR),
Chennai - 600097.
Ph : +91 9884070470
Email : contact@woodooz.com
Created By SoraTemplates & MyBloggerThemes