Category : DIY


DIY in India is certainly a concept that is catching up. While there are individuals in pockets already indulging in Do It Youself, the idea by itself cannot gain widespread awareness unless there is more focus, attention and thrust coming from the industry at large. Bosch, India, is now getting to broaden that interest through its Home and DIY power tools and its DIY experience center, The DIY square.

Home and garden tools
Home and DIY Power Tools stall
I recently had the good fortune of interacting with Mr. Vijay Pandey, Vice President of Bosch power tools, India, at their facility in the Garden City. The event was organized for folks from the media to break Bosch’s image of being a predominantly Automotive focused organization and was aimed at introducing the audience to the other streams of business lines that it was already flourishing in - DIY, Home and Garden power tools being one of them.

VP, Bosch Power Tools
Mr.Vijay Pandey at the Bosch Brand DIY Square
Here’s couple of interesting things that came out straight from the horse’s mouth.

He said,
“Bosch provides the joy and first hand experience of DIY by allowing interested hobbyists to unleash their creativity at the Bosch brand store and DIY Square – An experience center that provides tools, assistance and all the needed guidance to overcome the hesitation of using power tools. The use of DIY Square is completely free (unless there is considerable amount of materials used) and there is absolutely no sales pressure. Walk in. Walk out. And have fun in between.”
When asked about the target market,
“We are not trying to replace the carpenters, nor are we trying to convince every individual to DIY. There is a certain section that knows DIY is cool and the outcome of DIY is worth showing off. We want to target that section by providing them with a platform to learn and the right tools to experiment and experience DIY”
DIY Stall
Tools demonstration at the venue - Got to hold and try the tools
It was also interesting to note that the tools are very easily available through Flipkart, Amazon, Snapdeal and other E-commerce portals. Bangalore is lucky in one sense that this whole revolution is starting with the city. We had a tour of the DIY Square (And that is a separate post by itself) and I spent the most time there laying my hands on the tools and watching others get a grip of it too. Friendly staff eager to see us brim with joy was an added bonus. Try it and if you like, buy it is an idea I wish existed here in Chennai too. 

DIY tools
Bosch tools on display
DIY tool kit
Bosch Home Smart Kit 
The whole event left me with a sense of pride. I walked out with the resolution to up my ante. DIY is cool and I hope to continue enjoying the benefits that it has to offer. And it is indeed nice that Bosch is doing its bit to popularize the DIY culture in the Indian sub-continent. That said, what is your take ? Do you think there is growing enthusiasm to embrace this culture ? Share your thoughts as a comment.

Disclaimer : My entire visit was sponsored by the event organizers. However, I was not asked or influenced in anyway to write this post. My opinion here is voluntarily written and is completely mine.


It is exciting when the desire to DIY is fueled by an actual requirement at home. There is now the need for a bedside table in our guest bedroom that is bare with only a cot and no other piece of furniture. The broadband modem, mobiles/other accessories have no designated space while in the room. As always, I want to explore the DIY route before looking at readily available products. Another functional necessity and am already so pepped up.
Recommended Reading : Using Google Sketchup to create 3D designs
The plan for the table is based on a simple thought process. Avoid perception of taking up space in an already small room by keeping all sides open. The design is not anything original and you can find similar ones on the internet.
DIY bedside table
Simple Side Table plan designed with Google Sketchup
For now, I have only bought the wooden legs from the local shop. My initial plan was to keep the budget low (less than Rs.300) and build a low cost table. On second thoughts, want to build a really sturdy one and so stretched it a bit. The teak wood legs you see below cost about Rs.25 per foot. 
Recommended Reading : Easiest DIY Center Table you can ever build
The design has the necessary approval at home. While I am starting with what you are seeing above, during the course of building it, I may improvise and deviate from the basic plan. The cot is brown and the wardrobe / wall is white which should explain the color combination. The dimensions are not frozen as yet.
Side table for bedroom
Guest bedroom and the designated space for the side table
I will be making this as yet another simple and everyone-can-make-at-home kind of a project. I plan to put up the progress (dimensions, materials used, and the step by step process) of this DIY in a series of posts. So, watch this space if you think this assignment will be of interest to you.  


I had not been working much on DIY for a very very long time, and I hope that changes in 2014. While there are so many that are in mind, more time is what I need to execute them all. Maybe, this year around, will allocate focused time for Woodooz. My plan for 2014 is to work on simpler, easier and cost-effective projects that add functionality around the house that everyone can build. This miniature News Desk was a requirement from someone. While I should have spent more time on it, I ended up working on it overnight. Eventually, whoever wanted it, didn’t have reasons to use it, and promptly returned it. No specific requirement was given except for the dimensions (22 inches long, 7 inches wide and 8 inches tall).
Small newsdesk
News Desk
There is not much that I want to write here. This was quite simple to do. As always used 6mm thick sticks (1.5” wide)  with a 12mm strip (12mm wide)  in the middle. Since I did it overnight, didn’t bother to take the step by step pictures.

Newsdesk
Miniature News Desk
Apart from wanting to do more projects this year, I would also want to pay more attention to quality and proficiency going forward. Probably that could be my only resolution for this year. Hope the start to 2014 has been wonderful for you and if it is not anything personal, do share your resolution for the year in the comments section.


Do it yourself is fun. The pleasure I derive from finishing a project is immensely fulfilling. The near end of one assignment almost immediately marks the beginning of the next envisioned idea. And there are countless conceived designs that are waiting to be executed. My grouse though is that most of the ideas are still only in their conception phase. I find it extremely hard to maintain the consistency with which I would like to indulge in this hobby.  And that, quite naturally, affects the frequency of posts you see here. While there are many factors, there is one main challenge that I face in being able to sustaining the DIY steadiness.

Time

There is me time, we time, free time. There is work time, travel time. And amid all this I have to squeeze in hobby time. While working on a DIY project is one thing, making a post on it is another thing altogether. My last post on building a shoe rack took 6 hours of my Sunday to make just the illustrations. And the shoe rack itself took close to 12 effective hours spread across multiple days.

The fact that woodworking is an addictive hobby, it is not difficult to understand that you would soon get sucked into it much like any other pastime. Sometimes I am glued on to it for hours together completely oblivious to the passage of time. Spending time compromising on other priorities is quite concerning right?  Though at one point, I would have easily declared “not finding time” as a made-up myth, I am coming to realize that it is an apparent truth and a reality.

It is easier to read and hear about things like, “You have to work around your obstacles if you are really passionate about something”, and other such philosophies. But in reality, it becomes quite impossible to make compromises for just a hobby, even if it means am obsessively passionate about it. Right ?

Do you relate to the situation? How do you handle it? Leave me a comment. Am sure it would make me feel better.

Linking in : Colours Dekor


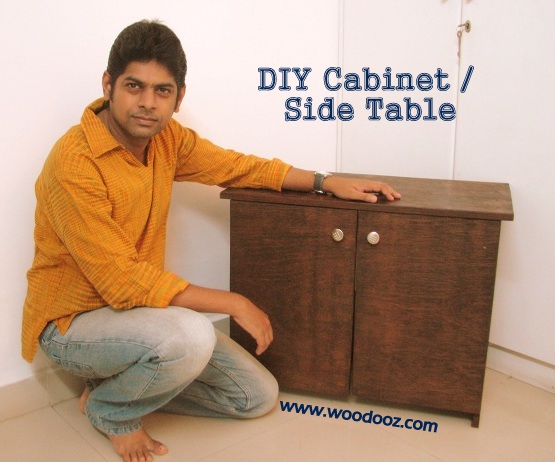
This DIY project started off as a requirement for an inverter battery case. The need was to make something that will blend in with the rest of the living room furniture and so we decided to do a side table / cabinet that will hide the out of place battery and the stabilizer. Though I started off with a very simple design  it took me close to 6-7 months to really start putting the effort to build it. Decided to pose with it to give you an idea on the size of this cabinet.
Indian DIY
Do it yourself - Side table 
While I shall come back and put up a detailed post on how this can be effectively built by you too, I was a little impatient and wanted to show off the finished product here. I will leave you, for the moment, with  some work in progress photos.
DIY Cabinet
The making of a DIY Side table / Cabinet
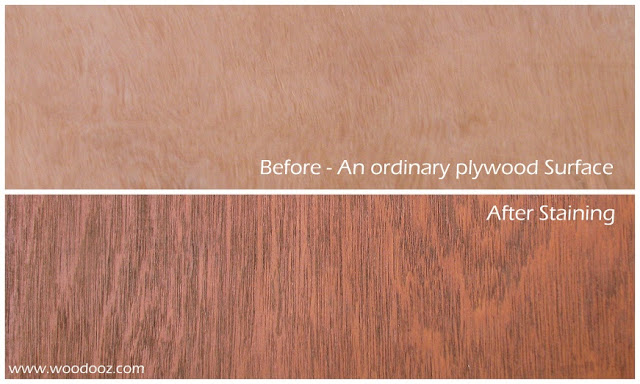
While I have all along been used to working with one side teak, this time around I decided to apply the finish directly on the plywood. This is something I had not done before and so I was a little skeptical. That said, I should accept that the outcome was quite satisfactory. If you have been following our "How to stain wood" series in Woodooz, you would understand how the  finish for this cabinet was achieved. 

I used European cup hinges for the cabinet door. The installation procedure for a cabinet door using cup hinges has earlier been documented in this blog. I chose a very simple pair of knobs from the local store for the door. Work is still in progress as I need to apply the final coat of varnish and also install a shelf to hold the stabilizer.
Woodworking DIY
Battery Cabinet
Meanwhile, do let me know how this cabinet has turned out. Do you think I should have done some things differently ? Share your feedback.

- Somu
Linking in : Colours Dekor


Ever wondered how the dull and boring surface of an ordinary plywood can be made vibrant with colours that enhance the surface patterns ? Enter Wood stains (Click on link for the beginner's guide to using wood stains). Wood stains are finishing media that allow for adding color to a wooden substrate. Staining the wood results in the wooden grains / patterns being enhanced resulting in a finish appealing to the eyes. Now, wood stains is a topic that I have been deliberately avoiding because of my inadequacy in the skill. However, over the last few years, I believe that I have gained enough practice and expertise to discuss it here.
Complete guide to wood staining
Walnut wood stain
Wood stain - Before and After
The surface preparation required and the method of stain application may make the whole staining process look very complicated. The idea behind this post and the subsequent posts (COMING UP) is to detail the process of staining for all to benefit. This will be a series of 5-6 posts explaining the individual steps involved in achieving the desired look using stains.

Wood Stains in India

I don’t claim to be an expert and I am not offering to elaborate on all the different types of stains that are there in the market. This blog is brand agnostic, and so am not endorsing any particular brand either. Following are some of the Wood stains that I have worked and have seen fulfilling results with.
  • Asian Paints
  • Wudfin (by Pidilite)
  • MRF Wood Stains
  • Sheenlac
All these stains come in a 100 ml bottle and will cost anywhere between Rs.33-Rs.40/-.
Wood Stains available in India
Different wood stains - 100 ml bottles

Colour options in Wood Stains

Wood stains come in various colors that suits your needs. These are available in most hardware stores that also sell paints. Unfortunately, not all colours may be available at the local store as they stock only fast moving colours. The following is the shade range that I picked from the MRF Paints website. Other brands also have similar colour ranges.

Wood Stain colour options
Wood Stain colour ranges
Image Courtesy : MRF Paints

Stained Wood Finish

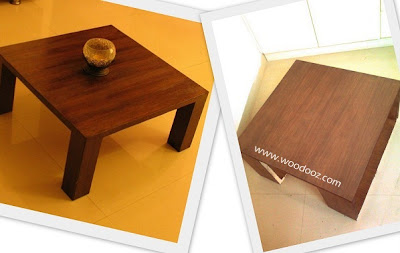
As I mentioned earlier, the stained finish will enhance the wooden patterns on the surface and make the grains noticeable more prominently. Unlike in paints, where the surface finish is one uniform opaque layer, stains will make the surface grains visible. Stained finish is certainly my favorite and I have shown few projects below that I did using wood stain.

Stain wood finish
Stained wood look

Application procedure

Though I am going to elaborate each of the steps involved in staining wood in individual posts, it makes sense to mention the steps involved in staining wood:
  • Sanding. Stains fill the grains and other dents in the wooden surface giving it a different color. And so this becomes a very important step. Staining requires a very smooth surface
  • Sealing. Sealants prevent uneven distribution of the stain and helps in achieving a uniform color across the surface
  • Staining
  • Varnishing
While there are certainly other types of wood stains, I have only mentioned those that I have worked with. The composition of these stains is beyond the scope of my understanding. That said, I should warn you that working with sealants and stains may result in inhalation of fumes and hence warrants the need to follow safety precautions. 

More later in the subsequent posts. Meanwhile, do leave a comment and let me know if there is anything specific you need me to cover in this series.

- Somu


This is a very simple and easy to do photo stand that you can build in a very short span of time. The materials are easily available in the local plywood store and the only tool required is a Rs.5 hacksaw blade. 
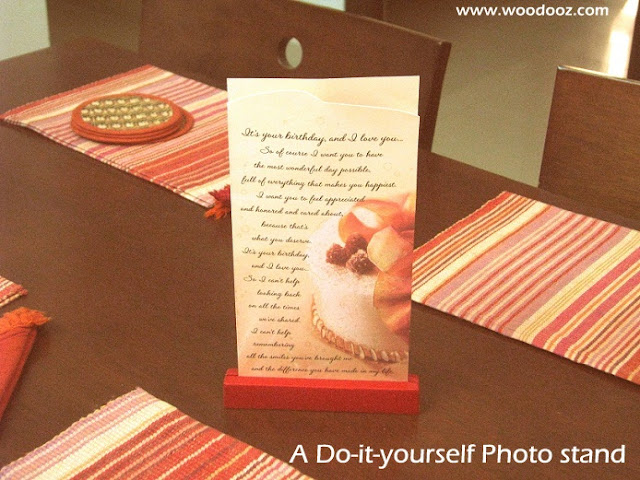
The stand is ideal for showcasing photographs and also greeting cards at home. If you are a crafter displaying works in a stall, you can use the stand to hold your brochure or banner.

Interested in making one yourself ? Hop over to Craftsia where we have guest posted the complete step-by-step tutorial. Or continue reading. [Posting it temporarily here as the Craftsia site is temporarily under maintenance at the time of making this addition]
DIY photo display stand
Do it yourself photo stand 
Here is how you can make this one yourself:

Materials and tools used:
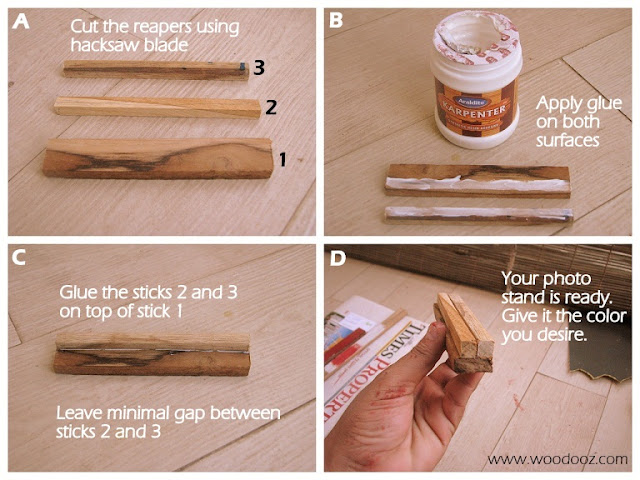
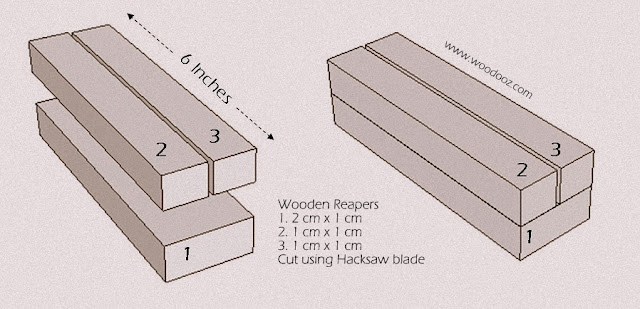
  • Wooden Reapers from "ANY" plywood store. I have used two reapers of different sizes here. One is 1cm (Wide) x 1cm (Thick) while the other is 2cm x 1cm. 
  • A Hacksaw blade available for anywhere between Rs.3-Rs.5 in "ANY" local hardware store
  • A synthetic resin glue (I have used Karenters while Fevicol SH would just work fine) 
build a photo stand
How to make a photo stand
Step A:
Cut the wooden reapers using the hacksaw blade. This is not a herculean task and if you are used to using a knife in your every day chore, this should be just as easy. The length can be as big as you want it to be. I cut them to a length of about 6 inches.

Step B:
Reaper 1 would be the base while 2 and 3 should be glued on to of the base. Apply glue generously on both the base on the top sticks.

Step C:
Glue stick 2 first and hold it in place for a while until the glue bond strengthens.

Step D:
Glue the reaper 3 next to reaper 2 with a teeny tiny gap (About 2mm) between them. The photo or card will be sliding into this gap. The gap should be small enough to grip the photo and big enough to allow the card to slide through.

Here is a simple diagram that depicts how this photo stand is built.
photo stand do it yourself
Making a photo stand made easy
Once you give the glue enough time to dry, give it color as you desire. As you can see from the first picture above, I have colored one red, while I was too lazy to touch the other one and left it in its natural glory. The below picture also shows you how the photo stand looks without the photo and with some color :)


So, how did you like this DIY ? Do you think it is something that you can try at home ? I would most certainly love to hear your feedback on this one. Know that comments get me going and so leave me one :)

About Craftsia - Handmade with passion
Craftsia - Handmade with passion is a reliable and growing market place for unique and rare Indian Handmade products. You can buy and sell your products through Craftsia conveniently from the comfort of your home.

Linking in : Colours Dekor


2012 was an interesting year for Woodooz filled with lots of learning, sharing and showcasing. From focusing on producing helpful content to understanding the mysteries around SEO, it has been one hell of a ride. We worked with the purpose of bringing resourceful tutorials and DIY tips to whoever landed here and we hope to keep going with the same objective in mind. We built some goals around the blog and 2012 has sowed the seed for us to take baby steps towards those aspirations.  As we look back at the year that went by, and eagerly look forward to what lies ahead, here are some highlights.
Thank you note from Preethi and Somu

Some things new

Collage of paintings

Popular Posts

Number of organic hits, number of comments and number of Facebook likes were some of the indicators to what everyone loved in Woodooz this year
Woodworking DIY Projects

Featured posts

We opened the blog this year for others to feature their work and so far we have had some really wonderful projects that found their way into Woodooz
Featured posts

Tools and Accessories

Tools are the best things that we love investing in. Be it en electric drill or a small screw driver, each one has its own ways to make life easier for us.
  • The power screw driver was one such life saver that came as a gift from Indonesia.
  • We also lined up our tools for our readers to know what we owned and with what we made all our projects.

A live demonstration

For the first time ever we did a live demonstration of one of our products in front of an audience. When the Chennai Crafters team met up, it was an exciting opportunity for us to showcase and show everyone how we made, what we made. Meeting up with fellow crafters who are bestowed with varied, unique and exquisite talent by itself was an enriching experience. As we finish summarizing the highlights of Woodooz 2012, we will leave you with some pictures of the crafters meet.

Photos from Chennai crafters meet

As we set our foot into the forthcoming year, we want to come up with easy, innovative projects that everyone can make. We would like to bring to you the joy of working with wood and show you how much of a fun and useful hobby DIY can be. While we continue what we do with more focus on information and knowledge sharing, we long for your continued support, for, without you, this blog would merely be an online version of a personal journal that no one desires to read.

Please do come back for more and while you do so, have a happy, prosperous and a wonderful year ahead.


DIY as a hobby is so much fun. Being able to build things around the house by itself is a testament to the joy it brings. But what it also brings in with it is the eventual feeling of wanting to try everything yourself before really turning to a professional. And no. Am not talking about building a lampshade, or a center table, or a wall hanging. Am referring to leaking sinks, broken pipelines, overflowing flush, a flat tyre, a busted electrical fitting and more.
Home repair is largely never spoken about in Woodooz, but I wanted to mention how much it is part of everyday DIY activities and how much of trouble and money it can save us. These are things that I would have never tried if not for the love that I had developed for doing things myself.

Fixing a drain pipe

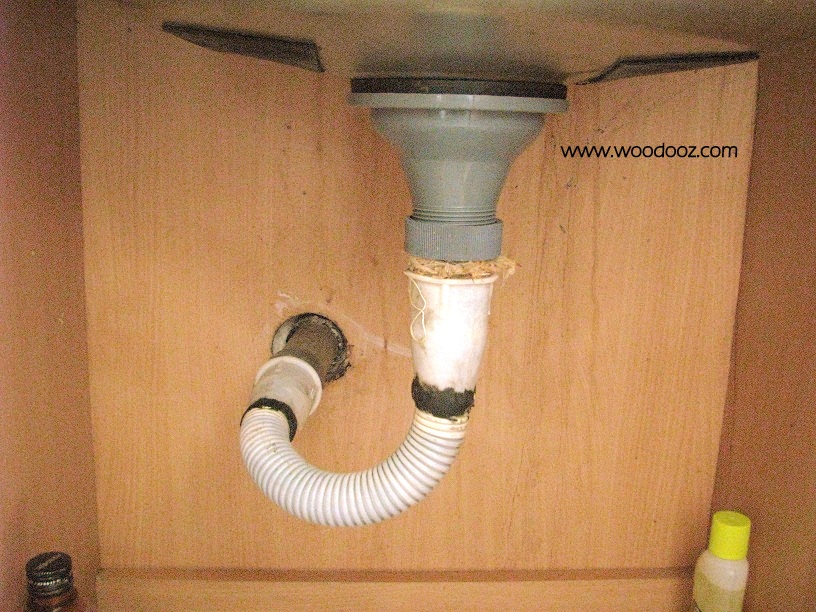
Take our kitchen drain pipe for instance. I moved my kitchen sink during installation to the corner of the counter. As a result the pipe outlet on the wall and the drain outlet were not aligned. The builder refused to move the wall outlet and hence the usual stainless steel pipeline could not be laid. What he installed was the plastic flexible pipe that required replacement every 4 months. Losing much of our patience we decided to do it ourselves. What transpired was a combination of PVC, plastic pipe and some M-Seal and a no replacement guarantee for a long time.
Fixing kitchen drain pipe
DIY Plumbing

Covering the pipeline duct

Rat menace was something that we could not live with. After a damaged sofa, catching 6 rats in 6 days and finding newly born pinky rats in the service area cabinet, we decided to block the pipeline duct (in the service area) from the terrace through which the rats were gaining access. We approached an aluminium window vendor who gave a quote for Rs.14,000 and a carpenter who gave a proposal for Rs.4000. Not wanting to spend so much, we decided to do it ourselves. With aluminium sheets and some duct tapes, we covered the opening for a mere  Rs.200. Not a pretty picture but never a rat ever after.
Closing the rat entry
Stopping access for rats to enter

Fixing a leaking sink

Have you ever felt the smell of damp wood hitting you on your face ? It happened every time we opened the kitchen cabinet below the sink. The grouting around the sink had caved in resulting in water leaking into the wood below. Despite having an in house plumber, we decided to fix it ourselves. All it took us was Rs.25 of white cement and about 20 minutes of work. Problem solved.
Kitchen sink leaking
Grouting around kitchen sink
Building things is fun, but I have come to realize fixing things is so much more fun. Being able to remedy an issue without having to go around looking for a professional is also much appreciated at home. Am sure many of you do it too and so might think what is the big deal. The fact is not many do it which  makes it really a big deal. That said it is also important to understand when to give up and really seek expert help.

Are you the kinds that changes his / her own flat tyres ? Fixes leaking sinks ? Rectifies a broken cabinet hinge ? Leave me a comment. Let me know your thoughts about how DIY home repair has saved you trouble, time and won you appreciation.


(Note : I have started a new series on how to make a Golu Padi. I explain the process in three steps. Do check out the 1st post in the series for a better understanding)

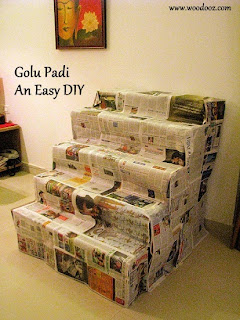
This time of the year, with everyone being busy with arrangements for Navarathri, one of the major task at almost every household is setting up the steps for arranging the dolls. If you have been setting up Golu for years together, am sure you would not have much of an issue with the steps. However, if you are doing it anew (like us) and have no major time at your disposal, here is a 5 step padi that you can build with planks, cardboards and everyday furniture around the house. 

We had leftover planks and card boards and the idea was to not spend time and money on Padi. Last year was the first time we kept Golu in our new home and maybe as we collect more dolls, we will look at a more permanent step arrangement. For now, the make shift one works good for us. Do share your thoughts in the comments section.

Golu  Padi Make it yourself
Make your own Golu Steps
Golu Padi - An Easy DIY
DIY Golu steps / Padi

1. Materials used for the steps

  • Bottom step - Center table
  • Step number 1 - Card board sheets (The ones I used for demo for my Clock DIY video)
  • Step number 2 - 6mm Plywood planks
  • Step number 3 - 19 mm Plywood planks
  • Top most step - OST sheets

2. Mounting the planks 

  • Bottom step - The center table itself formed the bottom most step
  • Step number 1 - Used two cardboard boxes (placed on the center table) on the corners and piles of papers to support the Carb board sheets
  • Step number 2 - Stacked up bricks (on the center table) on which the 6mm plywood planks were placed
  • Step number 3 - Placed dining chairs on opposite ends and supported the 19mm plank on the back rest
  • Top most step - Placed two modas on the dining chairs, added shoe boxes and books for height and for holding the OST sheets
Do it yourself Golu steps
Make your own Golu steps using planks and everyday furniture
The idea here was not to showcase any carpentry skills. The purpose was to build the steps with whatever we already had in ways that anyone can do. I know it doesn't look great on the inside. But it certainly serves the purpose after appropriately covering it up. We have for now covered the setup with news papers and we will soon use the traditional white dhoti on top. Work is still in progress and thought there is no better time than now to post this. 

How do you do your Golu steps ? Already have a knockdown setup ? Plan to get it done for the first time ? Leave us a comment.

Here is two DIY projects on Golu steps that we loved while browsing the net for ideas :


Hobby woodworking is not so much of a well-known domain in IndiaEasy access to labor, lack of readily available DIY kits, lack of awareness, absence of an active hobby community, lack of time are some of the reasons why this terrain is largely unexplored. Or so I thought. When I started my first project, I was skeptical because of these same reasons. However, it was a revelation as I moved on and have now come  to enjoy it with fervor. Here is the list of four things that created a block in my mind that I strongly believe are merely myths.

Myth 1: Tools are not available

Tools required depend on the project that one is undertaking. Hobby woodworking can also relate to smaller projects which eliminates the need for high end tools or machinery. However, knowing what tool one needs for a certain activity is essential. Unlike the western countries where you can walk through aisles in retail outlets to pick and choose your tool of choice, in India, the challenge is to specifically ask the hardware vendor what you need. From what I have seen, there is absolutely no dearth to the kind of tools that get sold in Indian hardware stores.

Myth 2:  Information is not available

In this world of Internet era, no amount of information is beyond the reach of an individual. Youtube and Google can throw millions and millions of tutorials for you to choose from. Right from how to buy a tool to how to use it to how to build a certain piece of furniture, everything you can imagine is available at a detailed level. Woodworking DIY is an established concept elsewhere and you would find what you need in every corner of the WWW.

Besides that, local carpenters carry a wealth of information with them. Though they are hesitant to share their trade secrets with hobbyists, there is so much that you can learn through observation. Also, of late, woodworking workshops for enthusiasts (will save the details for another day) have also sprung up in some cities.

Myth 3: Labor is inexpensive, so why sweat?

Hobby woodworking is most certainly not an alternative to cheap labour. It is like any other hobby. You don’t paint a canvas because buying an original Picasso is expensive. It is about being passionate and taking pleasure in your indulgences that enable you to explore your creative potential. On a different note, labour is indeed not cheap. Some of the quotes that I have received : Rs 500 for painting a 2 ft x 2ft low table, Rs 800 for installing glass doors for my TV unitRs. 1500 for erecting a frame around the cot (for mosquito netting).

Myth 4: There is no active community

I realized over a period of time that the number of Indian blogs in this niche is limited. However, that was no indication to the number of folks indulging in Woodworking. I found out that there are indeed people to whom I can reach out.
  • The DIY Woodworking India group is now becoming a very active Facebook group with hobbyists, enthusiasts and experts exchanging their WIP projects and expert tips. If you are looking to join an online community, THIS IS IT.
  • Indranil Banerjie is from Noida and manages a hardcore woodworking blog. Some of his projects are big and very very functional
  • Vinay is another blogger from Vellore and makes some really fun projects like wooden toys and Wooden Wagons for kids. 
  • Am sure at least one or two of you would now say,"Hey ! my father was never a blogger. But he was way into carpentry and did everything that he could inside our home."
  • And that is the point. There are more and more individuals who have always been into carpentry and there are many who show keen interest towards it.  Just that they never had / have a blog.
Woodworking is fulfilling and functional at the same time. If you are indeed thinking about hobby woodworking, Good luck. Start with smaller projects before you can venture into the bigger ones. Do not let these myths hold you back. Explore and experiment. India has all things in place for you to quench your thirst for DIY woodworking.

Do you agree with my views ? Do share your thoughts. I am game for a healthy debate on this topic. And think there are other myths too ? Leave a comment.


I remember being in a leading furniture store in Chennai two years ago looking for a center table for our newly moved in home. A simple yet elegant low table is what we had in mind.

I remember how much we liked a particular table that had just the right height and width, but was too lengthy for our living room.
I remember how the store manager refused to honor our request for custom making the table to the dimensions that we desired.

And I distinctly remember those 6 words from Preethi. “Why don’t we make one ourselves”.
We are turning two

It didn’t take us much time before we decided to take the challenge of making a table head on. Despite having no knowledge whatsoever and the necessary skills, the prospect of dirtying our hands to make that table seemed exciting. And so we built it, with the same dimensions the store manager refused to custom make it for us. (Now you know why our logo is a center table)

And then later on when we needed something or the other for the home, guess what we decided to do ? We decided to build them all ourselves.
Woodworking and DIY projects
A Collage of some of our works
The seed for the doing-it-ourselves and building-things-on-our-own culture was sown by those very same words that Preethi muttered. And eventually they led us to Woodooz. And today we complete 2 years of having started that fun filled, zealous and near obsessive passion of ours. While the need for things around the house helped us with our enthusiasm to create, there were other factors that kept us going with our interest and momentum.
Thanks to Raji and Madhu for custom ordering and buying our first work. They made us believe that if we make good stuff, people will be willing to pay for it.

Thanks to Patricia Torres, her Colours Dekor and the link parties. She continues providing us with a wonderful platform and the support to showcase our works.

Thanks to all the fellow bloggers and our readers who never failed to visit and leave us a comment or two. It made us realize that we are not alone.

Thanks to all those Facebook fans, all of whom we would love to know personally in due course.  Every like in the Woodooz page has been a big boost to our confidence. Incidentally we also reached the 200 landmark yesterday.
Join us on Facebook
Click the image to like us on Facebook
 Two years on and we still want to continue what we do here. Share and Learn. Do continue supporting us and  join us in this journey filled with abundance of passion and enthusiasm.

Leave us your best wishes and comments. Let us know what you think about Woodooz. Good, bad or otherwise – Your opinion matters.

~Preethi and Somu
Did you like this post ? Enter your E-mail address and join our growing E-mail list

Linking in : Colours Dekor


The requirement

What I like about the DIY projects I am getting is the variety in the requirements and the purpose that they are meeting. My recent assignment is to build an inverter battery case that will house the heavy battery and the inverter stabilizer. Considering the inverter is in the living room, the need was to build a cabinet around the whole thing which will look neat and can double up as a small side table.
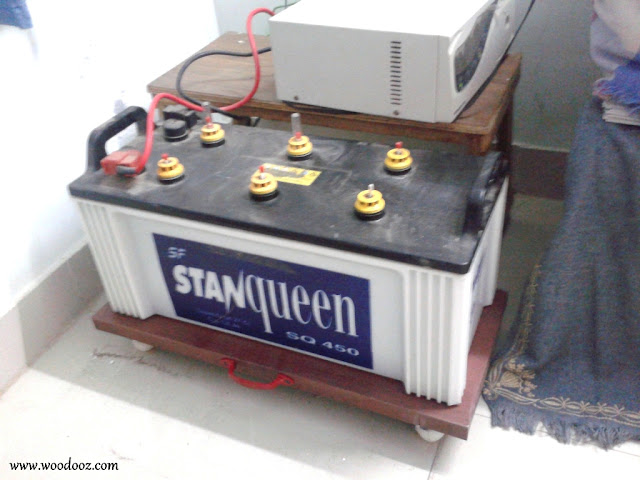
Battery and stabilizer
The inverter

Making the trolley - Phase 1

One constraint though. The battery needs to be fed with water at least once every two months. So an enclosed cabinet will not serve the purpose. Either the cabinet should open up to expose the battery or the battery should easily move in and out. I went with the latter option and decided to place the battery on a trolley.

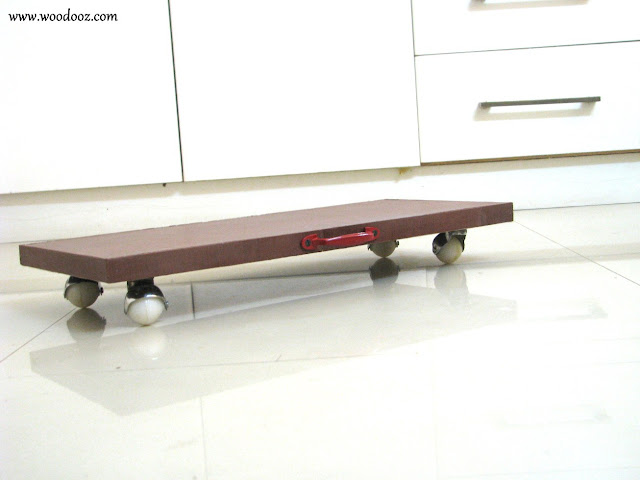
The first phase of the project was to build the trolley. I used 19mm plywood board for the trolley and had wooden laminate installed around it. I installed trolley wheels beneath the board and also had a door handle screwed in. The handle is to aid in pulling the trolley out of its enclosure. I tried using it as a skate board for sometime and ended falling flat.

Plywood with edge beading
19mm Plywood plank

Battery trolley
The trolley
Yesterday, I had the trolley delivered and installed. The dimensions ended up being perfect and it was really easy to pull the battery around.

Installation of the trolley
Battery on the trolley

Making the cabinet - Phase II


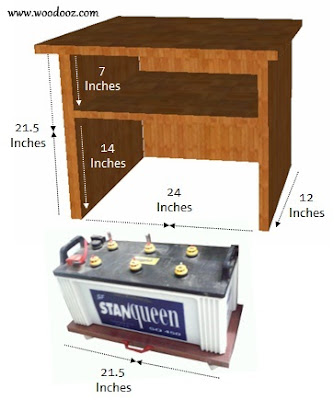
Cabinet design in #D
Tentative design and measurements
I have to now build the cabinet around the battery. Since the trolley needs to move in and out, decided to not have any base for the cabinet. It will have one additional shelf to house the stabilizer and will have doors covering the front of the cabinet. While the doors will hide the inverter, they will also have sufficient ventilation to allow for any smoke to sneak out. Adequate ventilation also needs to exist in the sides and rear.

This 3D design that I created using sketchup is very simple and tentative. Once approved I will be starting work on Phase II.

Most countries and states may not understand the need for inverters in the house. But, with daily power cuts being the norm in Chennai, almost every household has one. Do you have one too installed in your home ? How have you covered it up? There are ready made cases available. What did you go for ?

- Somu
Did you like this post ? Enter your E-mail address and join our growing E-mail list


If you liked this, you may also like

Know more about us

About Us
Reviews
Media
Our showroom location
Return and refund policy
Review us on Google

Connect with us


Mail us
Subscribe to our newsletter

Our Address :
Woodooz Home Decors,
3/371, First floor,
Metukuppam, Thoraipakkam,
Old Mahabalipuram Road (OMR),
Chennai - 600097.
Ph : +91 9884070470
Email : contact@woodooz.com
Created By SoraTemplates & MyBloggerThemes