Category : photo stand


This is a very simple and easy to do photo stand that you can build in a very short span of time. The materials are easily available in the local plywood store and the only tool required is a Rs.5 hacksaw blade. 
The stand is ideal for showcasing photographs and also greeting cards at home. If you are a crafter displaying works in a stall, you can use the stand to hold your brochure or banner.

Interested in making one yourself ? Hop over to Craftsia where we have guest posted the complete step-by-step tutorial. Or continue reading. [Posting it temporarily here as the Craftsia site is temporarily under maintenance at the time of making this addition]
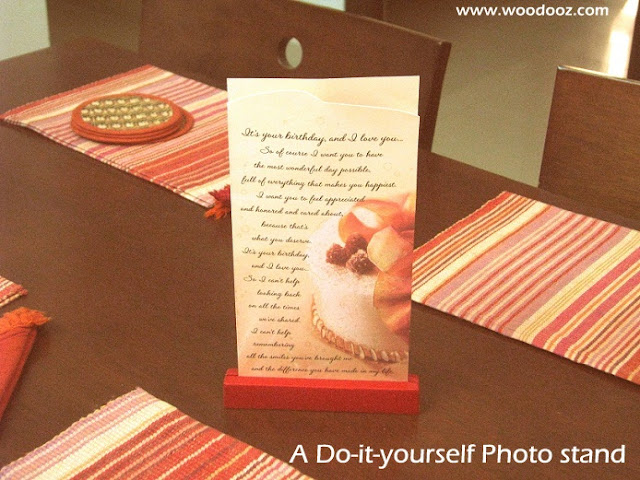
DIY photo display stand
Do it yourself photo stand 
Here is how you can make this one yourself:

Materials and tools used:
  • Wooden Reapers from "ANY" plywood store. I have used two reapers of different sizes here. One is 1cm (Wide) x 1cm (Thick) while the other is 2cm x 1cm. 
  • A Hacksaw blade available for anywhere between Rs.3-Rs.5 in "ANY" local hardware store
  • A synthetic resin glue (I have used Karenters while Fevicol SH would just work fine) 
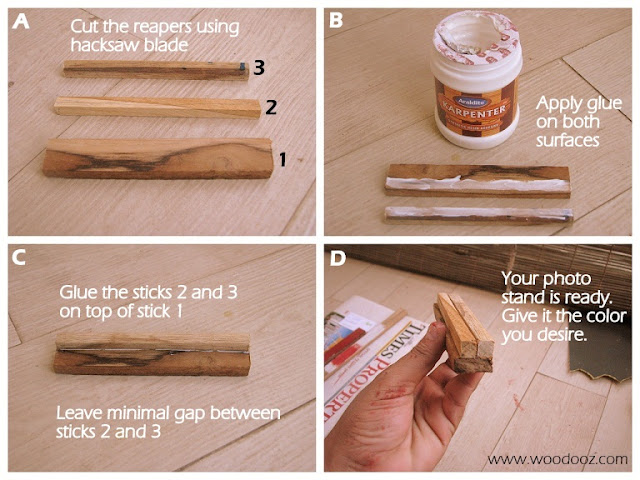
build a photo stand
How to make a photo stand
Step A:
Cut the wooden reapers using the hacksaw blade. This is not a herculean task and if you are used to using a knife in your every day chore, this should be just as easy. The length can be as big as you want it to be. I cut them to a length of about 6 inches.

Step B:
Reaper 1 would be the base while 2 and 3 should be glued on to of the base. Apply glue generously on both the base on the top sticks.

Step C:
Glue stick 2 first and hold it in place for a while until the glue bond strengthens.

Step D:
Glue the reaper 3 next to reaper 2 with a teeny tiny gap (About 2mm) between them. The photo or card will be sliding into this gap. The gap should be small enough to grip the photo and big enough to allow the card to slide through.

Here is a simple diagram that depicts how this photo stand is built.
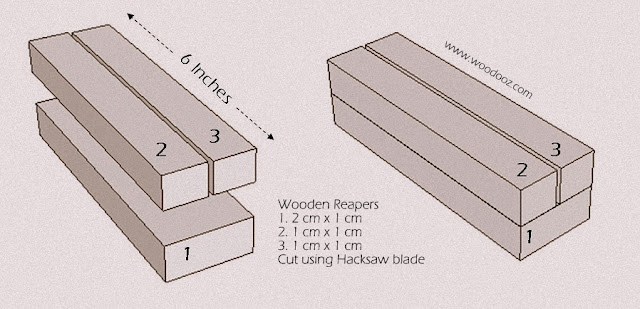
photo stand do it yourself
Making a photo stand made easy
Once you give the glue enough time to dry, give it color as you desire. As you can see from the first picture above, I have colored one red, while I was too lazy to touch the other one and left it in its natural glory. The below picture also shows you how the photo stand looks without the photo and with some color :)


So, how did you like this DIY ? Do you think it is something that you can try at home ? I would most certainly love to hear your feedback on this one. Know that comments get me going and so leave me one :)

About Craftsia - Handmade with passion
Craftsia - Handmade with passion is a reliable and growing market place for unique and rare Indian Handmade products. You can buy and sell your products through Craftsia conveniently from the comfort of your home.

Linking in : Colours Dekor


  • Do you prefer a designated space for your phone ?
  • Do you find it hard to hold your phone while watching a video on Youtube ?
  • Do you place the phone face up on the table and barely hear your alarm because the speaker is in the rear ?
  • Like me, do you get into the habit of looking for your phone under the couch, under the pillow, or in the balcony, because you don't know where you kept it ?
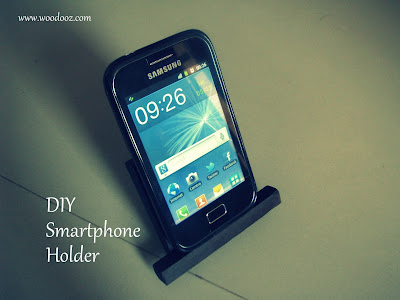
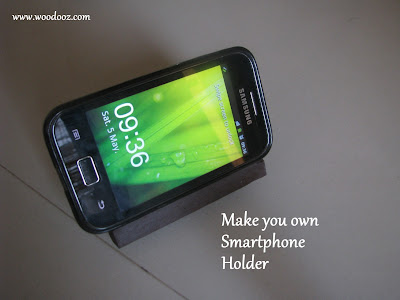
Here's an easy to do Smartphone holder that you can build yourself to keep your phone safely in one place. Remember the over-sized mobile phone charger holder that didn't need any nailing down ? This time I wanted to make a right-sized holder for my smartphone.

Smartphone Holder DIY
DIY Smartphone Holder / Stand
This is a simple DIY that uses wooden sticks. Scroll below to find out how you can make a smartphone holder.

Smartphone stand
Make your own smartphone holder

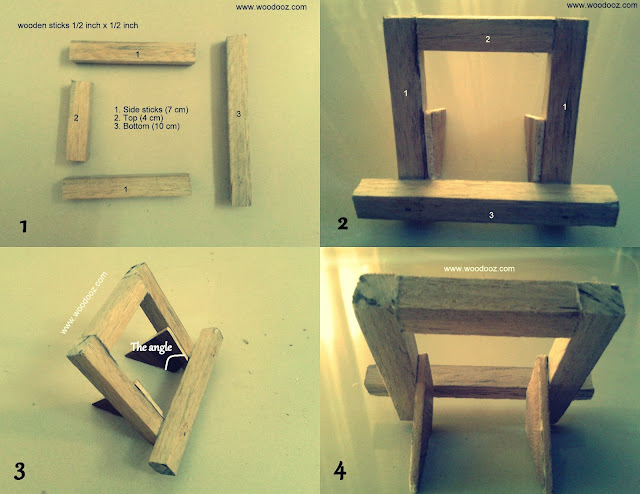
Materials Required - Picture 1

    • I used 1/2 inch x 1/2 inch sticks (The same sticks that I used for this bedside lampshade base)
    • Used wooden board (4mm) for the supporting rear (You can also use thick card or cork board)

Cut and glue the sticks together - Picture 2

    • Cut the sticks to your required dimensions. The dimensions should be such that it should be able to hold the phone vertically and horizontally
    • Glue them together. Notice how stick 2 is in line with sticks 1, while the base (stick 3) that will hold your phone is glued on top of the side sticks ?
Smartphone holder - DIY
Smartphone holder - Do it yourself

Make the triangular rear support - Picture 3

    • Cut a triangle out of the card board and stick on the inner sides of sticks 1 
    • This board will support the holder while it is leaning backwards. The backward lean is required to prevent the phone from slipping off.
    • The angle of the backward lean is decided by the angle between the two inner sides of the triangle. 

Make sure your speaker is not hidden - Picture 4

    • Make sure the dimensions of the sticks are such that they do not hide the speaker when the phone is placed on the holder. 
    • So, here it is, a smartphone holder for less than Rs.10. Yeah, really. Less than Rs.10
    • Paint, stain or do whatever you want to give your holder color.
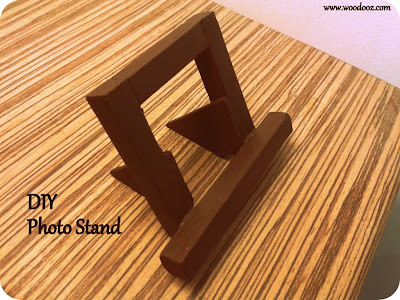
You can also additionally use it as photo holder, or greeting card holder. Works out to be a neat alternative to DIY photo frames.
DIY Photo Stand
Photo stand DIY - Place your photos on the base :)
So, how did you like this simple DIY? Where do you place your Smartphones? Much like me, are you just as careless and never bother about how you handle your phones ? Leave a comment.
Subscribe to our RSS feed. It is just a click away
Woodooz

If you liked this DIY tip, you may also be interested in our other posts :

Linking in : Colours Dekor, Made with Love Party
- Somu

Know more about us

About Us
Reviews
Media
Our showroom location
Return and refund policy
Review us on Google

Connect with us


Mail us
Subscribe to our newsletter

Our Address :
Woodooz Home Decors,
3/371, First floor,
Metukuppam, Thoraipakkam,
Old Mahabalipuram Road (OMR),
Chennai - 600097.
Ph : +91 9884070470
Email : contact@woodooz.com
Created By SoraTemplates & MyBloggerThemes