Category : photo frame


This is a very simple and easy to do photo stand that you can build in a very short span of time. The materials are easily available in the local plywood store and the only tool required is a Rs.5 hacksaw blade. 
The stand is ideal for showcasing photographs and also greeting cards at home. If you are a crafter displaying works in a stall, you can use the stand to hold your brochure or banner.

Interested in making one yourself ? Hop over to Craftsia where we have guest posted the complete step-by-step tutorial. Or continue reading. [Posting it temporarily here as the Craftsia site is temporarily under maintenance at the time of making this addition]
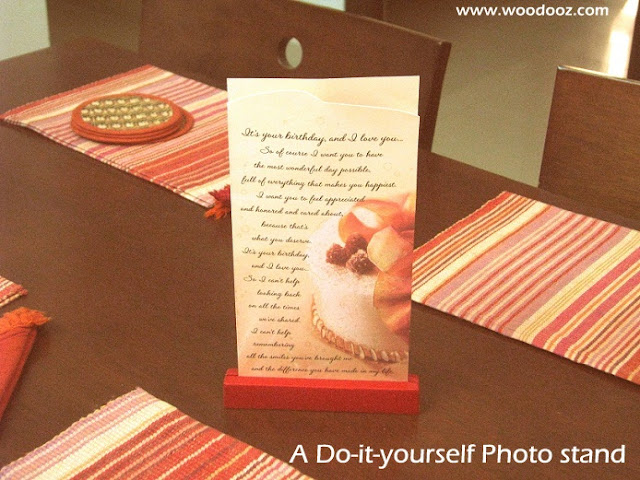
DIY photo display stand
Do it yourself photo stand 
Here is how you can make this one yourself:

Materials and tools used:
  • Wooden Reapers from "ANY" plywood store. I have used two reapers of different sizes here. One is 1cm (Wide) x 1cm (Thick) while the other is 2cm x 1cm. 
  • A Hacksaw blade available for anywhere between Rs.3-Rs.5 in "ANY" local hardware store
  • A synthetic resin glue (I have used Karenters while Fevicol SH would just work fine) 
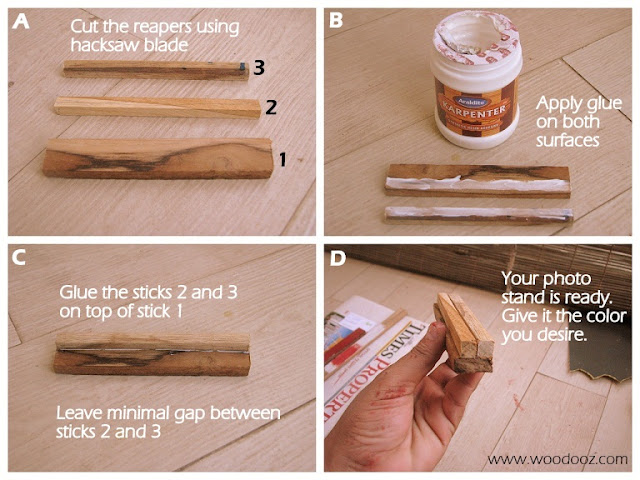
build a photo stand
How to make a photo stand
Step A:
Cut the wooden reapers using the hacksaw blade. This is not a herculean task and if you are used to using a knife in your every day chore, this should be just as easy. The length can be as big as you want it to be. I cut them to a length of about 6 inches.

Step B:
Reaper 1 would be the base while 2 and 3 should be glued on to of the base. Apply glue generously on both the base on the top sticks.

Step C:
Glue stick 2 first and hold it in place for a while until the glue bond strengthens.

Step D:
Glue the reaper 3 next to reaper 2 with a teeny tiny gap (About 2mm) between them. The photo or card will be sliding into this gap. The gap should be small enough to grip the photo and big enough to allow the card to slide through.

Here is a simple diagram that depicts how this photo stand is built.
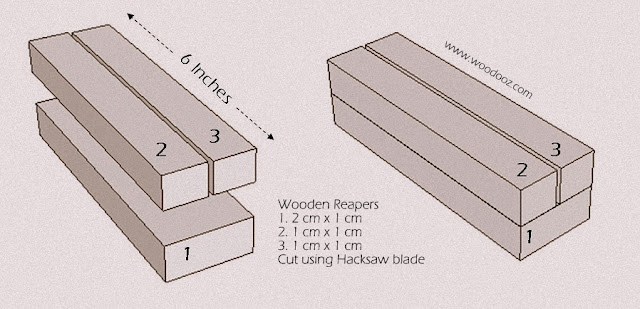
photo stand do it yourself
Making a photo stand made easy
Once you give the glue enough time to dry, give it color as you desire. As you can see from the first picture above, I have colored one red, while I was too lazy to touch the other one and left it in its natural glory. The below picture also shows you how the photo stand looks without the photo and with some color :)


So, how did you like this DIY ? Do you think it is something that you can try at home ? I would most certainly love to hear your feedback on this one. Know that comments get me going and so leave me one :)

About Craftsia - Handmade with passion
Craftsia - Handmade with passion is a reliable and growing market place for unique and rare Indian Handmade products. You can buy and sell your products through Craftsia conveniently from the comfort of your home.

Linking in : Colours Dekor


Here is a short DIY tutorial on how to make your own wooden DIY photo / picture frame . These photo frames are built completely with wood materials that are easily available at the local plywood store.

All the materials, supplies and tools required were bought at a local hardware store in Chennai. Only tool that is used is a hack saw blade which is available for Rs.2/- at the hardware shop. Ready made wooden frame moulds are also available which come with the groove for glass / picture insertion.
Photo frame DIY
Wooden DIY Photo Frame
Home made picture frame
DIY Photo frame

How to make a picture frame
Make your own photo frame

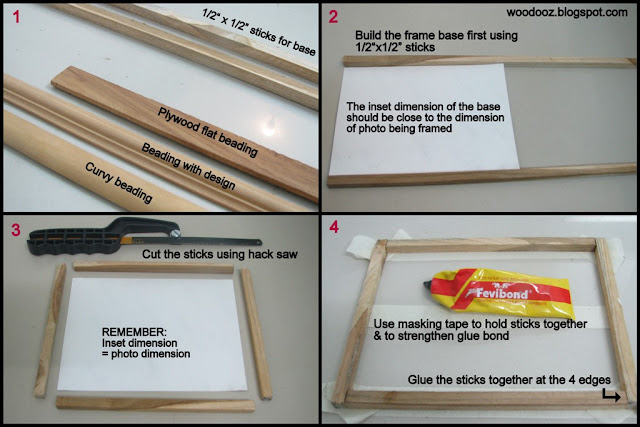
1. Materials, supplies and tools required

  • Wooden sticks (1/2"x1/2")
  • Plywood beading (Usually used for edge banding and available in different designs. We have used the curvy edge banding for this frame
  • Glue (Fevibond / fevicol)
  • Hack Saw blade
  • Set square (To mark the 45 degree miter joint)
  • X-acto knife or a pencil knife

2. The wooden stick base

    The wooden stick will form the base of the photo frame and will not be visible from the front. The frame face (Beading) will be glued onto this base.

3. Cut the wooden sticks

    Cut the wooden sticks to the desired length using a hack saw blade. These cut sticks will be glued to each other to form a rectangular base onto which the frame face will be glued. The inset dimension of the rectangular base should be equal to or slightly higher than the dimension of the photo being framed, else the photo will not fit into the frame.

4. Glue the sticks together

    Generously apply glue on the edges of the wooden sticks and glue them together. Use masking tape to hold the sticks together while the glue is drying. Allow for at least 3 hours before the glue can completely dry. Allowing it to dry ensures the glue bond is much stronger.
Useful tip: Use a masking tape to hold the sticks together. This will ensure the sticks do not move away from each other and will also provide enough pressure to strengthen the glue bond
Do it yourself photo frame
Learn to make a wooden photo frame

5. Build the frame face using plywood beading

    Now cut the frame face. The outer edge of the frame should align with the outer edge of the base. The frame will look good if it is joined together on the edges using a miter joint (the edges are at a 45 degree angle)

6. Mark the 45 degree angle

    Before cutting the frame, mark the 45 degree angle using a set square. To ensure the hack saw blade cuts along the 45 degree line, create a ridge or groove along the line using an Xacto knife / pencil knife or a mica cutter. This will ensure the blade does not slip while cutting and will result in an almost perfect 45 degree cut.

7. Cut the wooden frame

    Cut the 4 frame sticks to the desired dimension using the hacksaw blade. 

8. Glue the frame to the base

    Generously apply glue both on the rear of the frame and the rectangular base. Use masking tape to hold the frame tightly onto the wooden base. Allow for at least 3 hours of drying time.
Useful tip: Make a ridge or groove along the 45 degree line to ensure the hacksaw blade does not slip and stays on the cutting line resulting in an almost perfect cut
How to make a photo frame using wood
Wooden photo frame - Do it yourself

9. Clear view of the frame face being glued onto the wooden base

10. Rabbet

    Rabbet is a step-shaped recess cut along the edge or in the face of a piece of wood, typically forming a match to the edge or tongue of another piece. The additional width of the frame stuck to the wooden base forms a recess or groove (called rabbet) at the rear, onto which the picture will be housed

11. House the photo in the rabbet

    Overturn the picture and place it neatly on the recess formed at the rear of the frame.

12. Your wooden photo frame is ready to be showcased and showed off

FAQ: What is Miter Joint?
A Miter Joint (mitre in British English), sometimes shortened to miter, is a joint made by bevelling each two parts to be joined, usually at a 45 deg angle, to form a corner, usually a 90 deg angle. Common applications : Picture frames, pipes and molding.
Source: Wikipedia


Curious to know how the photo frame has been made to stand  upright on the table ? Join us on FACEBOOK just so you don't miss the follow up post on making the stand using wood / cardboard / cork board and a hinge.

Meanwhile, let me know what you think of this DIY. Do you think there is a better way to do this ? Are there alternatives to a wooden stick for making the frame ? Have you done a DIY frame post yourself ? Do share the link. Would love to know your methods.

Linking in : Lines Across my Face, Colours Dekor


DIY photo frames (Learn how to make a photo frame) are fun to make and can be made using simple plywood edge reapers that are available in the local hardware store. While there are many designs available, one can also opt for various color finishes based on their choices and taste. 

 For these two frames, I used carved wooden reapers (sometimes used for plywood edge banding) for the frame face. I placed a 4mm glass plate cut to the required dimension on which the photo can be positioned. The rear of the frame was filled with a thin sheet of OST to secure the glass in place. Sanded,sealed and stained (walnut color) the frame to give it the desired finish.
make at home photo frame
Photo Frame Made at home
DIY Photo frame
DIY Photo frame
Some limitations though. The 45 degree diagonal cut is still not perfect due to use of hand tool. The 4mm glass adds quite some weight to the entire frame. My regular supplier didn't have anything lesser. So I still need to scout for the 3mm or 2mm glass plates for my next work. And guess, am still at least another 2 frames away from achieving that elusive perfect professional finish.

You can make these photo frames for your personal pictures as well as for your art work on canvas. Depending you whether you want it displayed on a table, or hung on a wall, you may want to use a stand or a clamp in the rear of the frame. Click here to learn how to make a photo frame at home

P.S. Just for the records, there was no specific reason for using a Katrina Kaif photo for the purpose of this post.
- Somu

Know more about us

About Us
Reviews
Media
Our showroom location
Return and refund policy
Review us on Google

Connect with us


Mail us
Subscribe to our newsletter

Our Address :
Woodooz Home Decors,
3/371, First floor,
Metukuppam, Thoraipakkam,
Old Mahabalipuram Road (OMR),
Chennai - 600097.
Ph : +91 9884070470
Email : contact@woodooz.com
Created By SoraTemplates & MyBloggerThemes