Category : showcase


I have always worked independently on all my projects. Of course, Preethi lends a helping hand, and that’s that. For once, I had a request from my very friendly neighbor(s) if I could help her with a wall clock. Surprisingly, it was the power of Google and my Wall Clock DIY tutorial that led them to me despite meeting and chatting up on a regular basis for the last 6 odd years. And I happily took up the opportunity.

A little background about Varsha. She is a fine arts student and needed to do this as part of one of her final year projects. To make a painting was the need, and the choice of the base was left to the students. She chose to showcase her painting on a clock. 

Do it yourself wall clocl
Beautiful hand painted DIY Wall Clock - By Varsha Sowmyanarayan
My role was to help her make the clock and so we started the project one Sunday evening. I chose to make it with wooden sticks for the frame and OST for the base much like all my other clock projects. It took us less than about couple of hours to get the clock base done. Most of these two hours were spent in waiting for the glue to dry. Once done, it was all left to Varsha to splash it with her creativity. The clock went with her to her home and so Preethi and I were left to wonder what the outcome was going to be like. We had no clue whatsoever, and so that added to the excitement. We didn’t have to wait for more than a day to see what she had done with the clock.

Wooden sticks and OST
Clock base using OST and wooden sticks

Rear of clock
Wall Clock rear side

These pictures were shared with me later. We only got to see the final product and trust me, we were so excited. My clocks mostly had printed images or wooden stain, and so you can understand the delight to see a wonderful painting.  Part of the excitement was about the options that acrylics on a wooden surface opened up for us. Guess, it was time we also gave up on wood paints and stains for a while.

Primer
Textured acrylic primer 

Outlining and base coat
Base coat and outlining

More detailing
More detailing using permanent marker

That she had the clock mechanism with her saved us much time. The clock hands were so beautiful and went so well with the theme of the painting. The usual black / gold ones that I used for my clocks looked more like a drab now.

Wall clock
DIY Wall Clock
It turned out to be a really beautiful clock. If you guys ever get a chance to cross the Stella Marys premises in Cathedral Road, look for the wall paintings outside the college premises. Varsha and her friends did that. This clock painting is only a tip of the ice berg. You will have to see her sketches, and caricatures, and water colors to truly understand the bundle of talent that she is. If you are a keen follower of art, you are sure to discover that later and from a different source.

Traditional Wall clock DIY
Finished Wall clock - Now fully functional

For now, am working on a lampshade and it is for another neighbor of mine. This is more like a workshop and we do hourly sessions based on mutual time conveniences. It is still work in progress and I will come back to talk about that too soon.


There is always this fun activity of engaging my 4 year old niece whenever she comes home. Sometimes it is the little cars, sometimes the crayons and sometimes we play with the scrabble board. Yesterday, when she came home to personally deliver her hand painted diya for Kaarthigai Deepam, Preethi decided to give her some water color challenge. 
I don’t know what is with kids and Dora. When my niece was given an outline of Dora and Boots, she was all the more excited to sit down and complete the task.  She hand-picked a brush from Preethi’s collection and gave the outlined characters undivided focus. Mix of red and white becoming pink had her thrilled and we could see it all over her face. And here’s what she came up with in a matter of 45 minutes.
Water color painting
Dora and Boots in Water Colors
She is the youngest up-and-coming artist in the family that we have featured in Woodooz. You have already met the oldest one here. Give her your feedback and encouragement. We are going to show her this post and read her your comments when we meet her next. 


[This is a guest post by Sharmilee Muralidharan]

First of all, big thanks to Woodooz for this Paper Mache recipe, which woke up the crafty girl in me and there is no stopping it now. Beware. This is a dangerously obsessive craft. I chose eco-friendly-NO-plastic-in-any-form concept for my Golu 2013 and that led me to making handmade items. It was very challenging, but learnt a lot in the process, and it pushed me to create a lot of things. 

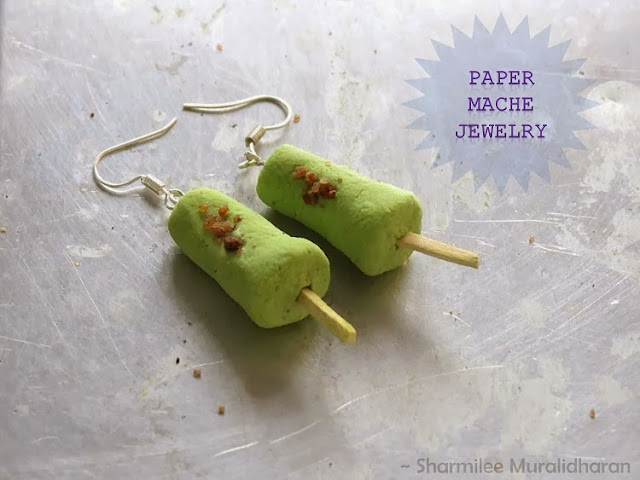
1. Paper Mache Earrings (using kitchen paper towel)

DIY paper Mache
Paper Mache Jewelry
I made some clay jewelry as return gifts and thought would make jewelry with paper mache too. I didn't have any paper pulp remaining and so made this quick recipe:

  • Soak few sheets of kitchen paper towel in boiling water for an hour
  • Squeeze out the water, and grind them in a mixer into a smooth pulp (as much as possible, can add water while grinding which can be squeezed off later)
  • Strain them on a strainer for sometime or squeeze out the water by hand. Once all water is squeezed out, add Fevicol glue. 
  • Keep adding the glue in small amounts and keep kneading it till it becomes a dough (it resembles a cookie dough). 
  • I also added a little bit of all-purpose flour/ Maida and salt, which added smoothness and I felt they helped in making shapes better than the one without it.

When it is wet, insert the required jewelry hooks and allow it to dry. Once dried, you can paint them and apply a coating of Artist's picture Varnish . If small pieces or shapes are made, instead of painting after drying, you can add acrylic colours to the pulp when it is wet, like I did for this Kulfi earring and then dry it. Though they can be sanded smooth, what I like the most in these is the unfinished rough look.

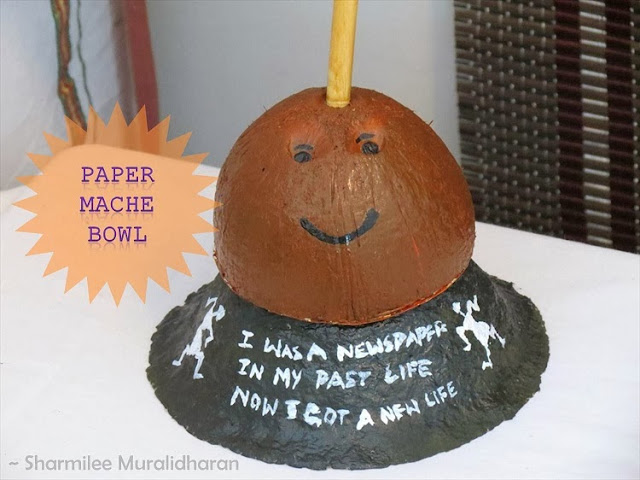
2. Newspaper paper mache bowl

How to make paper mache
Paper Mache bowl
This is a technique used during our grandma's time to make vessels out of paper mache. I used a Styrofoam bowl as a base. I applied paper mache on the outside of the bowl, covering it completely with the pulp, and allowed to dry for 4-5 days. Since the Styrofoam is flexible, the bowl comes out easily after it dries. And it can be painted as per wish. I used this as a prop for my Golu below a painted coconut shell.

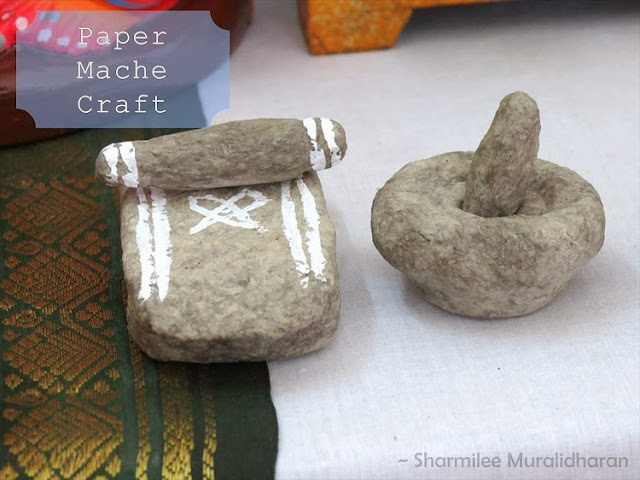
3. Aatukkal and Ammikkal (yesteryear's grinding stone)

DIY Craft
Paper Mache miniatures
When the paper mache bowl was drying, its colour and texture reminded me of the grinding stones. Immediately planned to make these for the Golu. I used a match box as an armature/base for making the Ammi (the flatter grinding stone) and shaped the ends accordingly. For the Aattukal no base was used, just made a ball, and slowly shaped them with hands. All my golu visitors loved them, they all thought these were real miniature grinding stones until they touched and felt them. They are as light as a feather.

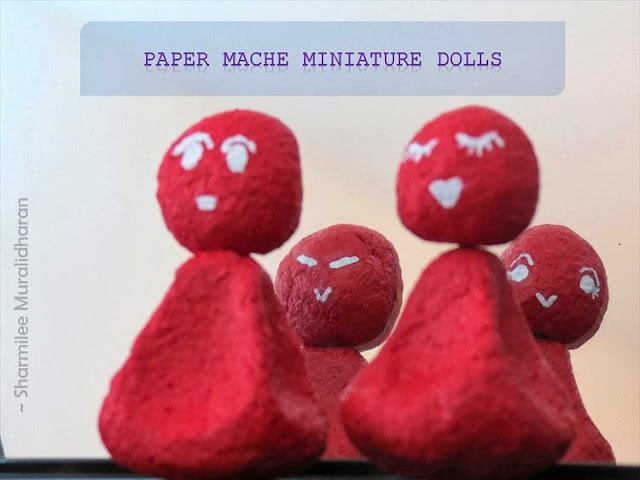
4. The Maaya sisters (miniature dolls)

DIY miniature dolls
Paper mache dolls
With the leftover paper clay I made a small doll with a curvy base, so they dance if you push them. No base was used for this. I inserted a thin steel wire as support for the head and the body, though not required. I painted a face both in the front and the back with different expressions and kept them in front of the mirror to click this photo. I made only 2 dolls, but there are 4 girls in total. I call them The Maaya sisters.

5. Paper Mache Rangoli

How to make paper mache pulp
Paper mache Rangoli
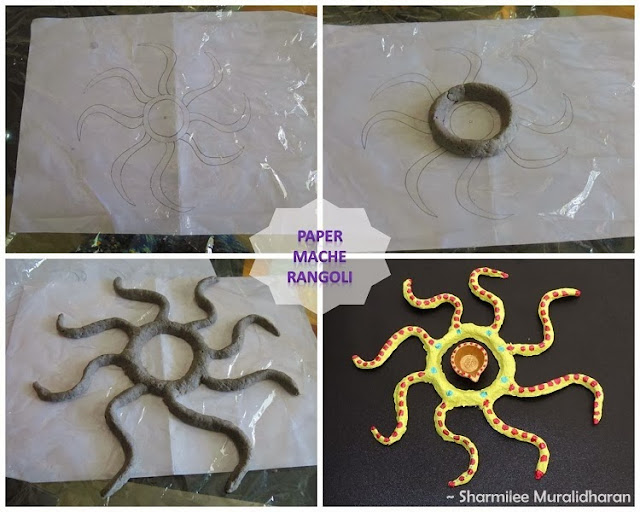
The picture is self explanatory on how the design was made. As a trial I chose some odd design with a circular shape in the center to keep a Diya. It took few days to dry. I guess lots of rangoli - to be assembled pieces can be made using this, which is as attractive as the kundan rangolis available in stores. Could be a fun activity for kids to make and assemble them as they wish. 

Paper mache is such a great medium to work with and can be used to create anything right from miniatures to life size structures. One most important thing is the opportunity for recycling anything lying around at home, newspapers, cardboard, cereal boxes and the list goes on. So, how do you like my paper mache creation ? Please do leave me a comment.
About the crafter : 
Sharmilee Muralidharan is a Chartered Accountant by profession and she works as a Management Consultant in her husband's consulting Company. She is an avid birdwatcher and nature lover. She has deep interests in recycling and eco-friendly concepts. She is from Chennai and is an active member of the ChennaiCrafters club.


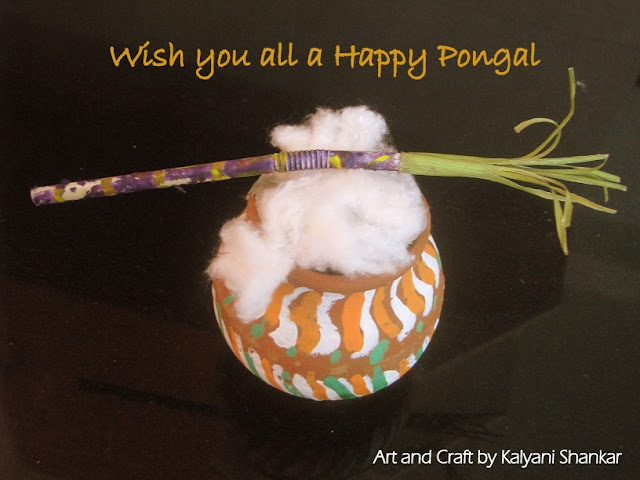
First and foremost, here's Happy Pongal wishes from both of us. This post was never intended, but the simplicity of the idea behind this DIY was so alluring, that we had to share it here. This little Pongal pot and the sugarcane was a gift from our Aunt Mrs.Kalyani Shankar when she visited us yesterday. The photo is self explanatory and hence we are going to leave you with the picture. 
An easy pongal craft
Pongal craft - DIY Sugarcane and a painted pot
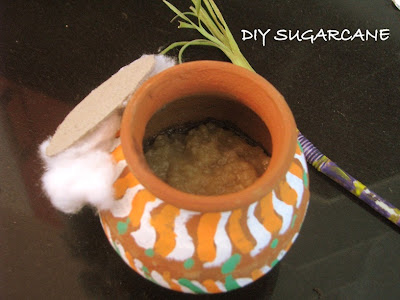
A straw, colored paper and acrylic colors - It came in as amazing for us because we would never have thought of it. And what more, the pot even had yummy Pongal for us to relish. Well, unlike the sugarcane, the Pongal in the pot is real :)
Pongal DIY
DIY Pongal Craft
Do spare a moment to leave us your view on this sugarcane. And do let us know how your Pongal was.


2012 was an interesting year for Woodooz filled with lots of learning, sharing and showcasing. From focusing on producing helpful content to understanding the mysteries around SEO, it has been one hell of a ride. We worked with the purpose of bringing resourceful tutorials and DIY tips to whoever landed here and we hope to keep going with the same objective in mind. We built some goals around the blog and 2012 has sowed the seed for us to take baby steps towards those aspirations.  As we look back at the year that went by, and eagerly look forward to what lies ahead, here are some highlights.
Thank you note from Preethi and Somu

Some things new

Collage of paintings

Popular Posts

Number of organic hits, number of comments and number of Facebook likes were some of the indicators to what everyone loved in Woodooz this year
Woodworking DIY Projects

Featured posts

We opened the blog this year for others to feature their work and so far we have had some really wonderful projects that found their way into Woodooz
Featured posts

Tools and Accessories

Tools are the best things that we love investing in. Be it en electric drill or a small screw driver, each one has its own ways to make life easier for us.
  • The power screw driver was one such life saver that came as a gift from Indonesia.
  • We also lined up our tools for our readers to know what we owned and with what we made all our projects.

A live demonstration

For the first time ever we did a live demonstration of one of our products in front of an audience. When the Chennai Crafters team met up, it was an exciting opportunity for us to showcase and show everyone how we made, what we made. Meeting up with fellow crafters who are bestowed with varied, unique and exquisite talent by itself was an enriching experience. As we finish summarizing the highlights of Woodooz 2012, we will leave you with some pictures of the crafters meet.

Photos from Chennai crafters meet

As we set our foot into the forthcoming year, we want to come up with easy, innovative projects that everyone can make. We would like to bring to you the joy of working with wood and show you how much of a fun and useful hobby DIY can be. While we continue what we do with more focus on information and knowledge sharing, we long for your continued support, for, without you, this blog would merely be an online version of a personal journal that no one desires to read.

Please do come back for more and while you do so, have a happy, prosperous and a wonderful year ahead.


We have the internet, we have mod podge, we have millions of tutorials on decoupage, we know how to make our own glue, we have fellow crafters to turn to, and we are probably only reinventing the wheels. But imagine a time when all this was absolutely not available to us. Am talking about the 80s when all we  probably had was the desire to resourcefully spend our times, but no assistance in terms of tips and tutorials.
Bharani Decoupaged
 Decoupage using Fevicol

This decoupaged Bharani is vintage, comes from the 80s and is the handiwork of Suja Mohan. What really drew me to this project was the idea of decoupage (Passport size photographs) during a time when decoupage was not a known / popular concept at all, at least around here. With just an idea in mind, hear out how Suja Mohan came out with this brilliant finish (with little aid from Doordharshan - Remember that ?)  for her bharani using just Fevicol.
  • I used only fevicol. Can u believe it !
  • I soaked the picture in water for a while and removed the thick paper behind and separated it carefully.
  • Then I let it dry and stuck it onto the jar which was painted with enamel paint (maroon).
  • I then painted the rest of the jar with golden paint. I used black marker to draw some designs all round.
  • I also used a silver pen,which used to be availabe in those days. Now the paint has started peeling off, so i may change the background sometime in the future.
  • After the whole thing was done , I let it dry for a day and then applied clear varnish.
  • As simple as that and I had not even heard of Mod Podge in those days.
I so love this work for the sheer reason that the idea to decoupage completely stemmed from the need to use the photographs on a decorated Bharani. That, I believe, is really a high form of creativity. Agree / Not agree ? Either way leave your comment. This work deserves all your accolades.

About the crafter
Suja Mohan is a Dental Surgeon by qualification, though is more passionate about music and handicrafts of any kind. She is a crafter by heart  and loves working on needlework, glass painting and more. She loves to spend time productively when she is not catering to patients.

Did you like this post ? Enter your E-mail address and join our growing E-mail list

If you liked this, you may also like

- Somu
Linking in : Colours Dekor


When Sumathi wrote me an E-mail, little did I know that we used to live in the same gated community until four months back. This is one instance when the blog proved that the world is indeed a small place. The E-mail had a query on where a clock mechanism can be bought and that is all I answered.

What you see here in this post is completely her work and I am awed by how this project has turned out. I hardly battled my eyelid before I asked her if I could feature her work and she was only too happy to share with you, the details on how this clock was made. Go ahead, read about it in her own words. 

Do check out the video post on how to use the clock assembly on any clock face first and then come back.
Photo Frame wall clock
Wall clock with photo frames
  1. Frame 12 photos of your choice
  2. At the watch shop, ask for Clock hands and movements.  Choose the size of clock hands depending on  Wall clock size that you prefer (i.e diameter of the circle)
  3. Cut chart sheet or thick paper (any color of your choice)  and make a hole  in the center, so the knob of the clock movement goes inside
  4. Frame the  chart sheet (See Picture below) along with the clock movement ( Glued at the back side).  Fix hooks to hang on the wall.  The  center  frame (13th frame) is now ready
  5. Decide the diameter of the wall clock  and keep the 13th frame at the center.  Place the remaining pictures in the numerical order and you can try the same on the floor before nailing on the walls. Additionally you can also mark points on the wall for drilling using masking tapes.
  6. After finalizing the diameter, with the  help of the tape, mark the center as well as the ends of the horizontal line (i.e where you will be hanging the Number 3 and Number 9  picture)
  7. Do the same measurement vertically as well and mark the ends (i.e numbers 12 and 6)
  8. Do the same marking / nailing with the appropriate spacing and measurement for the remaining numbers*** ( Do diagonally opposite  marking so that they are in straight line)
  9. You can also try variations in the frame sizes (i.e 12, 3, 6,9 ) being in different shapes compared to other numbers
*** The numbers should be at an angle of 30 degrees from each other. If you do not have a protractor, you can simply take a  print out of this clock template and use it to mark the number points on the wall.

Wall clock with wooden frames
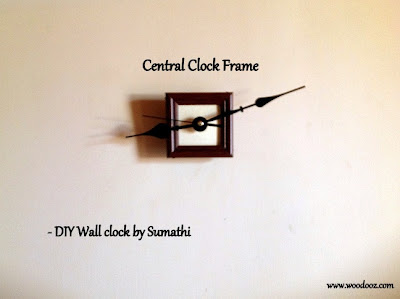
Clock Mechanism framed

Was that not a wonderful way to personalize a clock ? I so loved the way it has been built and I sincerely hope you loved reading Sumathi's DIY tutorial on how she made this clock. Do remember to check out what she did with Wall Decals at Colours Dekor too. Do leave a comment and let her know how much you liked her work.

- Somu

About the DIYer
Sumathi is a mother of 2 lovely boys (fighter-cocks:) who juggles well  between home and work. She is a Software Professional who is passionate about gardening and home decor.  In her spare time she enjoys being productive rather than to spend time on TV Soaps/movies. Currently she has a list of pending DIY projects in mind and is enjoying the process of learning to do things on her own.

Did you like this post ? Enter your E-mail address and join our growing E-mail list


If you liked this, you may also like


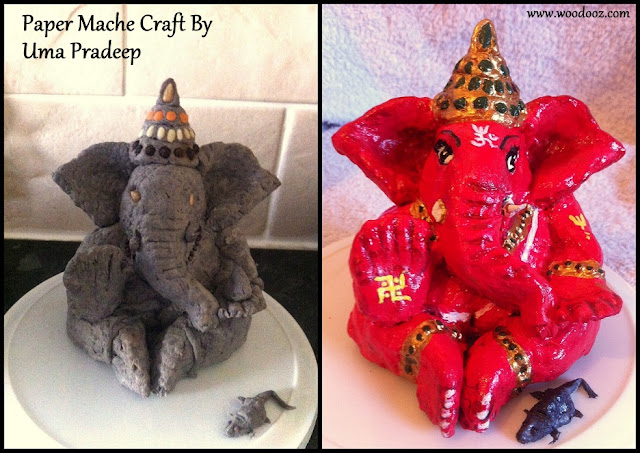
The truest testament to a DIY tutorial is when someone follows your instructions, improvises and comes out with their own project. When we posted the complete guide to making a paper mache clay, I had few friends write to me about the how to process. One of them was Uma Pradeep, who is a big follower of Woodooz. She had been telling me how much she wanted to make something out of paper mache, and finally managed to make this idol of Lord Ganesha at the most opportune time.  

These pictures have come all the way from Edinburgh, Scotland and I shall let Uma tell you more about this project herself. 

Paper Mache Do it yourself
Make your own Ganesha idol for Ganesh Chathurthy
First of all, this is something that was very effective in keeping my kids engaged for as long as we were making this idol. They were keenly looking forward to helping me with ripping the papers off.

I did some research after I was done with this, and found that the roughness in the outcome can be avoided if soft tissues are used instead of news papers. It takes time to dry and patience is very key.

I also found that it is better if the final product is dried using a hair drier for getting a better density Small amounts (One spoon) of bleaching powder can be used on the idol after it is done to prevent formation of any moulds.
I used a base coat of poster paint and then layered it with three more coats of poster paint. The last coat was made with glossy poster paint.
I was only glad that I was able to complete this just in time for Ganesh Chathurthy. It is indeed quite a fun craft to work on and I intend to make more such stuff in some time. Of course, I also intend to apply my new learnings. Hope you like it. Do leave me a comment and let me know what you think.
Paper mache craft for 3D figurines
Lord Ganesh with his little mouse
We take a lot of pride in showcasing this post and work of Uma Pradeep. It is not so often that we have someone expressing their thoughts on the utility value of this blog, and this is one of those moments. Hope you loved this post and project just as much as we did. Remember to leave your comments. Also, Do let us know how your Ganesh Chathurthy celebrations went.

And here is a couple of Lord Ganesh DIY posts that we loved reading in the blog world.

                                 Join us in Facebook

About the crafter:
Uma Pradeep is a mother to two very active twins and gives vent to her busy schedule through her passion for painting. She is a trained artist in Tanjore painting. She holds a full time job as a delivery manager with Accenture and lives in Edinburgh, Scotland.

If you liked this post, you will also like the other showcases :

Linking in : Colours Dekor, ArtsyCraftsyMom


To be practising an art from an early age and continuing the tradition is one thing. But to show interest in a new art form, learn and master it at 70 something is completely another thing. Today, we learnt that everything is possible if the heart and mind is focused and age is no barrier to imbibing newer faculties and creating magic.
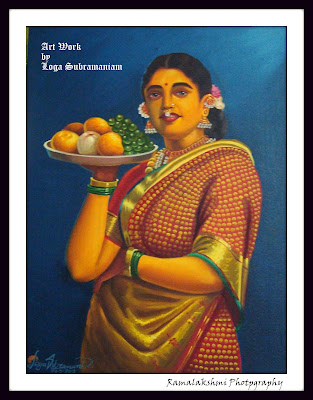
This portrait by my aunt Mrs.Loga Subramaniam, is truly an inspiration to us. Just as art is timeless, this painting establishes that talent knows no frontiers and there is never a laid down age to be trained, to learn and to acquire untried skills. 
Portrait of a woman
Portrait of a traditional Indian woman
Showcase
This portrait apparently is my aunt’s first painting ever (can you believe that !) that she worked on after half a year of formal training. The portrait exudes a certain charm which we believe couldn’t have been possible without a certain innate artist who was only waiting to be unleashed all these years.

Athai, we were struck by sheer joy when we saw this painting and have been talking about it all evening.  You have so evidently shown us the blaze of passion can never be doused by the passing of timeWe are eagerly waiting to see more of your work.

The artist with her painting
The artist with her artwork
Over to you now. Is there something that you have always wanted to learn but have been shying away from ? Have you kept  yourself away from learning a skill because you thought it was too late to grasp the concepts ? Tell us about it. And also remember to leave a comment rightaway on what you think of this painting. Your kind words mean a lot.

Join us in Facebook

This post is partially a translation of a similar post made by my cousin Ramalakshmi who is a passionate photographer and a Tamil enthusiast. She is a renowned blogger from Bangalore who manages a very active Tamil blog. Her photos, poems and articles have consistently found their way into well known Tamil websites and print magazines. The credit for the photos in this post goes to her.

If you liked this, you may also like:

Linking in : Colours Dekor


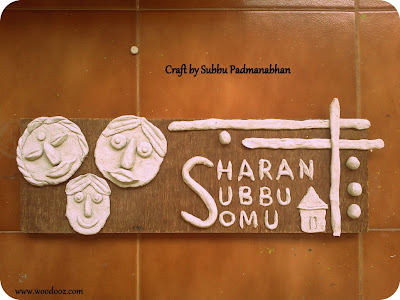
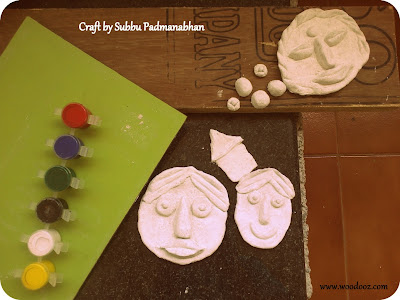
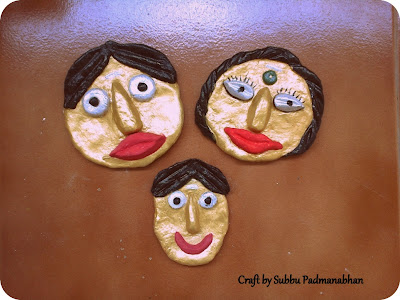
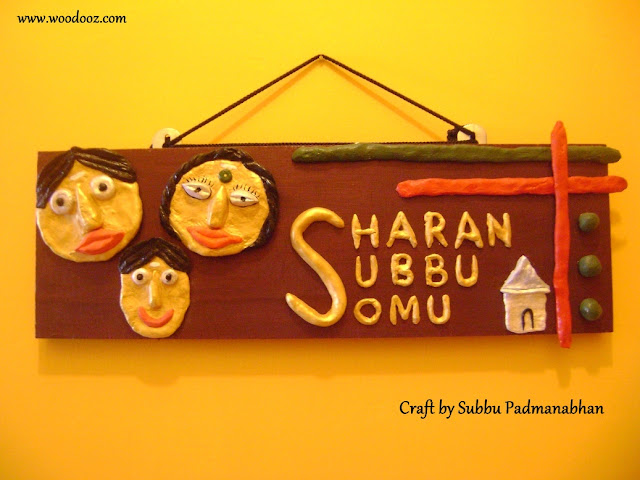
Second in our series of WOODOOZ SHOWCASE, we bring to you a craft project by Subbu Padmanabhan. We once did two tribal face masks and then a personalized name board using paper mache. Here’s a paper mache craft idea that combines the faces and the name plate into one beautiful welcome board for the entrance.

Read more to know what Subbu has to say about her project, in her own words.

"I had a spare wooden plank and lots of time during my son’s summer vacation and wanted to use them resourcefully. One of the many things I made was this name board for my home in Bangalore.

I wanted to make a home, faces to represent the occupants of the home and then our names. Making the paper mache paste is easy and you can find a detailed step by step description of how Preethi made the paper mache paste here in Woodooz. One additional thing I did was add chalk paste putty when I ran short of flour."

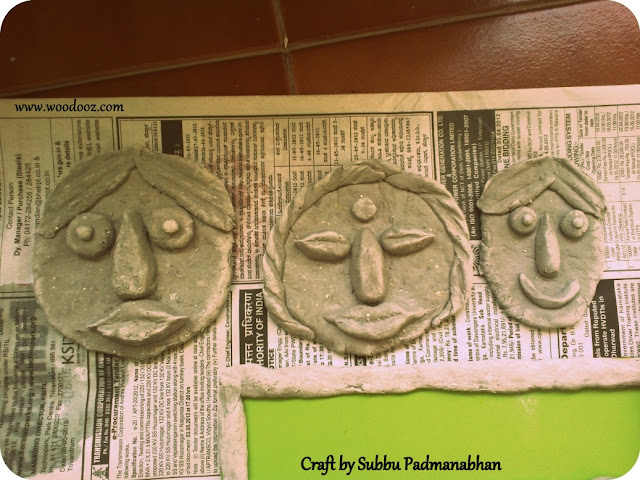
Paper Mache Faces
Paper Mache faces

"The grey color is because of the water in the mix. Once the figures are made, they need to be allowed to dry for a minimum of 24 hours before you can do anything with it. Once dried, it takes a lighter color with all the water drained off. I made the letters separately and then set it on the plank."
Paper Machie DIY
Arranged to be glued
"Once I was happy with the arrangement, I set out to color the faces and the letters. I used acrylic colors to give the entire project some life."

Acrylic colors for painting paper mache
Acrylic colors for painting
"You can use acrylic primer as a base coat as it also allows for hiding the pores in the figures."

Paper mache masks
Paper mache faces painted
"Once the coloring was done, I used fevicol to stick everything onto the 6mm plywood plank. While you can use wood paint to prime and paint the wood I used acrylic color to give it uniform texture as the faces. I used gold predominantly to go well with the contrasting brown color of the backdrop. After giving the glue time to dry up, the plank was up on my entrance wall."

DIY Paper mache craft
DIY Paper Mache Craft
"How do you like it?  Do you think something is amiss ? Let me know your thoughts. Leave a comment."

By the way, her friends in the apartment loved the name plate so much that one of them wanted to learn how it was made and another wanted to custom make a plate similar to this one. Isn’t that wonderful ?

About the Artist
Subbu Padmanabhan is a mom to a 3 something year old boy, and works as faculty in a premier play school. She likes to indulge in mini crafts projects, for the school and her home, during her spare time. The wall art that you see in the backdrop of this bedside lamp is her handiwork too. She lives in Bangalore.

You may also be interested in

Linking in : Colours Dekor
- Somu


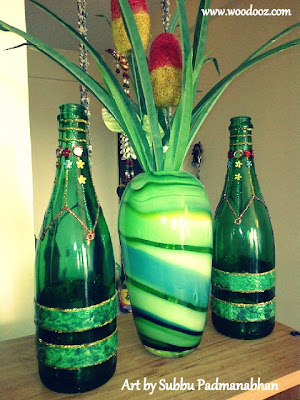
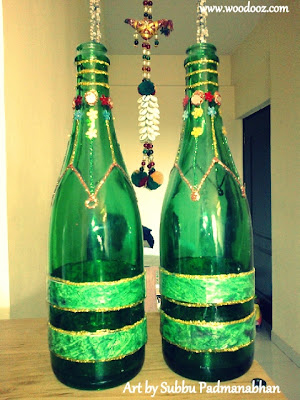
So far, Woodooz has always been about our works. We thought it is about time that we also use this platform to showcase arts and crafts by others, particularly those that do not have a blog to write about their work. In the recent days, we have been reaching out to talented friends and family and the first in this series of Woodooz Showcase is a DIY bottle art by my sister Subbu Padmanabhan.
Preethi and I have always been fascinated by wine bottle art, and so when we laid our eyes on these bottles during our last visit to Bangalore, we wanted to know how it was done.
DIY Wine Bottle art
DIY Wine Bottle Art
Woodooz Showcase
               Art by Subbu Padmanabhan
So here it is, in her own words : 
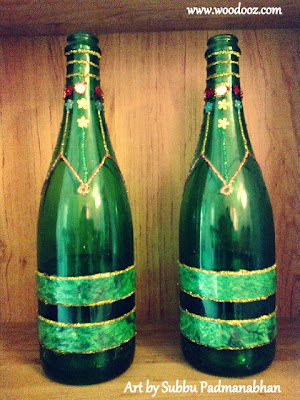
"I wanted to keep it simple and so went for a minimalist design. The green wraps that you see in the bottom is handmade paper, bordered with glitters. I stuck the paper on to the bottle using cellotape."
Yeah, Cellotape. No fancy decoupage glue used. 
How to recycle wine bottles
Wine Bottles - Recycled
"For the top, I again chose a simple design, and had it drawn lightly using a pencil. I filled up the line drawing with Fevicryl 3D glitters. I then completed the design by gluing sequins around the top of the bottle"
Wine bottle Craft ideas
Craft idea for your Wine bottles
"I left most of the surface area of the bottle blank, because the green backdrop was by itself enhancing the look.  And now this pair of bottles lay right where everyone can see them - In the living room."

So how did you like it ? Sometimes overcrowding can be an overkill, and we thought it is the simplicity of the design that makes it stand out. Leave your comments and let the artist know what you think of her work.
Another wine bottle idea that we loved : 
by Sarmistha Roy 

About the Artist
Subbu Padmanabhan is a mom to a 3 something year old boy, and works as faculty in a premier play school. She likes to indulge in mini crafts projects, for the school and her home, during her spare time. The wall art that you see in the backdrop of this bedside lamp is her handiwork too. She lives in Bangalore.

You may also like :

Linking in : Made with Love PartyColours Dekor
- Somu

Know more about us

About Us
Reviews
Media
Our showroom location
Return and refund policy
Review us on Google

Connect with us


Mail us
Subscribe to our newsletter

Our Address :
Woodooz Home Decors,
3/371, First floor,
Metukuppam, Thoraipakkam,
Old Mahabalipuram Road (OMR),
Chennai - 600097.
Ph : +91 9884070470
Email : contact@woodooz.com
Created By SoraTemplates & MyBloggerThemes