Category : Festival craft


Last week, we had two major events in Woodooz:
  1. We announced the starting of the DIY Woodworking group on Facebook. Interestingly, we received good response and we are getting to consolidate the group with woodworking enthusiasts and aspirants. Already, there are useful threads around how to prepare chalk putty, and what should be the essential tools in a beginner's list. I strongly urge you to join as I foresee interesting DIY shares from folks around the world.
  2. We had our first DIY woodworking tip published in the honorable Hindu Melange Metroplus Edition (17th Oct, 2015). I chose a small, beginner level project that can be made around Navratri / Diwali when we have guests coming home. A DIY tray can carry a good show-off value as you can show it around casually and subtley without trumpeting about your new found hobby. This week, I wanted to elaborate on the project - The basic serving tray you can make.
Basic level carpentry
Easy Diwali DIY - Basic woodworking project
The step by step procedure is already in the published content (Check image below), and so I want to focus on the photos (Published and unpublished) that by themselves explain the procedure. Do take a look and let me know if this is something that you would love to make sometime.
Click here to enlarge image
Hindu Melange Metroplus - 17th Oct, 2015
Used simple materials like plywood reapers, OST / Plywood sheet for this project. Made it easier as no power tools are required. Just a hacksaw blade did all the trick for me.

Materials - tools required
Plywood reapers, OST / Plywood, hacksaw blade, wood adhessive
The size of the tray is based on your requirement. Mine is a square tray and it is 12 inches on all sides. You can make a smaller, bigger or even a rectangle tray - Just customize the size to you needs.

Tray frame
Cut using hacksaw blade
6mm plywood or a 4mm OST sheet (One Side Teak) - Both would serve the purpose. Just walk into a plywood store and ask them if they will be able to spare a sheet that was cut from a bigger sheet. Such sheets normally never sell and the vendors would be happy to give it to you for a small cost.

Tray base cut to fit the frame
Glue on both surface

Apart from the glue, you can use small headless nails to secure the base to the frame. For making sure the glue bond is strong, use masking tape, clamps or just overturn the tray and place something heavy to hold the base and the frame. I use a vessel filled with water if I cannot find my tape.

Masking tape on tray
Masking tape or heavy weight. Both can help to hold the surfaces together
After the base and the frame have bonded well, I used hammered in headless nails (Optional). This is your basic tray. You can even use it without a handle. However, you need to apply the required finish for the tray to be functional. Remember, you are going to serve coffee and tea and you need means to handle the spill.

Serving tray tutorial
The tray - Before

Until now, whatever you see is my handiwork. I promptly handed over the tray to Preethi and left it to her to finish it up. I was awed by the outcome and I realized it is good to have an art expert at home. After all, art is not my forte.

Serving tray tutorial

The tray - After
I will detail the finishing process as a separate post as this one is already getting photo heavy. It will also help break down the process without having to stuff you with too much information in one go. 

As a parting note, I want to tell you this. Working with wood opens up options for you to make small functional items for your home. If you are hesitant, working on this DIY is an ideal first step to gain confidence. You can make your DIY a talking point among guests and items like your own tray can become conversation starters Now that Navaratri is over, try this out for Diwali. Go DIY and leave us your feedback as a comment.


The truest testament to a DIY tutorial is when someone follows your instructions, improvises and comes out with their own project. When we posted the complete guide to making a paper mache clay, I had few friends write to me about the how to process. One of them was Uma Pradeep, who is a big follower of Woodooz. She had been telling me how much she wanted to make something out of paper mache, and finally managed to make this idol of Lord Ganesha at the most opportune time.  

These pictures have come all the way from Edinburgh, Scotland and I shall let Uma tell you more about this project herself. 
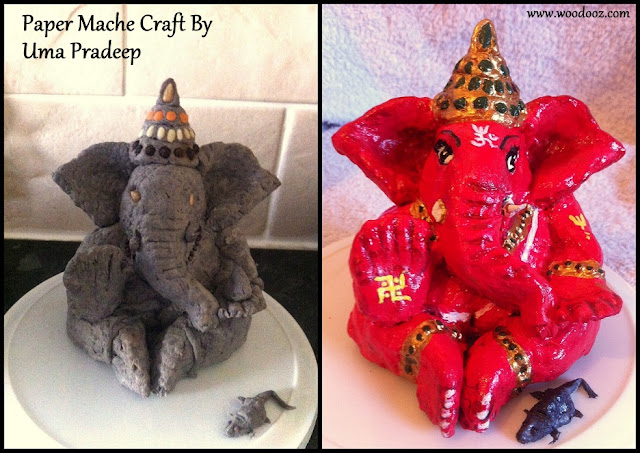
Paper Mache Do it yourself
Make your own Ganesha idol for Ganesh Chathurthy
First of all, this is something that was very effective in keeping my kids engaged for as long as we were making this idol. They were keenly looking forward to helping me with ripping the papers off.

I did some research after I was done with this, and found that the roughness in the outcome can be avoided if soft tissues are used instead of news papers. It takes time to dry and patience is very key.

I also found that it is better if the final product is dried using a hair drier for getting a better density Small amounts (One spoon) of bleaching powder can be used on the idol after it is done to prevent formation of any moulds.
I used a base coat of poster paint and then layered it with three more coats of poster paint. The last coat was made with glossy poster paint.
I was only glad that I was able to complete this just in time for Ganesh Chathurthy. It is indeed quite a fun craft to work on and I intend to make more such stuff in some time. Of course, I also intend to apply my new learnings. Hope you like it. Do leave me a comment and let me know what you think.
Paper mache craft for 3D figurines
Lord Ganesh with his little mouse
We take a lot of pride in showcasing this post and work of Uma Pradeep. It is not so often that we have someone expressing their thoughts on the utility value of this blog, and this is one of those moments. Hope you loved this post and project just as much as we did. Remember to leave your comments. Also, Do let us know how your Ganesh Chathurthy celebrations went.

And here is a couple of Lord Ganesh DIY posts that we loved reading in the blog world.

                                 Join us in Facebook

About the crafter:
Uma Pradeep is a mother to two very active twins and gives vent to her busy schedule through her passion for painting. She is a trained artist in Tanjore painting. She holds a full time job as a delivery manager with Accenture and lives in Edinburgh, Scotland.

If you liked this post, you will also like the other showcases :

Linking in : Colours Dekor, ArtsyCraftsyMom

Know more about us

About Us
Reviews
Media
Our showroom location
Return and refund policy
Review us on Google

Connect with us


Mail us
Subscribe to our newsletter

Our Address :
Woodooz Home Decors,
3/371, First floor,
Metukuppam, Thoraipakkam,
Old Mahabalipuram Road (OMR),
Chennai - 600097.
Ph : +91 9884070470
Email : contact@woodooz.com
Created By SoraTemplates & MyBloggerThemes