Category : video


The wooden plywood beading sticks have always been my favorite materials to work with. There are a multitude of things that can be made with these and I have personally used them for many projects. Be it a photo frame, or some parts of my lampshades, or frames for my wall clocks, they have always come in very handy. I believe these are good materials to start with for a beginner who is looking using wood for his / her craft projects. They are cheap, easy to work with and can be cut using hacksaw blades.

Here are 4 projects that can be easily made using wooden sticks (look for the video at the end of this post).

Simple DIY
Easy DIY projects

1. A wooden coaster

This was an interesting project for me. Did this mostly as an experiment. Have always been awed by some of the cutting board projects I have seen on the net and so wanted to use the same concept. Stacked few wooden sticks together, joined them with glue, and cut them to the desired dimension. And viola ! My coaster was done.

Wood Coasters
Do it yourself wooden coaster

2. A Pen Stand

There are many ways to get this done. However, since I was only in an experiment mode, I used the same coaster to demonstrate this. Just few holes of required diameter and your pen stand is ready. Try it out. I really like the way it turned out.


3. Smartphone holder

This DIY was recently published in The Hindu Metroplus. But, only not had the time to write about it. Watch the video to know how you can make it too.

Wood mobile holder
Smart Phone Holder

4. A Photo Stand

While I had already written about this DIY, I got around to doing a video too. Do check out.

DIY Photo frame / stand
And finally, don't be limited by these 4 options. There are many more things that you can do with wooden sticks. Given that it is easily available, can be easily cut and can be easily glued, you should certainly give it a shot. Start with these 4 and then give wings to your creativity to get more and more things done. Good luck.


Yeah. And I can vouch for that. Being able to customize is one of the biggest advantages of DIY. And being able to change from one décor scheme to another is easily facilitated by DIY. You would have seen the DIYed side table from one of our earlier posts. The traditional look was something in line with the décor makeover that we are working on. However, how interesting would it be if we could have a completely opposite design on the side table that we can keep going back to ! It was this thought that inspired the idea behind this rehab project.  The side table top is 12mm plywood plank and is merely placed on top of the table.

The underside of the plank, until yesterday was just an unfinished plywood surface. But today, it carries a swanky design on it. Bored of the traditional Kathakali painting ? I can overturn the plank to expose the newly painted top. And that means, I can keep moving between this and that whenever I want to. Cool, no ?
Side table painting
Side table makeover


The video is self-explanatory. And so I am not going to write much about this make over. All that it required was primer, acrylic paints and some masking tape. At the end of it all, we have a table can flip flop between two décor extremes – A table I so lovingly call the bi-polar side table.

Traditional to abstract
Do it yourself project


I am back with another video. But before that, wanted to take a moment to share a wonderful news that can do loads of wonders for whatever I am trying to do here on the blog. Social Samosa along with Asian Paints opens the gates for the first ever India’s Décor Influencer Awards (IDIA) – an initiative sculpted to accost the contribution of influencers in the digital hemisphere. And guess what !!! Woodooz.com has been nominated in 5 distinct categories. Fortunately or unfortunately, it boils down to the number of votes the blog can garner for the jury to come to a conclusion on the winners. And hence this request.

VOTE FOR ME and WOODOOZ.COM. Help us win. All I need you to do is follow the links below and cast your vote for Somu Padmanabhan. Here’s the link to my profile that has all the nominations. If you are not interested, you can skip and get to the post below. 
Click to go to my profiles page

We have always been driven by our passion to do what we do here. Sometimes, a little motivation and push from you can help fuel that passion. Please do consider voting for us before you head to the post below. You can use your FB login to cast your vote. Thanks 

Meanwhile, here’s what we have been up to. We have been wanting a paper towel holder for a while now.  The little one is still not 100% potty trained and we have been using up loads of these papers on and off. So having it readily available on the kitchen counter became the need of the hour. Please do watch this video on the step by step procedure on how this was made.


Our Kitchen cabinets have a combination of bright red and white. And so when it came to matching up with the existing scheme, the choice of colors was evident.  Furthermore, we are also working on an overall traditional decor for the home, which made the design on the holder even more evident. The design, the color scheme and the execution – All Preethi’s handiwork. All I had to do was to give her the holder made in Plywood.

Do it yourself decor

DIY project
Traditional finish to a DIY stand
While the video explains how this was made, I shall leave you with some progress shots of the project. Meanwhile, it would be great if you can reconsider voting for me, just in case you came until this point without casting your votes. I shall meet you soon with another project and I expect feedback from you that can help me improve the quality of my next video. Please leave me a comment.
Make your own DIY Stand
Progress shots


It is a new year and I wanted to start the year with a positive note with the Wodooz resolution for 2016. Over the last few years, I have received queries on the DIY posts requesting me to explain few things in detail. Either the photos posted were not helping or the post itself was lacking in some information. I have felt the inadequacy myself at times when I am reading something for inspiration. And more often than not, videos come to the rescue. We also realized it late when we saw my Golu Padi video reach more than 10K views.

Videos are fun to watch and help to easily understand the DIY procedures involved. And so this year, I have taking it upon myself to make more DIY videos to go along with the blog posts we make here. That means step by step instructions on how I build the things here. And that is my top resolution for 2016.

In the last 30 days, I have made 5 videos and that by my standards is a very good thing. And I intend to keep the good thing going on. And I need you to subscribe to TheWoodooz YouTube channel (Https://www.youtube.com/TheWoodooz) just so you are informed whenever there is a new video published. Not all videos might translate into a blog post and so a subscription will ensure I would be able to reach you as soon as a video is published.

So , go on, SUBSCRIBE now. This could be your New Year gift to us.

I made a short video talking about what we do in Woodooz and also about our goal for 2016. Do check it out. You can either click on the SUBSCRIBE link you see on the right bottom of the video or click the image further below to go to the subscription page.


Click to go to the subscription page
Click on the image to subscribe

I also have an important announcement to make in YouTube in the next two days. Something I have not tried before, something I have been receiving requests for and something I am so looking forward to. Please do join us and remember to leave your feedback as a comment.


This is the final post in the golu padi series. This one will be about the assembly of the golu steps. Do ensure you check out the two earlier posts. I am a bit relieved that we don't have to go in search of bricks, card boards, or left over planks to build the steps like we did the last two years.
Before you read the rest of the post, do spend some time to understand what a pilot hole is and what is a cross dowel. These two concepts are essential to get a better grip of the post / video.

Since the video is a little elaborate, I will write only a bit about what needs to be done with pictures.

Check Out ! Complete guide to build your own Golu steps
Disclaimer : Materials used and measurements depicted are suited for the collection of dolls we have. Kindly assess your collection and accordingly choose 12mm / 19 mm ply for your steps.


Navaratri Steps DIY
The Golu Padi - Final look

Step 1

Join the vertical teak wood support with the horizontal strip of wood. Drive pilot holes and use the nuts and bolts to tighten the wooden pieces.

Do this on both sides of the plywood strip to get the basic support structure in place. (Watch video to know how this is done)

Horizontal and vertical support
Vertical supports joined at the bottom using a horizontal wooden strip

Step 2

Join the side risers with the vertical teak wood support. Make sure the top rear of the side step is aligned with the wall, and the bottom is parallel and placed on the floor. This is critical to get the required stability. Again, use pilot holes, nuts and bolts. (Watch video to know how this is done)

Side Riser 1
Side riser joined to the vertical support
Attach the other side riser to the other side of the support structure. Notice how the side steps are balanced without any further support?

Side riser 2
Other side riser attached to the 2nd vertical stem

Step 3

With side risers in place, start joining the steps (padis) to the sides. You can screw the step planks to the side steps, but then, it would make assembling and dismantling on a regular basis a pain. To overcome this, use nuts and bolts the way cross dowels are used in the flat pack furniture industry (Watch video to know how this is done).

Start with the top step. Use two bolts on both sides of the planks.

top plank
Start adding the step planks - Top one added

Keep adding all the other steps in sequence. For the 2nd, 3rd and 4th padis, it is enough you use only one bolt on both sides.

For the bottom step, use two bolts on both sides. This will ensure the steps do not split at the bottom.

Padi completed
All the step planks joined with the side risers
Finally, evaluate your outcome. Think the steps are wobbly ? Check if the bolts are sufficiently tight. If required include an additional horizontal support connecting the two teak wood vertical stems on the top. And most important : If you know someone who would benefit from this post, do remember to share it. Just click on one of the share options at the end of this post :)

Happy Navaratri 


Making a video post has long been in my mind and I was shying away from it for various reasons.  Today, I decided to take the plunge and chose a very simple post just for me to get used to being in front of the camera.
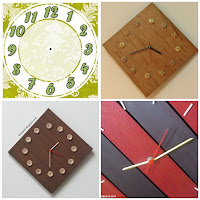
In this video post, I am explaining the making of a sample DIY wall clock along with
  • the clock assembly,
  • the various materials that you can use for the clock face and 
  • how the assembly is fixed to the face.

This is my first attempt and hence looking forward to your feedback on the content and delivery, as it would help me improve the quality of the videos in future. Was it properly paced ? Was it too slow ? Was it too boring ? Was it too monotonous ? Was it too long ? Was it clearly understood ? Those are the kind of feedback am looking at.
Clock assembly and wall clock making
My DIY Wall Clocks
Meanwhile, I hope you find good use for this video post. This post is highly relevant considering we have a "Showcase" post coming up this week on building your own DIY clock at home by one of our readers.

Did you like this post ? Enter your E-mail address and join our growing E-mail list


If you liked this, you may also like

P.S. Did not find time to make a regular post on this topic along with the video. Will do it another time and update it as part of the same post.
Linking in : Colours Dekor

Know more about us

About Us
Reviews
Media
Our showroom location
Return and refund policy
Review us on Google

Connect with us


Mail us
Subscribe to our newsletter

Our Address :
Woodooz Home Decors,
3/371, First floor,
Metukuppam, Thoraipakkam,
Old Mahabalipuram Road (OMR),
Chennai - 600097.
Ph : +91 9884070470
Email : contact@woodooz.com
Created By SoraTemplates & MyBloggerThemes