Category : Do it yourself


The earlier two weeks, we looked at how to build the side table frame. Today, we look at how the frame can be finished to get the desired look as well as fixing the table top. Before you read any further, I suggest that you look at the below three posts to ensure continuity:
  1. Starting a Side Table project
  2. Side Table – Design, dimensions and materials required
  3. How to build the table frame using teak wood legs
Building a side table
DIY Side Table
At this point, it makes complete sense to go back and look at how staining can be done on a wooden surface. While this has been extensively covered, a little reiteration will certainly help you get a hold of the methods used. The first step is to sand the wooden surface. Sanding provides the necessary level of smoothness that is required for you to achieve the stained finish that you are looking for.

Recommended reading : The basics of sanding explained through a simple video
Sanding
Sanding and staining
The next logical step in the sequence is to apply sanding sealant. However, considering I already had an exceptionally even surface, and the teak wood was absorbing the stain very well, I decided to skip the sealing process. Sometimes, even when there is an established method, it does not hurt to experiment and resort to methods that work well for a particular project. I used gada cloth to apply the stain, and used another piece of the same cloth to immediately wipe off the excess stain.

Recommended reading : How to apply wood stain for your DIY projects
How to stain wood
Staining process continued
Finally, the frame is built and wood stain has been applied. Now the next step is to fix the top and middle layer. I used a 12mm plywood for both the layers. To fix the plywood on the frame, you can nail wooden reapers along the inner sides of the frame. Considering the plywood top is 12mm in thickness, the reaper should be nailed 12 mm below the top of the frame to ensure the plywood is in line with the frame top.
Wooden reaper
Using a wooden reaper to support the plywood top
What you see above is the reapers nailed on the inner side of the frame for the top layer. Similarly, I have nailed 4 more for the middle layer (not shown in the picture). The plywood needs to be neatly cut with the dimensions being almost equal to the inner dimension of the frame - In this case, about 14 inches x 14 inches. Once the reaper is in place, and the plywood is cut, all you need to do is merely place the plywood on top of the reapers. And your side table is ready to be used.

Do it yourself
A Do-it-yourself sidetable
We are still debating on how I should finish the table top. Right now, it is just the plywood surface. We are considering doing an art work on the top to give the side table an ethnic look. What do you think ? Should we consider other options. Let us know.


Child safe door barriers or safety gates / picket fences are a must in homes with little babies and toddlers. They are very effective in keeping kids away from areas within the home they are not intended to be in. At the same time, these baby proof doors also help create a safe boundary, within which kids are free to roam about and play.

Potential areas where the babies need to be kept away from are the kitchens, balcony areas (learn how to baby proof your balcony) and stairways. This DIY door barrier / picket fence was built to keep my niece away from the kitchen especially when the grinder is on. We built this fence using wooden sticks that are about 2 inches wide and half an inch thick.Considering it was supposed to be baby safe, the first thing I did was to ensure all the edges are made blunt and the surface is smoothed using sand paper.

child proof barrier supplies
Child safe barrier - Supplies
The wooden sticks were nailed together (7 vertical sticks nailed / screwed onto 3 horizontal sticks). We made two similar gates which we joined together using regular door hinges in order for the doors to half open. What you see below is work in progress for one of the gates. The gate was painted (learn how to paint wood) and varnished for protection.

Baby proof picket fence - Work in progress
Baby proof barrier doors - WIP
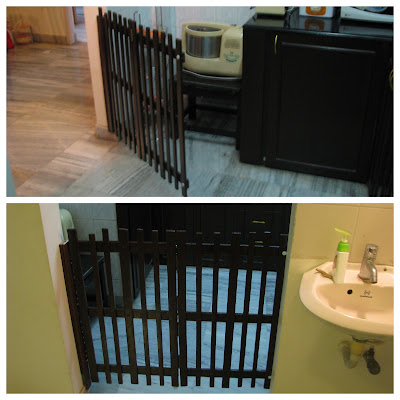
The two gates were joined together using hinges and one side of the gate was fixed  (again using regular door hinges) to a wooden panel installed on the side of the wall. You can see a break in the middle of the gate indicating the hinges (marked in the picture below).

Child proof picket fence-door barrier
Child safe picket fence
As you can see, we had to coordinate the color to ensure that it matches the kitchen cabinet colors. Fortunately for us, the kitchen entrance and the Grinder section were at 90 degrees to each other. The installation was made in such a way that the kitchen entry is blocked when the gate is closed... and the grinder area is closed when it is open. And because it was along the corner, it also became non-intrusive providing easy access to the kitchen when the grinder is not in use.

baby proofing the kitchen using child safe door barrier
Baby Proof / Child Proof fence / door


Over to you : Tell me how have you baby proofed your home ? Did you have an off the shelf product installed ? Did you make one yourself ? Share your thoughts and ideas.

P.S. Linking in : Colours Dekor, Lines Across My Face, Kreative Korner
- Somu

Know more about us

About Us
Reviews
Media
Our showroom location
Return and refund policy
Review us on Google

Connect with us


Mail us
Subscribe to our newsletter

Our Address :
Woodooz Home Decors,
3/371, First floor,
Metukuppam, Thoraipakkam,
Old Mahabalipuram Road (OMR),
Chennai - 600097.
Ph : +91 9884070470
Email : contact@woodooz.com
Created By SoraTemplates & MyBloggerThemes