Have you ever been put off by the idea of doing something with wood because of the hard work that it involves? Have you been giving up on executing a thought because you didn't have the necessary tools? Do you like to explore woodworking as a hobby but don’t know where to begin? Here is a list of some simple and easy projects that you can do to give your interest a kick start. Why do I call them simple and easy? All these projects use easily available materials, requires a hack saw blade and don’t take much time to complete. 
Further reading: My 17 point recipe on how to start a woodworking hobby
DIY woodworking projects
Simple and easy DIY Woodworking projects
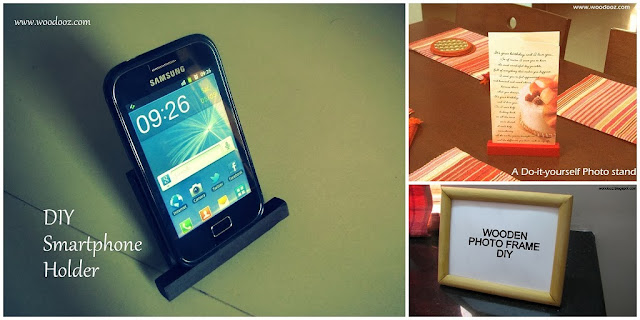
1. DIY Photo Stand (Beginner level)
    If you have a display space at home, this is a really wonderful thing to own. Inspired by a menu card holder, this is one of the easiest projects I have ever done. Takes just a couple of wooden reapers and adhesive and you have your own photo stand.
2. A Smart phone holder (Beginner level)
    Another very functional project. I was really glad that I made it. Makes watching Youtube much easier than ever. Again, just a couple of wooden sticks and some glue is all you need.
3. A Photo frame (Beginner to intermediate level)
    This serves the same function as the photo stand, except that it is a conventional photo frame. This DIY apparently is among the top 5 popular posts in Woodooz. Little bit of creativity and you can have personalized photo frames to hold all your memories together.
4. Wooden Wall clock (Beginner to intermediate level)
    You can make a simple clock to a really fancy one and all that depend on the thought you put into the projects. However small / big your clock may be, the concept behind making one is just the same. You will need to get the clock mechanism, but beyond that, you can use pretty much any material to make your own clock.
5. Broadband router holder (Beginner level)
    This is the ugliest looking holder that you would have ever seen. But, what the heck, it really serves its purpose. The inspiration was a mobile phone charger holder that I saw at a duty free shop in the airport. The design is raw and rough, but it certainly saved us some floor space. Try it out if you think you have a similar need.
Starting with smaller projects and then gravitating towards bigger and more complex ones can help sustain your newly found interest. And the sustenance is key to your interest growing into a passion that you most certainly love to indulge in. If you let non-availability of materials and tools to discourage you, these 5 projects will help get you back in track. Do you have any other small and easy projects in mind? Leave me your thoughts in the comments section.

- Somu


[This is a guest post by Sharmilee Muralidharan]

First of all, big thanks to Woodooz for this Paper Mache recipe, which woke up the crafty girl in me and there is no stopping it now. Beware. This is a dangerously obsessive craft. I chose eco-friendly-NO-plastic-in-any-form concept for my Golu 2013 and that led me to making handmade items. It was very challenging, but learnt a lot in the process, and it pushed me to create a lot of things. 

1. Paper Mache Earrings (using kitchen paper towel)

DIY paper Mache
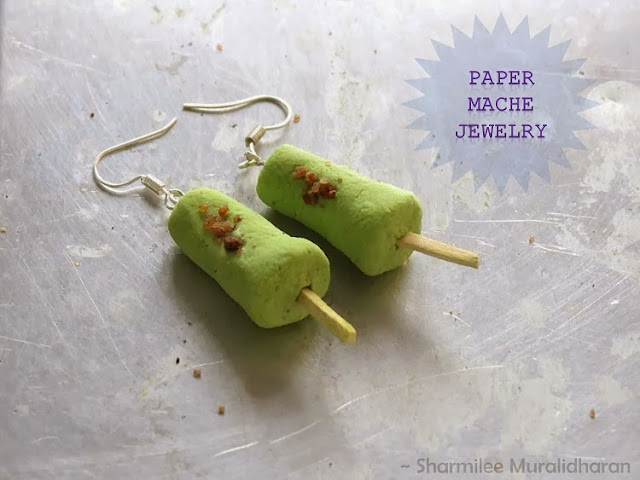
Paper Mache Jewelry
I made some clay jewelry as return gifts and thought would make jewelry with paper mache too. I didn't have any paper pulp remaining and so made this quick recipe:

  • Soak few sheets of kitchen paper towel in boiling water for an hour
  • Squeeze out the water, and grind them in a mixer into a smooth pulp (as much as possible, can add water while grinding which can be squeezed off later)
  • Strain them on a strainer for sometime or squeeze out the water by hand. Once all water is squeezed out, add Fevicol glue. 
  • Keep adding the glue in small amounts and keep kneading it till it becomes a dough (it resembles a cookie dough). 
  • I also added a little bit of all-purpose flour/ Maida and salt, which added smoothness and I felt they helped in making shapes better than the one without it.

When it is wet, insert the required jewelry hooks and allow it to dry. Once dried, you can paint them and apply a coating of Artist's picture Varnish . If small pieces or shapes are made, instead of painting after drying, you can add acrylic colours to the pulp when it is wet, like I did for this Kulfi earring and then dry it. Though they can be sanded smooth, what I like the most in these is the unfinished rough look.

2. Newspaper paper mache bowl

How to make paper mache
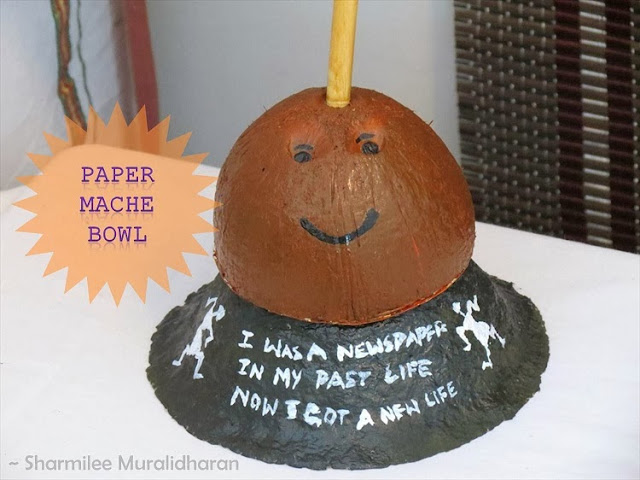
Paper Mache bowl
This is a technique used during our grandma's time to make vessels out of paper mache. I used a Styrofoam bowl as a base. I applied paper mache on the outside of the bowl, covering it completely with the pulp, and allowed to dry for 4-5 days. Since the Styrofoam is flexible, the bowl comes out easily after it dries. And it can be painted as per wish. I used this as a prop for my Golu below a painted coconut shell.

3. Aatukkal and Ammikkal (yesteryear's grinding stone)

DIY Craft
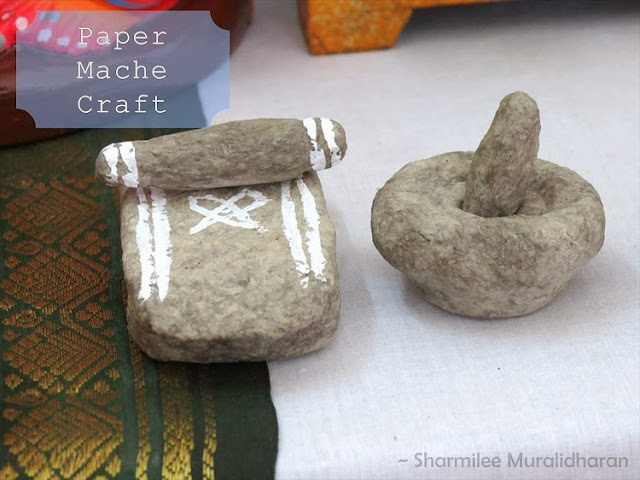
Paper Mache miniatures
When the paper mache bowl was drying, its colour and texture reminded me of the grinding stones. Immediately planned to make these for the Golu. I used a match box as an armature/base for making the Ammi (the flatter grinding stone) and shaped the ends accordingly. For the Aattukal no base was used, just made a ball, and slowly shaped them with hands. All my golu visitors loved them, they all thought these were real miniature grinding stones until they touched and felt them. They are as light as a feather.

4. The Maaya sisters (miniature dolls)

DIY miniature dolls
Paper mache dolls
With the leftover paper clay I made a small doll with a curvy base, so they dance if you push them. No base was used for this. I inserted a thin steel wire as support for the head and the body, though not required. I painted a face both in the front and the back with different expressions and kept them in front of the mirror to click this photo. I made only 2 dolls, but there are 4 girls in total. I call them The Maaya sisters.

5. Paper Mache Rangoli

How to make paper mache pulp
Paper mache Rangoli
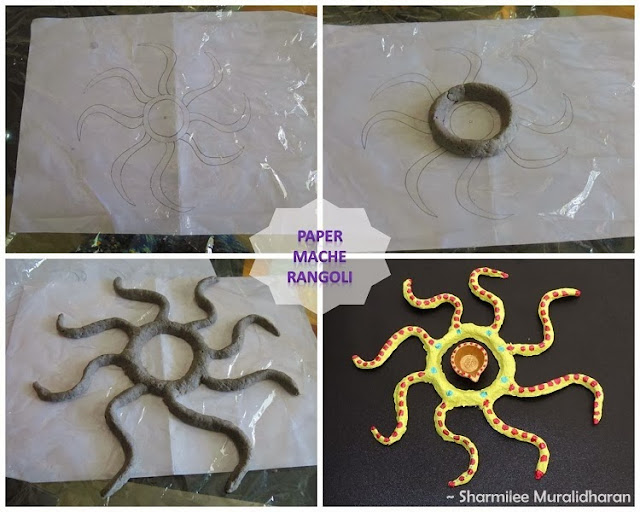
The picture is self explanatory on how the design was made. As a trial I chose some odd design with a circular shape in the center to keep a Diya. It took few days to dry. I guess lots of rangoli - to be assembled pieces can be made using this, which is as attractive as the kundan rangolis available in stores. Could be a fun activity for kids to make and assemble them as they wish. 

Paper mache is such a great medium to work with and can be used to create anything right from miniatures to life size structures. One most important thing is the opportunity for recycling anything lying around at home, newspapers, cardboard, cereal boxes and the list goes on. So, how do you like my paper mache creation ? Please do leave me a comment.

About the crafter : 
Sharmilee Muralidharan is a Chartered Accountant by profession and she works as a Management Consultant in her husband's consulting Company. She is an avid birdwatcher and nature lover. She has deep interests in recycling and eco-friendly concepts. She is from Chennai and is an active member of the ChennaiCrafters club.


A long pending post and finally I get to take you through a portion of our home. The saying “home is where heart is” is so apt  as Somu and I spend a lot of time at home - in front of the TV, in the balcony, in our kitchen and just about any corner of the house. Since this was our first home, we gave it a lot of thought, love and care before doing up every piece of it. I still recollect the umpteen number of store visits and countless arguments before we had to choose the color theme, the mood and the accessories that brought life to our little abode. During the time we spent on making our home, we discovered some interesting things about ourselves - our tastes, our love for art and how we longed to personalize everything in the house. Today, as I write this post, it is such a pleasure to look back, remember and cherish every moment of it.
Here are some pictures of our home that speaks a million things about us. Take a glimpse of the walls and every object, each having a happy story to tell.  

Living room interior
Living Room
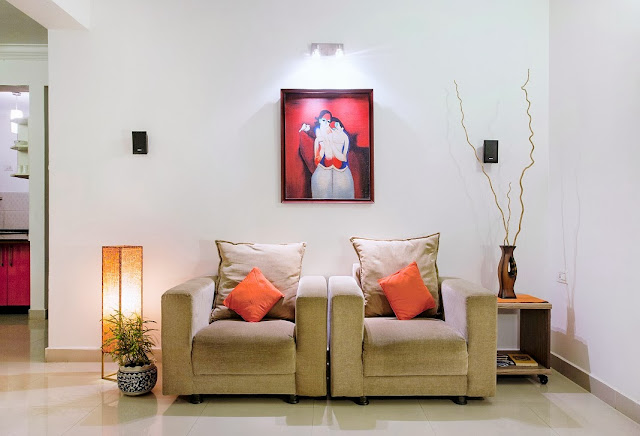
The living room mostly has accents of red, orange or yellow which are supposed to create an environment for lively conversations and happy times. We wanted to have a Buddha sculpture and went with a painting to give it a serene look. The couples painting, the center table and the lamp shade were all added to match with the color theme of the room.

Living room
Living Room again
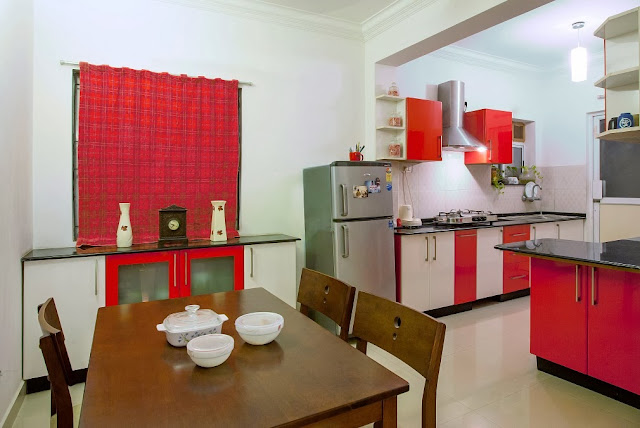
My kitchen is my own space and is the place where I spend maximum time. The decision that took the most time was the selection of colors for the kitchen. And despite all the conventional choices thrown at our face, we went ahead with real bold colors. I have this unusual craze for reds and my friends would relate better to that obsession of mine.  Proud that it even made through the nominee list of Apartment Therapy's small kitchen content.

Red and White Kitchen
Dining and Kitchen Space
Notice how we had the cot and side table customized to match the wardrobe in the room ? This was one time that we decided that buying off the shelf does not make sense all the time.

Bedroom Decor
Bedroom Space
And that’s about what I wanted to show for the moment. Every room has some stamp of our DIY and we take immense pride in showing them off to every visiting guest  I still have to put up the images of the foyer, the balcony and some of my favorite nooks and corners of the home. But then I will save it for part-II and for another day.

Meanwhile, do leave me a comment. Would certainly love to know your feedback.

~ Preethi

"All Photographs by Architectural Photography Chennai."


Finally. It arrived.  The cheque from Google. Something I have been waiting for 20 odd days. And not sure if it is any indication that it reached me exactly on Vijayadasami. While I have never posted anything on Woodooz for monetary benefits, this income does help recover some of the costs that I have incurred in the past. The blog domain for instance. When few opined that it is unnecessary for a hobby, I felt it was important. Now I don’t have to really worry about that investment. While am elated about my first payout, I have to accept that it is not something that I see as way forward. More so because the daily revenue is meager and I doubt if I can ever make a post to influence the earning – A reason why am opening the blog to direct advertising.
Google Adsense Payment
With my Adsense cheque
The whole blogging experience offers something new to learn with every passing day. This is my decision for the moment and here are the top four reasons why I want to venture out of Adsense and explore other means of generating income in the coming days :
  1. While there are experts who understand the system and manipulate (not sure if it is the right word to use) content without breaking any of the rules, it does take lot of reading and experience to completely comprehend the art of Adsense. 
  2. Ad placement, ad types, ad sizes and more impact the chances of a click through and there is always a need to experiment before a firm decision can be taken.
  3. I notice that the Cost Per Click (CPC) for the keywords in the craft / DIY segment is very low. This demands a higher Click Through Rate (CTR) than most other genres where the keywords fetch a fairly high cost per every click. 
  4. It is hard work and not as easy as many may make it sound.  I need higher organic traffic with sizable amount of every day visits. The problem with me is that I am not able to quantify higher and sizable.
I don’t want to discourage anyone. There are way too many successful stories on Adsense up on the net for you to read. I just wanted to impress upon the fact that Adsense is not necessarily easy money. It takes time by which time it is quite possible for one to be consumed by the paltry daily revenue that trickles into the account.

Do share your thoughts. Do you have Adsense installed ? Do you see a promising future in it ? Would love to hear from fellow craft / art / DIY bloggers and in general from others too.


The biggest issue for me while working on a DIY is that I keep wasting time looking for things. I would have no clue where I kept my small screw driver or where the 220 grit sand paper is. The other issue is taking them out of their storage cabinet. If I need something, there is every bit possibility that I might have to dig deep into the cabinet, maybe even pull some things out, before I can find what I want. Considering I was not working on any projects for a long time,  thought will use the time to put an end to all these issues.

Does it partially remind you of your spice rack in the kitchen ? :) I had a spare 12 mm plywood which I hung in a non-intrusive space in the service area. May look clumsy, but trust me, very convenient. The reason for putting this up was twofold:
  1. Clear up space in the service area cabinet and find more functional uses for it
  2. Designate space for every tool and make it easily accessible (for me)
Now I have designated holders and space for:
  • My 3 inch screws (notice the upcycled green Vaseline bottle ?)
  • Smaller screws
  • Headless nails
  • Drill bits
  • Some of my tools
  • And even sand papers
While I have been wanting to do this for a long time, I have to agree that I was inspired by this post of Vinay to get this done really quick. I still have lot of space left on the plywood (as you can see) and will probably spend sometime this week hanging up the rest of the items in my list. Meanwhile, if you can guess what the blue file holder is for, leave me a comment. Leave me a comment otherwise too. :) 


There are two reasons why I have titled this post the way I have :
  • One is because it is simply the easiest center table that you can ever make
  • And secondly, I made my table with no prior knowledge on Woodworking and so I believe anyone can too


For reasons unknown, I never captured the individual steps involved in making the earlier tables. And so, I am going to take advantage of Google Sketchup and the illustrations I made to try to explain the steps in making this simple table. Point to note : This will work wonders if the height of the table is low, and the legs are wide.

Materials and tools required :

  • 19mm Plywood (2 ft x 2 ft) for the table top
  • Padauk Wood (4 inch x 4 inch and 23cm in height). You can get this from either a plywood store or a local timber store.
  • In both the cases above, I gave the specifications to the store owner and had them cut at the store
  • 3 inch screws
  • Electric Drill
  • One Side Teak for covering the table top 
  • Stains / paint as applicable

Step 1 and  2

Just place the plywood top on legs that are placed on each corner. Make sure the legs are properly aligned to be along the edges of the plywood top
Do it yourself coffee table
Place the plywood top on the wide legs below

Step 3 and 4

Drill pilot holes through the plywood top and into each of the legs beneath. Through the already drilled pilot holes, drive the 3 inch screws in. You will need a minimum of 2 screws and can add more if needed. As you can see, I drove those screws along the diagonal edges of the padauk legs.

You can smear Fevicol SR (before you drive the screws) to the surface of the legs and the top where they come in contact with each other.
Pilot holes and driving screws
Just drill pilot holes and drive the long screws in

Step 5 and 6 :

Just allow the glue to dry and your table is ready. Of course, it is not ready in its finished state. You still have to sand, add color and apply a top coat. You can also install rubber bushes to the bottom of the legs to make pulling around noise free.
Center table - Coffee table
Install rubber bushes if required
Do remember that this simple technique works as long as the table height is low and legs are wide. Longer and slender legs would mean there would be instability because of wobbling. Of course, this can be overcome by using joints and additional horizontal support between the legs, but then, it would not be the easiest table to make, right?

To finish, here’s what I did (You can click on the links for more details).
I covered the top with One Side Teak, completely sanded all the surfaces (top and the legs) and finally stained it.
So, agree or not agree?  Does that look like the simplest table? Share your thoughts.
Linking in : Colours Dekor


Over the last few months, we have been looking at the various preparatory steps involved in applying stain to wood. Today, we come to the conclusion of this series as we look at how to apply stain. While I have been mentioning this in most of my earlier posts, I would like to reiterate that stains help augment the grain patterns and give them a more enhanced look. If you landed here directly, do consider checking all the other posts in the staining series.
Complete guide to wood staining
Applying wood stain technique
How to apply stain
The application of stain is much like how we applied sealant in the last tutorial. The following are the materials required :
  • A bottle of stain (Asian paints / MRF / Wudfin / Sheenlac )
  • Gada Cloth
  • Thinner (If you need the color to be lighter)

Application procedure

  • Pour the stain into a bowl
  • Mix thinner only if you want the shade to be lighter
  • Dip the gada cloth in the bowl of stain
  • Dab it to squeeze the excess stain
  • Apply the stain along the grains covering a small area
  • Allow a minute or two for the stain to be absorbed by the wooden surface
  • Before the stain is dry, wipe of the excess stain off the surface (using a dry piece of gada cloth)
Applying wood stain - How to
How to apply wood stain
  • Repeat the procedure until you have covered the entire surface area of the wood
  • Give it about 30 minutes drying time before you apply the subsequent coats
  • Apply multiple coats as desired
  • Remember to apply varnish or other top coats for long term durability
And that is about it. Just one thing though. Much like any other activity, achieving perfection in staining takes lot of patience and practice. You may probably not get it the first time. But it is not rocket science and with little repeat effort, you will be happy with what you can do to your small furniture and other craft projects.

Follow these steps and let me know how you fared in staining. If you think I missed something or something can be done in a better way, leave me your comments.
Linking in : Colours Dekor


Before looking at how to use the sanding sealer, do understand three important things :
Complete guide to wood staining

Materials required 

  • Sanding sealer
  • NC Thinner
  • Gada Cloth (for applying the sealer)
  • Sand paper (220 grit)
All the above materials are easily available in the local hardware store.

Sealing wood
Materials required - Sealing Wood

Procedure

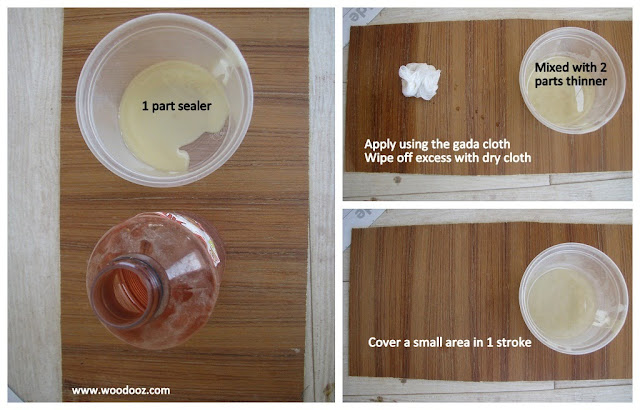
  • Pour 1 part of sanding sealer in a bowl
  • Mix 2 parts of NC thinner to the sealer
  • Stir thoroughly to ensure the mix is consistent
  • Dab the gada cloth in the mix and apply it on the surface of the wood
  • Cover a small area in one stroke
  • Before the layer dries, wipe off the excess sealer using a dry cloth
  • Using the same method, apply the sealer across the entire surface area of the wood
  • Allow it about 1-2 hours of drying
  • Lightly sand the dried surface of the wood (Remember ? It is a sanding sealer)
  • Apply two to three coats of the sealer to achieve a really smooth surface. Remember to sand in between coats.
How to seal wood
How to seal wood
This sets the surface ready for the stain to be applied. The application of stain on the surface of the wood is very similar to that of how the sealer is applied. Will very soon post the stain application procedure. Meanwhile, do leave us a feedback in the comments section. If you think, staining can be done in a different and easier way, feel free to leave me a comment.


As we step into the fourth year of Woodooz tomorrow, we wanted to look back at our most favorite project ever. This center table - The first thing we ever made. Still remember how when we started, we had absolutely no clue how to go about it. The internet had loads of information, the plywood store guys were not so helpful and we had no expertise whatsoever to even think that we could pull it off.


It has been an enriching ride here in Woodooz with learning opportunities coming our way every other day. It is this table that made us ask the question, "Can we make it ourselves?" every time we wanted something for the home. Three years on, and we still proudly use this table in our living room.. It may have its minor defections, but to know that we built it from scratch has always given us immense pleasure.

The table has seen many a steaming coffee spills and yet has stood the test of time. Many a dinners have happened around it. We have used it for all our Scrabble and Rummy sessions. And to think how many conversations it has started only makes this table a personal favorite of ours. 

Center Table / Coffee Table
While I intend to do a "How to build your coffee table" using Sketchup illustrations (unfortunately, we never thought we would have a need to put up a DIY post ever and so we never took pictures at every step), I will leave you with the details on the materials, tools that I used to get this done. Do remember to leave us a, "Happy Blog Birthday" message and make our day :)

Materials usedTools usedFor the finishMiscellaneous
Deal wood for the legs
Plywood for the table top
One side teak (OST) for the top finish
Rubber bushes
Electric Drill
Drill bit for pilot hole
Drill bit for counter sink
4 inch screws
Glue (Fevicol SR)
L Shaped clamps
Hammer
Headless nails
Screw Drivers
Emery (Sand) Paper (Grade 80, 100, 120)
Thinner
Ramson wood sealant
MRF Wood stain
Clear Gloss Varnish
Sponge
Gada Cloth
Vinyl Gloves

Table Measurement
Height 10.2 inches
Length 3 ft
Breadth 2 ft
Linking in : Colours Dekor


One of the most common questions that I get on mail and on comments is, ”Where do I start if I want to develop interest in carpentry” ? Not that I have gained enough authority on this subject, but since am quite often faced with this question, I decided to write about what worked for me. The objective of this post is not to make a professional woodworker out of you, but to draw your attention towards basic carpentry and the everyday projects that you can build around the house. So here goes - My 17 point recipe for starting a carpentry hobby:
Carpentry as a hobby
Starting a hobby in carpentry / woodworking
  1. Don’t let anyone make you think that DIY woodworking is not for the Indian conditions. It is as much possible here as much as it is elsewhere.
  2. Your first project: Choose one that is easy to make. Completing a DIY project, however small it may be, will encourage you enough to take up the next one. Start with something like a smartphone stand or a photo frame or whatever you want to make. My first project was a center table.
  3. Take a plunge and give your project a jump start. Don’t let something you don’t know slow you down. You will learn as you progress.
  4. Gift yourself a basic electric drill. You must own one.
  5. You don't need to have an entire collection of tools before you start. Buy them as and when you need them. I bought my collection of tools over a period of 3 years.
  6. There is no shame in outsourcing wherever you don’t have the skills or tools. I cut my plywood at the plywood store. I don’t have the space or proficiency to own and use a circular saw at home.
  7. Plan, plan, plan. Put your design in paper before you start the actual execution. Use a design software if necessary. It will save you materials,cost, time and energy.
  8. Keep your design simple and easy to make. Worry not much about joints to start with.
  9. Space can always be a constraint for an apartment dweller. Use whatever little space you have efficiently. A guest room or a balcony can be life savers. Just make sure you clean up once you are done.
  10. Read, read, read. Every bit of information is available on the Internet. Google and Youtube have been my best friends. Buy or borrow a book if necessary.
  11. Join like minded communities or forums. This will help you reach out to professionals who can provide valuable inputs.
  12. Join woodworking classes if your city has one to offer. It will put the foundation in place and help build more confidence.
  13. Practice, practice, practice. Nailing, screwing, gluing, cutting, sanding  – All come with practice.
  14. There is paint or stain, and clear varnish. Don’t confuse yourself with other finishing methods in the beginning. You will naturally transition to the next level with every project.
  15. Enjoy what you do. Carpentry is beyond the hard labor that it seems to be and beautifully functions as a hobby you can pursue with fervor.
  16. Take a break once in a while. This can be addictive and you don’t want it to get on your nerves.
  17. And finally, give utmost importance to safety. If you work in haste, you will repent in leisure.
Do you think you can add some more ingredients to my recipe ? Please let me know in the comments section.
Linking in : Colours Dekor


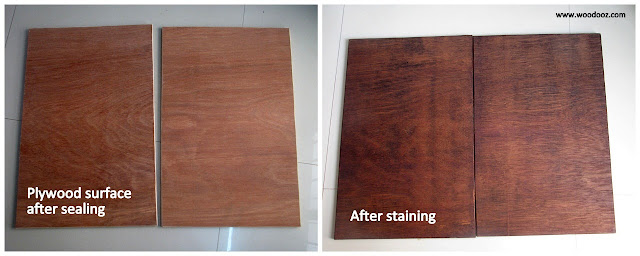
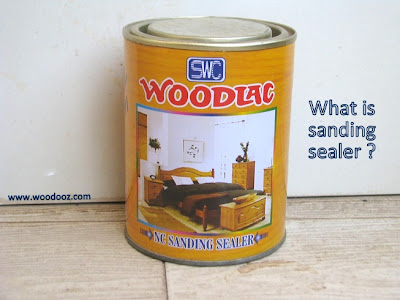
The sanded surface of the wood looks very smooth. But in reality, if you inspect closely, the wooden surface will have minute pores and jagged valleys. Application of stain directly on top of the sanded surface may, and I repeat, may result in uneven absorption of the stain. While the color is taken in well by most portion of the wooden surface, some portions may look patchy because of poor absorption of the applied stain.
Complete guide to wood staining
NC Sanding sealer
Sanding Sealer
Other posts in the staining wood series
1. Introduction to stains
2. Steps in staining wood
3. How to sand wood 
4. Wood sealers explained
5. How to seal wood
6. How to stain wood

Secondly, while sanding results in desired smoothness, it does not necessarily make the surface completely flat, and this you would notice when you run your palm / fingers along the sanded surface.

Sanding sealers help in overcoming the above two issues. Here's what sealers do when applied on a wooden surface:
  1. They fill the pores along the wooden surface and make it smooth to the touch 
  2. The allow for consistent absorption of stain coat preventing patchiness
  3. They also bring out the splendor of the grain pattern when stain is applied
  4. Each layer of sealer can be sanded with fine grit sand paper (hence the name sanding sealer) adding increasing levels of evenness to the surface
There is also an opinion that sealers should actually go on top of the stain and is not an equivalent of pre-stain conditioners. However, in my personal experience, since sealers are used with thinners, I have seen the thinner removing the stained color from off the surface. Most carpenters I have had a word with state that they actually mix the stain and sealer and apply it in one go. I have not tried it and hence not able to comment on it.

For now, we have already seen how sanding is a mandatory surface preparation step in the staining process. The next post is all about sealers and how they can be applied on wooden surface. Have you stained furniture before? Did you have to work with sealers? Leave me a comment and share your experience.
Linking in : Colours Dekor


Do it yourself is fun. The pleasure I derive from finishing a project is immensely fulfilling. The near end of one assignment almost immediately marks the beginning of the next envisioned idea. And there are countless conceived designs that are waiting to be executed. My grouse though is that most of the ideas are still only in their conception phase. I find it extremely hard to maintain the consistency with which I would like to indulge in this hobby.  And that, quite naturally, affects the frequency of posts you see here. While there are many factors, there is one main challenge that I face in being able to sustaining the DIY steadiness.

Time

There is me time, we time, free time. There is work time, travel time. And amid all this I have to squeeze in hobby time. While working on a DIY project is one thing, making a post on it is another thing altogether. My last post on building a shoe rack took 6 hours of my Sunday to make just the illustrations. And the shoe rack itself took close to 12 effective hours spread across multiple days.

The fact that woodworking is an addictive hobby, it is not difficult to understand that you would soon get sucked into it much like any other pastime. Sometimes I am glued on to it for hours together completely oblivious to the passage of time. Spending time compromising on other priorities is quite concerning right?  Though at one point, I would have easily declared “not finding time” as a made-up myth, I am coming to realize that it is an apparent truth and a reality.

It is easier to read and hear about things like, “You have to work around your obstacles if you are really passionate about something”, and other such philosophies. But in reality, it becomes quite impossible to make compromises for just a hobby, even if it means am obsessively passionate about it. Right ?

Do you relate to the situation? How do you handle it? Leave me a comment. Am sure it would make me feel better.

Linking in : Colours Dekor


Yeah, I was equally shocked when I heard this news about closure of Google Reader from end of this month for two reasons :
  1. I follow close to 70+ remarkable crafts / home décor / arts / DIY and related blogs on Google Reader
  2. There is a possibility of losing existing RSS followers of Woodooz who currently are using Google Reader
The purpose of this post is two fold :
  1. Tell our existing subscribers to migrate from Google Reader (if that is what you are using) before it is too late
  2. Tell all the non-subscribers to go ahead and start subscribing to our RSS feed

Here’s two reasons why you should not worry about subscribing to the Woodooz feed :
  1. Our objective is to post 1 post every week. Sometimes, we post two. Most times, we fall short of meeting even this objective. Bottom line :  You will not see a torrent of updates from us everyday.
  2. Woodooz is all about Indian Woodworking, DIY, Arts and Crafts. I reiterate. It is all about only that. We completely avoid digressing, deviating, going off tangent, wandering, and straying (add every other synonym that you can find to this list). Except of course for an occasional post like this. 
If you are new here and not sure what to expect from subscribing, do take a moment to view our gallery to understand what we do here. If you are still not convinced… come on… Just go ahead and subscribe.
Woodooz
And for everyone else, please make sure you migrate your feeds to your new reader. Remember to not miss out on reading all your favorite blogs.  If you are clueless about an alternative to Google Reader, check out Feedly. I had all my feeds migrated to Feedly and am mighty happy with the interface. 

Also, remember to visit our subscription page to know how else you can connect with us.
And just in case you are still wondering... NO ! We are not shutting down. Woodooz is here to stay.


 Linking in : Colours Dekor


Making a shoe rack or a cabinet may seem complex and quite a task for a home DIYer, but you would be surprised to know how easy it is when you break it down to simpler steps. This is a step by step tutorial for making your own cabinet (like the one below) at home with just an electric drill, screws and screw drivers. Before you move further, do take a moment to read about pilot holes and butt joints. For the first time, I am trying to put up a 'how to' series by merely using illustrations. Would love to hear your feedback on this.

Materials Required

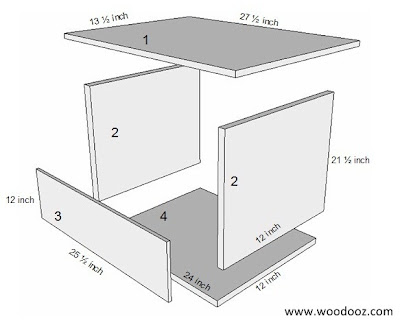
  1. 1 number of 12 mm plywood for the top (27.5 inches x 13.5 inches). This will be the cabinet top
  2. 2 numbers of 12 mm plywood for the sides (21.5 inches x 12 inches)
  3. 1 number of 6 mm plywood for the backing support (25.5 inches x 12 inches)
  4. 1 number of 12 mm plywood for the bottom (24 inches x 12 inches)
  5. Additionally, you would also need 12 mm plywood for the following (Not shown in the image below)
    • The shelf
    • The cabinet doors
  6. Rubber bushes (4 numbers)
  7. Door knobs (2 numbers)
Measurement of materials required
Dimensions for the shoe rack
You can get these materials in your neighborhood plywood store and you can have the plywood cut either at the same store (like I did), or in a timber store for a minimal cost. All you need to do is give them the dimensions. Of course, you can have it cut yourself if you have the necessary tools.

Tools and supplies required

  1. An electric drill
  2. Screw driver set
  3. Some star head screws (2 inches)
  4. Fevicol SH or an equivalent wood adhesive

Make the basic structure

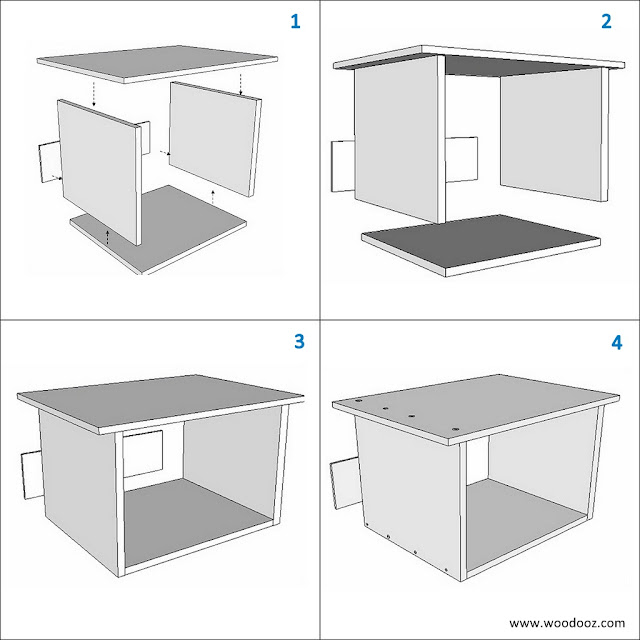
  1. The idea is to make the basic structure or the shell of the cabinet using simple butt joints. The top plywood plank is placed on the side vertical planks which are further joined together in the bottom (Check image below)
  2. Place the top on the vertical side planks. The dimensions are such that there is a space of 1 inch on all sides of the top planks.
  3. Similarly place the bottom plank between the two sides and fix the three together.
  4. Secure the planks together using 2 inch screws (indicated by dots) as shown in the image below. For additional reinforcement, you can use adhesive. To make it easier for driving the screws in, drill a pilot hole extending from one surface to the other surface.
Shoe rack DIY
Shoe Rack Do it Yourself

Fix the shelf and the doors

  1. When cabinet is made with butt joints, there is every bit chance that it would be weak and would wobble if considerable weight is applied. To overcome this issue, the backing support in the rear is mandatory. It is your personal choice and you can decide to cover the entire rear with the backing support.
  2. Install the shelf. You either drive screws into the shelf through the sides or you can also use shelf brackets. The advantage with shelf brackets is that you can remove the shelf to make more space when desired or you can adjust the placement of the shelf at any height you need at any point in time.
  3. Installation of the cabinet door is beyond the scope of this post. 
  4. However, you can learn the trick from this detailed post on installing a cabinet door.
A do it yourself shoerack
Make your own shoe rack
Attach rubber bushes to the bottom of your shoe rack to ensure that the rack is not placed directly on the floor. You can also have a simple knob installed. Whether you want to have a single door or a double door is up to you. But any length of the cabinet beyond 1 feet 9 inches, a double door would be preferable.
Shoe Rack illustration
DIY Shoe Rack
Of course, you will have to suitably finish it using stains or paint. Hope you find this useful. If you find information lacking, or need more inputs on this one, feel free to shoot a mail to contact@woodooz.com. Do leave your comments and let me know what you think of this DIY.
Linking in : Colours Dekor


I cannot even sit down to explain how frenzied life has been over the last month and a half. Being away from home and working long hours without weekend breaks has been demanding on both of us. Indulging in DIY was the last thing on our minds. A mini vacation is all we needed to de-stress, re-energize and pick ourselves up.
Nature photography
Much needed vacation to Thekaddy
The short retreat to Thekaddy was quite a welcome escape from all things that have been keeping us occupied and pre-occupied. It is always good to slow down, loosen up and relax and that is all we did. I learned a trick or two from Preethi in using her camera and I went click click click. Maybe I should learn photography properly to up the quality of pictures that we post here in the blog.

Well, sadly, we are back now and back to the usual rigmarole.  Still not sure how much time I would be able to spend on Woodooz for a short while now. You will see the frequency of posts coming down in the next two months, but only to pick up the lost momentum from thereafter.

For now, giving the customary DIY how-to posts a break and leaving you with pictures from our trip. Please do remember to not give up on us when you don't see a post for a long time.

Linking in : Colours Dekor


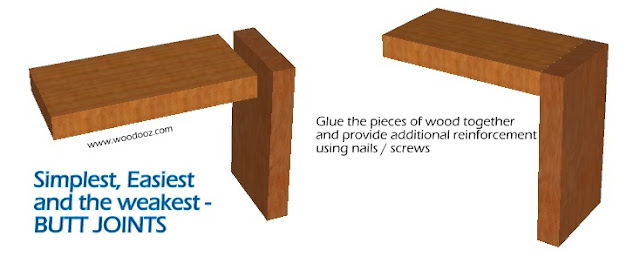
Wood joinery is an important aspect of Woodworking as it is critical to how strong and durable your project will be. Joinery involves putting two pieces of wood together. While there are many joinery techniques available, for a hobbyist who is beginning to learn the nuances of carpentry, butt joint will be the easiest and safest bet.  Two reasons why I say this :
  • No additional skill is required to join wood using this technique
  • No special tool is required
While appropriate joining methods need to be adhered to when making complex furniture at a professional level, butt joint would suffice for your everyday small DIY projects. 
Wood joinery
Butt Joints - Ideal for the beginner carpenter
When two pieces of wood are merely joined or butted together at right angles to each other, it is called a butt joint.  Since it involves fixing two surfaces using adhesive as the only joining medium, the strength of the joint is solely dependent on the glue potency, and hence is naturally weak. 

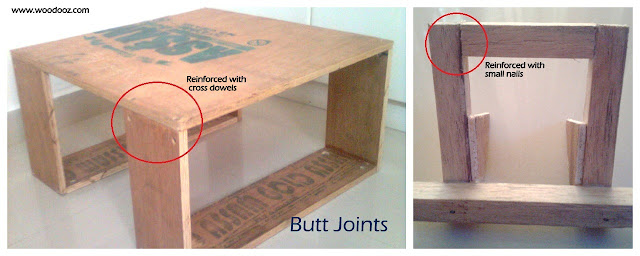
There are many ways to strengthen the joint and complement the effect of the glue. I use screws (which run deep into the surfaces that are being joined) to provide additional reinforcement for all my butt-jointed  projects. Whether it is the center table, or a clock frame or a lampshade frame, it is butt joints that I have used all the way.
Wood joining technique
Butt joints in my DIY projects
As you grow comfortable with butt joints, it is important to experiment with complex ones that are appropriate for the project that you are working on. Needless to say, butt joints are simple and hence ideal for anyone who is starting to pick up interest in carpentry.

Besides butt joint, I have also used mitre joint in one of my DIY projects. Can you guess which one ? Meanwhile, do leave your comment and let me know your thoughts on this post.
Linking in : Colours Dekor

Know more about us

About Us
Reviews
Media
Our showroom location
Return and refund policy
Review us on Google

Connect with us


Mail us
Subscribe to our newsletter

Our Address :
Woodooz Home Decors,
3/371, First floor,
Metukuppam, Thoraipakkam,
Old Mahabalipuram Road (OMR),
Chennai - 600097.
Ph : +91 9884070470
Email : contact@woodooz.com
Created By SoraTemplates & MyBloggerThemes