Making a shoe rack or a cabinet may seem complex and quite a task for a home DIYer, but you would be surprised to know how easy it is when you break it down to simpler steps. This is a step by step tutorial for making your own cabinet (like the one below) at home with just an electric drill, screws and screw drivers. Before you move further, do take a moment to read about pilot holes and butt joints. For the first time, I am trying to put up a 'how to' series by merely using illustrations. Would love to hear your feedback on this.
Materials Required
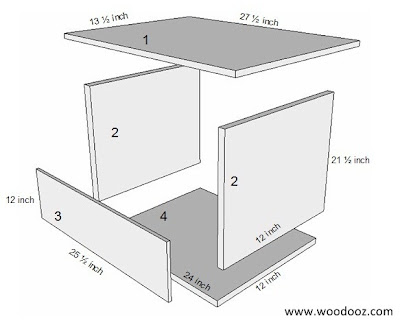
- 1 number of 12 mm plywood for the top (27.5 inches x 13.5 inches). This will be the cabinet top
- 2 numbers of 12 mm plywood for the sides (21.5 inches x 12 inches)
- 1 number of 6 mm plywood for the backing support (25.5 inches x 12 inches)
- 1 number of 12 mm plywood for the bottom (24 inches x 12 inches)
- Additionally, you would also need 12 mm plywood for the following (Not shown in the image below)
- The shelf
- The cabinet doors
- Rubber bushes (4 numbers)
- Door knobs (2 numbers)
 |
| Dimensions for the shoe rack |
You can get these materials in your neighborhood plywood store and you can have the plywood cut either at the same store (like I did), or in a timber store for a minimal cost. All you need to do is give them the dimensions. Of course, you can have it cut yourself if you have the necessary tools.
Tools and supplies required
- An electric drill
- Screw driver set
- Some star head screws (2 inches)
- Fevicol SH or an equivalent wood adhesive
Make the basic structure
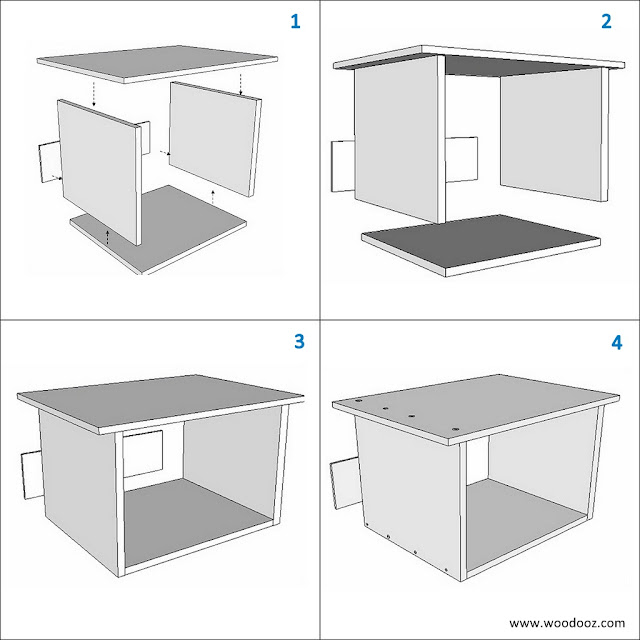
- The idea is to make the basic structure or the shell of the cabinet using simple butt joints. The top plywood plank is placed on the side vertical planks which are further joined together in the bottom (Check image below)
- Place the top on the vertical side planks. The dimensions are such that there is a space of 1 inch on all sides of the top planks.
- Similarly place the bottom plank between the two sides and fix the three together.
- Secure the planks together using 2 inch screws (indicated by dots) as shown in the image below. For additional reinforcement, you can use adhesive. To make it easier for driving the screws in, drill a pilot hole extending from one surface to the other surface.
 |
| Shoe Rack Do it Yourself |
Fix the shelf and the doors
- When cabinet is made with butt joints, there is every bit chance that it would be weak and would wobble if considerable weight is applied. To overcome this issue, the backing support in the rear is mandatory. It is your personal choice and you can decide to cover the entire rear with the backing support.
- Install the shelf. You either drive screws into the shelf through the sides or you can also use shelf brackets. The advantage with shelf brackets is that you can remove the shelf to make more space when desired or you can adjust the placement of the shelf at any height you need at any point in time.
- Installation of the cabinet door is beyond the scope of this post.
- However, you can learn the trick from this detailed post on installing a cabinet door.
 |
| Make your own shoe rack |
 |
| DIY Shoe Rack |
Linking in : Colours Dekor


That is such a useful and easy to make wood craft!
ReplyDeleteGreat crafts site indeed.
people's interest at clothing ALONG WITH shoes depends via one consumer to another since this can be a subjective matter. But, It does not mean The item men's shoes Should not possibly be attractive or even men are generally not interested inside wearing nice shoes.
ReplyDeleteOnly when I was in need of having a new shoe rack made, I found this amazingly helpful info! I have been asking legitimate paper writing services to help me out but they have not been much of a help! This info here, though, is amazing and I would definitely like to make a shoe rack from my own now!
ReplyDeleteLeaving nothing to chance the owners of prestigious executive houses often bring in experts that can deliver the custom cabinets Dallas homeowners are looking for in their kitchen, bathroom, study and bedroom.www.contractorstoday.com
ReplyDeletehttps://snipsandthreads.blogspot.com/2014/02/yogurt-cup-challenge.html?showComment=1557211852046#c776291043844147621 sims 4 cheats
ReplyDelete