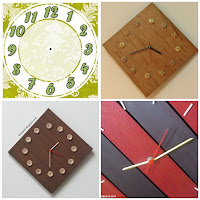
Category : How tos


Before looking at how to use the sanding sealer, do understand three important things :
Complete guide to wood staining

Materials required 

  • Sanding sealer
  • NC Thinner
  • Gada Cloth (for applying the sealer)
  • Sand paper (220 grit)
All the above materials are easily available in the local hardware store.

Sealing wood
Materials required - Sealing Wood

Procedure

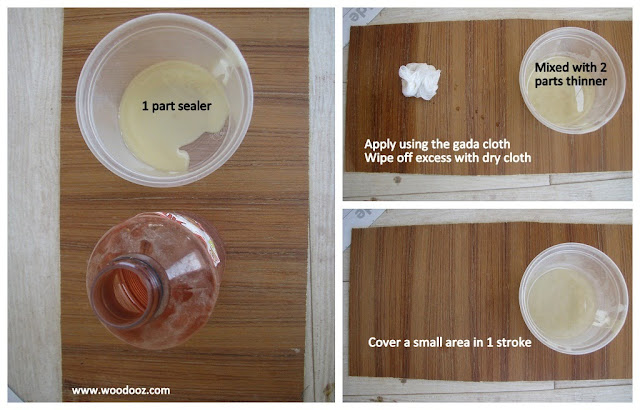
  • Pour 1 part of sanding sealer in a bowl
  • Mix 2 parts of NC thinner to the sealer
  • Stir thoroughly to ensure the mix is consistent
  • Dab the gada cloth in the mix and apply it on the surface of the wood
  • Cover a small area in one stroke
  • Before the layer dries, wipe off the excess sealer using a dry cloth
  • Using the same method, apply the sealer across the entire surface area of the wood
  • Allow it about 1-2 hours of drying
  • Lightly sand the dried surface of the wood (Remember ? It is a sanding sealer)
  • Apply two to three coats of the sealer to achieve a really smooth surface. Remember to sand in between coats.
How to seal wood
How to seal wood
This sets the surface ready for the stain to be applied. The application of stain on the surface of the wood is very similar to that of how the sealer is applied. Will very soon post the stain application procedure. Meanwhile, do leave us a feedback in the comments section. If you think, staining can be done in a different and easier way, feel free to leave me a comment.


One of the most common questions that I get on mail and on comments is, ”Where do I start if I want to develop interest in carpentry” ? Not that I have gained enough authority on this subject, but since am quite often faced with this question, I decided to write about what worked for me. The objective of this post is not to make a professional woodworker out of you, but to draw your attention towards basic carpentry and the everyday projects that you can build around the house. So here goes - My 17 point recipe for starting a carpentry hobby:
Carpentry as a hobby
Starting a hobby in carpentry / woodworking
  1. Don’t let anyone make you think that DIY woodworking is not for the Indian conditions. It is as much possible here as much as it is elsewhere.
  2. Your first project: Choose one that is easy to make. Completing a DIY project, however small it may be, will encourage you enough to take up the next one. Start with something like a smartphone stand or a photo frame or whatever you want to make. My first project was a center table.
  3. Take a plunge and give your project a jump start. Don’t let something you don’t know slow you down. You will learn as you progress.
  4. Gift yourself a basic electric drill. You must own one.
  5. You don't need to have an entire collection of tools before you start. Buy them as and when you need them. I bought my collection of tools over a period of 3 years.
  6. There is no shame in outsourcing wherever you don’t have the skills or tools. I cut my plywood at the plywood store. I don’t have the space or proficiency to own and use a circular saw at home.
  7. Plan, plan, plan. Put your design in paper before you start the actual execution. Use a design software if necessary. It will save you materials,cost, time and energy.
  8. Keep your design simple and easy to make. Worry not much about joints to start with.
  9. Space can always be a constraint for an apartment dweller. Use whatever little space you have efficiently. A guest room or a balcony can be life savers. Just make sure you clean up once you are done.
  10. Read, read, read. Every bit of information is available on the Internet. Google and Youtube have been my best friends. Buy or borrow a book if necessary.
  11. Join like minded communities or forums. This will help you reach out to professionals who can provide valuable inputs.
  12. Join woodworking classes if your city has one to offer. It will put the foundation in place and help build more confidence.
  13. Practice, practice, practice. Nailing, screwing, gluing, cutting, sanding  – All come with practice.
  14. There is paint or stain, and clear varnish. Don’t confuse yourself with other finishing methods in the beginning. You will naturally transition to the next level with every project.
  15. Enjoy what you do. Carpentry is beyond the hard labor that it seems to be and beautifully functions as a hobby you can pursue with fervor.
  16. Take a break once in a while. This can be addictive and you don’t want it to get on your nerves.
  17. And finally, give utmost importance to safety. If you work in haste, you will repent in leisure.
Do you think you can add some more ingredients to my recipe ? Please let me know in the comments section.
Linking in : Colours Dekor


The sanded surface of the wood looks very smooth. But in reality, if you inspect closely, the wooden surface will have minute pores and jagged valleys. Application of stain directly on top of the sanded surface may, and I repeat, may result in uneven absorption of the stain. While the color is taken in well by most portion of the wooden surface, some portions may look patchy because of poor absorption of the applied stain.
Complete guide to wood staining
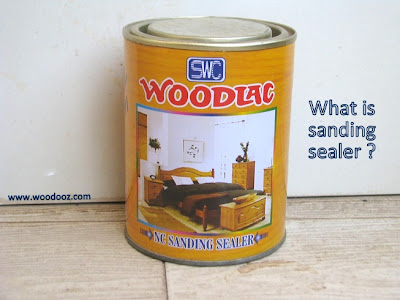
NC Sanding sealer
Sanding Sealer
Other posts in the staining wood series
1. Introduction to stains
2. Steps in staining wood
3. How to sand wood 
4. Wood sealers explained
5. How to seal wood
6. How to stain wood

Secondly, while sanding results in desired smoothness, it does not necessarily make the surface completely flat, and this you would notice when you run your palm / fingers along the sanded surface.

Sanding sealers help in overcoming the above two issues. Here's what sealers do when applied on a wooden surface:
  1. They fill the pores along the wooden surface and make it smooth to the touch 
  2. The allow for consistent absorption of stain coat preventing patchiness
  3. They also bring out the splendor of the grain pattern when stain is applied
  4. Each layer of sealer can be sanded with fine grit sand paper (hence the name sanding sealer) adding increasing levels of evenness to the surface
There is also an opinion that sealers should actually go on top of the stain and is not an equivalent of pre-stain conditioners. However, in my personal experience, since sealers are used with thinners, I have seen the thinner removing the stained color from off the surface. Most carpenters I have had a word with state that they actually mix the stain and sealer and apply it in one go. I have not tried it and hence not able to comment on it.

For now, we have already seen how sanding is a mandatory surface preparation step in the staining process. The next post is all about sealers and how they can be applied on wooden surface. Have you stained furniture before? Did you have to work with sealers? Leave me a comment and share your experience.
Linking in : Colours Dekor


Making a shoe rack or a cabinet may seem complex and quite a task for a home DIYer, but you would be surprised to know how easy it is when you break it down to simpler steps. This is a step by step tutorial for making your own cabinet (like the one below) at home with just an electric drill, screws and screw drivers. Before you move further, do take a moment to read about pilot holes and butt joints. For the first time, I am trying to put up a 'how to' series by merely using illustrations. Would love to hear your feedback on this.

Materials Required

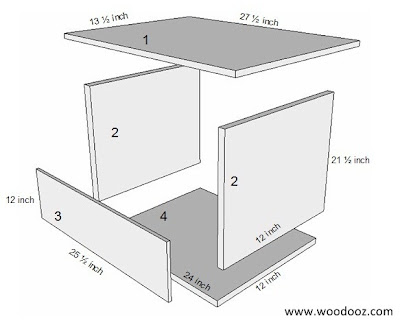
  1. 1 number of 12 mm plywood for the top (27.5 inches x 13.5 inches). This will be the cabinet top
  2. 2 numbers of 12 mm plywood for the sides (21.5 inches x 12 inches)
  3. 1 number of 6 mm plywood for the backing support (25.5 inches x 12 inches)
  4. 1 number of 12 mm plywood for the bottom (24 inches x 12 inches)
  5. Additionally, you would also need 12 mm plywood for the following (Not shown in the image below)
    • The shelf
    • The cabinet doors
  6. Rubber bushes (4 numbers)
  7. Door knobs (2 numbers)
Measurement of materials required
Dimensions for the shoe rack
You can get these materials in your neighborhood plywood store and you can have the plywood cut either at the same store (like I did), or in a timber store for a minimal cost. All you need to do is give them the dimensions. Of course, you can have it cut yourself if you have the necessary tools.

Tools and supplies required

  1. An electric drill
  2. Screw driver set
  3. Some star head screws (2 inches)
  4. Fevicol SH or an equivalent wood adhesive

Make the basic structure

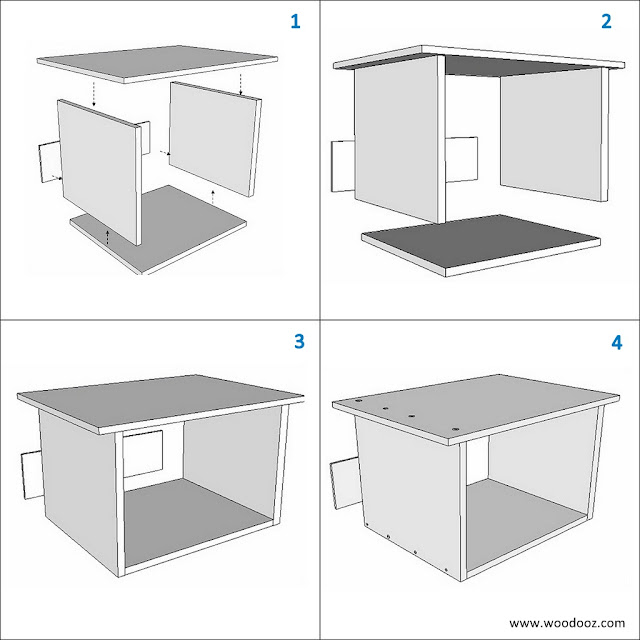
  1. The idea is to make the basic structure or the shell of the cabinet using simple butt joints. The top plywood plank is placed on the side vertical planks which are further joined together in the bottom (Check image below)
  2. Place the top on the vertical side planks. The dimensions are such that there is a space of 1 inch on all sides of the top planks.
  3. Similarly place the bottom plank between the two sides and fix the three together.
  4. Secure the planks together using 2 inch screws (indicated by dots) as shown in the image below. For additional reinforcement, you can use adhesive. To make it easier for driving the screws in, drill a pilot hole extending from one surface to the other surface.
Shoe rack DIY
Shoe Rack Do it Yourself

Fix the shelf and the doors

  1. When cabinet is made with butt joints, there is every bit chance that it would be weak and would wobble if considerable weight is applied. To overcome this issue, the backing support in the rear is mandatory. It is your personal choice and you can decide to cover the entire rear with the backing support.
  2. Install the shelf. You either drive screws into the shelf through the sides or you can also use shelf brackets. The advantage with shelf brackets is that you can remove the shelf to make more space when desired or you can adjust the placement of the shelf at any height you need at any point in time.
  3. Installation of the cabinet door is beyond the scope of this post. 
  4. However, you can learn the trick from this detailed post on installing a cabinet door.
A do it yourself shoerack
Make your own shoe rack
Attach rubber bushes to the bottom of your shoe rack to ensure that the rack is not placed directly on the floor. You can also have a simple knob installed. Whether you want to have a single door or a double door is up to you. But any length of the cabinet beyond 1 feet 9 inches, a double door would be preferable.
Shoe Rack illustration
DIY Shoe Rack
Of course, you will have to suitably finish it using stains or paint. Hope you find this useful. If you find information lacking, or need more inputs on this one, feel free to shoot a mail to contact@woodooz.com. Do leave your comments and let me know what you think of this DIY.
Linking in : Colours Dekor


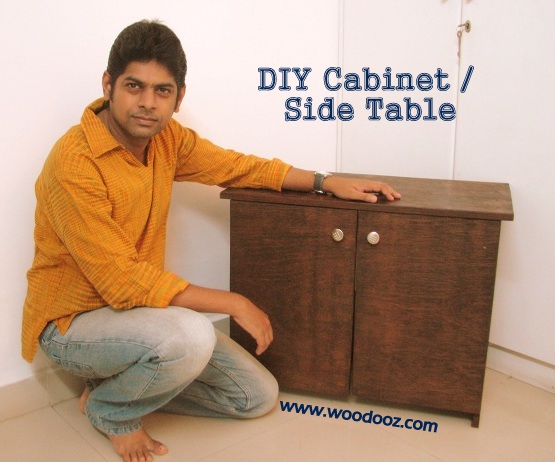
This DIY project started off as a requirement for an inverter battery case. The need was to make something that will blend in with the rest of the living room furniture and so we decided to do a side table / cabinet that will hide the out of place battery and the stabilizer. Though I started off with a very simple design  it took me close to 6-7 months to really start putting the effort to build it. Decided to pose with it to give you an idea on the size of this cabinet.
Indian DIY
Do it yourself - Side table 
While I shall come back and put up a detailed post on how this can be effectively built by you too, I was a little impatient and wanted to show off the finished product here. I will leave you, for the moment, with  some work in progress photos.
DIY Cabinet
The making of a DIY Side table / Cabinet
While I have all along been used to working with one side teak, this time around I decided to apply the finish directly on the plywood. This is something I had not done before and so I was a little skeptical. That said, I should accept that the outcome was quite satisfactory. If you have been following our "How to stain wood" series in Woodooz, you would understand how the  finish for this cabinet was achieved. 

I used European cup hinges for the cabinet door. The installation procedure for a cabinet door using cup hinges has earlier been documented in this blog. I chose a very simple pair of knobs from the local store for the door. Work is still in progress as I need to apply the final coat of varnish and also install a shelf to hold the stabilizer.
Woodworking DIY
Battery Cabinet
Meanwhile, do let me know how this cabinet has turned out. Do you think I should have done some things differently ? Share your feedback.

- Somu
Linking in : Colours Dekor


Having a really smooth surface is critical to achieving highly attractive finish and sanding helps achieving that.  Sand papers are available in all Indian hardware stores and will cost anywhere between Rs.5 and 10/-.
Complete guide to wood staining

Choose your sand papers

Sand papers are available in different grades. The grade mentioned in the rear of the sand paper refers to the number of sand grit particles per square inch. So, lower the grits, more is the roughness of the sand paper. Ideally, you have to start sanding with a lower grit sand paper and move upwards towards the higher grit papers. In essence, you need to have 4-5 levels of sanding before you can achieve that perfect smooth finish.

I normally use 80, 100, 120, 150 and 220 grit sand papers. Depending on the initial level of smoothness of the surface you need to choose the following :
  • Whether to start with 80, 100 or 120 grit papers and
  • How many levels of sanding is required
Each level of sanding would increase the degree of smoothness and will also reduce the scratches that were a result of the previous sanding level.

How to sand wood
Basics of sanding wood

3 key rules to follow

  • Always sand along the direction of the grains. Never sand across the grain direction.
  • Apply gentle and even pressure as you sand along the surface, Overdoing it might damage the surface.
  • Wipe off the leftover dust particles using a rag cloth after every level of sanding.
  • The not-so-key rule is to use a sanding block if required. It will ease the stress on the arms and will help evenly distribute the pressure.
For staining wood, surface preparation and in turn sanding is one of the most critical activities. Any blemish, or scratch on the surface will be distinctly visible making the whole staining process a failure. While it is a really tedious task, it would make sense for you to go through the inconvenience of sanding rather than to repent as you start staining.

Besides sanding, sealing is the other important surface preparation step which we shall look in the next post. Meanwhile, remember to enter your email address below just so you do not miss the rest of the posts.

Linking in : Colours Dekor


In one of the previous posts, we did look at an introduction to wood stains, the different brands available, cost and the basic application procedures. From this post on, we will look at, in detail, how to approach applying wood stains to your wooden substrate. We will delve into the various materials and supplies required, surface preparation techniques, the actual application procedure of stain and the top coat.
Complete guide to wood staining

For the purpose of demonstration, I will use a spare sheet of One Side Teak. I will use both sides of the sheet to lay bare how stains work and enhance the look of the substrate.
Staining wood tutorial
How to stain wood - A beginner's guide
The following are the topics that I will discuss in detail in the forthcoming posts. Each of these steps is important and critical to the effectiveness of the staining process.
  • Step 1 : Sanding the wooden surface
  • Step 2 : Understanding sealers and why they are required
  • Step 3 : Applying Sealer as a pre-conditioner
  • Step 4 : Applying the wood stain
  • Step 5 : Applying a top coat (Varnish)

Materials / Supplies required

  • Sand papers (Grit 80, 100, 120, 150, 220)
  • Muslin cloth (Ask for Gada Thuni if you are in Chennai) 1 meter
  • Thinner 500ml
  • Sanding Sealer 500 ml
  • Wood stain 100ml
  • Rag Cloth
  • Wood Polish 
The details of the brands, cost etc… , I shall discuss in the individual posts.

Wood staining in India
Materials required for staining wood

Some safety precautions

  • Using a mask is mandatory. Sanding can send in dust particles and staining can send strong fumes through your nostrils.
  • Cover your eyes to protect from the dust irritating your eyes.
  • Use gloves because it is very difficult to remove stain off your fingers.
  • Work in an open, well ventilated space
That said, shall come back and take you through each of these individual steps in the coming days / weeks. Meanwhile, do remember to leave a comment and enter your e-mail address below just so you do not miss the rest of the posts in this series.

- Somu


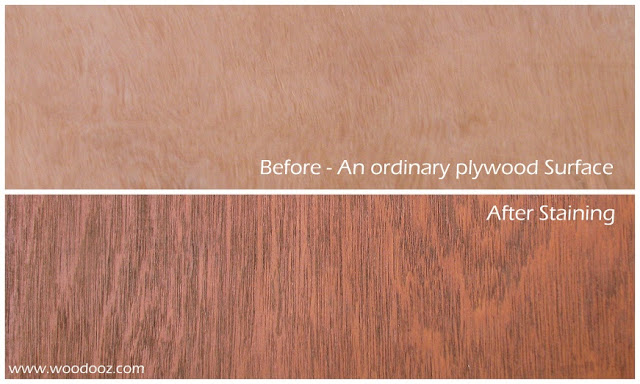
Ever wondered how the dull and boring surface of an ordinary plywood can be made vibrant with colours that enhance the surface patterns ? Enter Wood stains (Click on link for the beginner's guide to using wood stains). Wood stains are finishing media that allow for adding color to a wooden substrate. Staining the wood results in the wooden grains / patterns being enhanced resulting in a finish appealing to the eyes. Now, wood stains is a topic that I have been deliberately avoiding because of my inadequacy in the skill. However, over the last few years, I believe that I have gained enough practice and expertise to discuss it here.
Complete guide to wood staining
Walnut wood stain
Wood stain - Before and After
The surface preparation required and the method of stain application may make the whole staining process look very complicated. The idea behind this post and the subsequent posts (COMING UP) is to detail the process of staining for all to benefit. This will be a series of 5-6 posts explaining the individual steps involved in achieving the desired look using stains.

Wood Stains in India

I don’t claim to be an expert and I am not offering to elaborate on all the different types of stains that are there in the market. This blog is brand agnostic, and so am not endorsing any particular brand either. Following are some of the Wood stains that I have worked and have seen fulfilling results with.
  • Asian Paints
  • Wudfin (by Pidilite)
  • MRF Wood Stains
  • Sheenlac
All these stains come in a 100 ml bottle and will cost anywhere between Rs.33-Rs.40/-.
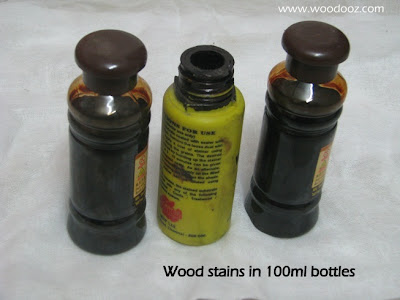
Wood Stains available in India
Different wood stains - 100 ml bottles

Colour options in Wood Stains

Wood stains come in various colors that suits your needs. These are available in most hardware stores that also sell paints. Unfortunately, not all colours may be available at the local store as they stock only fast moving colours. The following is the shade range that I picked from the MRF Paints website. Other brands also have similar colour ranges.

Wood Stain colour options
Wood Stain colour ranges
Image Courtesy : MRF Paints

Stained Wood Finish

As I mentioned earlier, the stained finish will enhance the wooden patterns on the surface and make the grains noticeable more prominently. Unlike in paints, where the surface finish is one uniform opaque layer, stains will make the surface grains visible. Stained finish is certainly my favorite and I have shown few projects below that I did using wood stain.
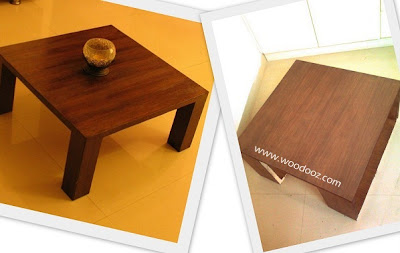
Stain wood finish
Stained wood look

Application procedure

Though I am going to elaborate each of the steps involved in staining wood in individual posts, it makes sense to mention the steps involved in staining wood:
  • Sanding. Stains fill the grains and other dents in the wooden surface giving it a different color. And so this becomes a very important step. Staining requires a very smooth surface
  • Sealing. Sealants prevent uneven distribution of the stain and helps in achieving a uniform color across the surface
  • Staining
  • Varnishing
While there are certainly other types of wood stains, I have only mentioned those that I have worked with. The composition of these stains is beyond the scope of my understanding. That said, I should warn you that working with sealants and stains may result in inhalation of fumes and hence warrants the need to follow safety precautions. 

More later in the subsequent posts. Meanwhile, do leave a comment and let me know if there is anything specific you need me to cover in this series.

- Somu


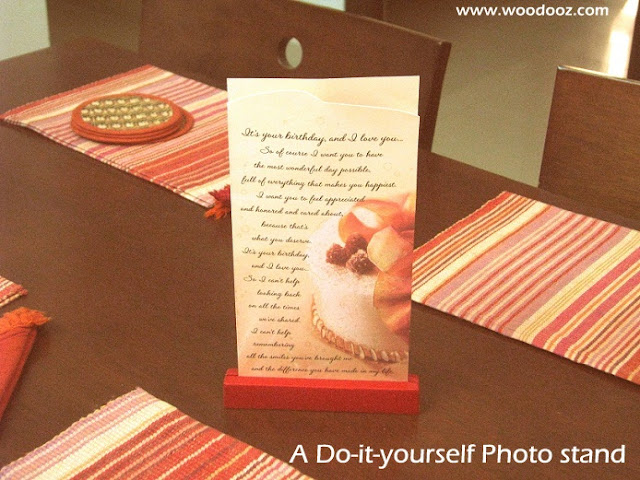
This is a very simple and easy to do photo stand that you can build in a very short span of time. The materials are easily available in the local plywood store and the only tool required is a Rs.5 hacksaw blade. 
The stand is ideal for showcasing photographs and also greeting cards at home. If you are a crafter displaying works in a stall, you can use the stand to hold your brochure or banner.

Interested in making one yourself ? Hop over to Craftsia where we have guest posted the complete step-by-step tutorial. Or continue reading. [Posting it temporarily here as the Craftsia site is temporarily under maintenance at the time of making this addition]
DIY photo display stand
Do it yourself photo stand 
Here is how you can make this one yourself:

Materials and tools used:
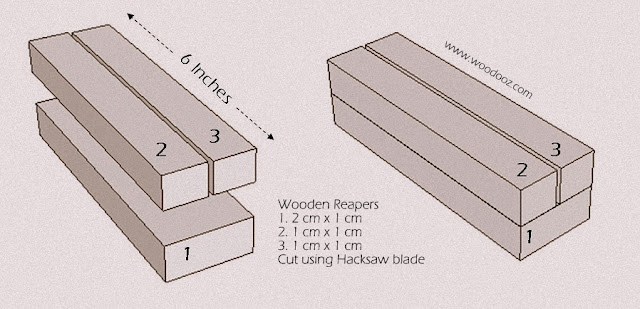
  • Wooden Reapers from "ANY" plywood store. I have used two reapers of different sizes here. One is 1cm (Wide) x 1cm (Thick) while the other is 2cm x 1cm. 
  • A Hacksaw blade available for anywhere between Rs.3-Rs.5 in "ANY" local hardware store
  • A synthetic resin glue (I have used Karenters while Fevicol SH would just work fine) 
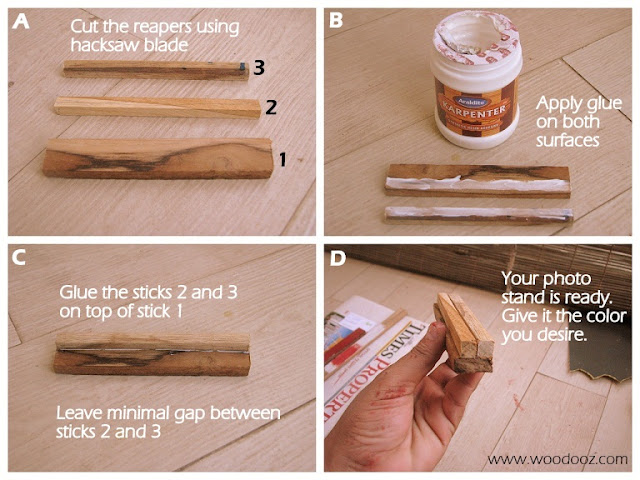
build a photo stand
How to make a photo stand
Step A:
Cut the wooden reapers using the hacksaw blade. This is not a herculean task and if you are used to using a knife in your every day chore, this should be just as easy. The length can be as big as you want it to be. I cut them to a length of about 6 inches.

Step B:
Reaper 1 would be the base while 2 and 3 should be glued on to of the base. Apply glue generously on both the base on the top sticks.

Step C:
Glue stick 2 first and hold it in place for a while until the glue bond strengthens.

Step D:
Glue the reaper 3 next to reaper 2 with a teeny tiny gap (About 2mm) between them. The photo or card will be sliding into this gap. The gap should be small enough to grip the photo and big enough to allow the card to slide through.

Here is a simple diagram that depicts how this photo stand is built.
photo stand do it yourself
Making a photo stand made easy
Once you give the glue enough time to dry, give it color as you desire. As you can see from the first picture above, I have colored one red, while I was too lazy to touch the other one and left it in its natural glory. The below picture also shows you how the photo stand looks without the photo and with some color :)


So, how did you like this DIY ? Do you think it is something that you can try at home ? I would most certainly love to hear your feedback on this one. Know that comments get me going and so leave me one :)

About Craftsia - Handmade with passion
Craftsia - Handmade with passion is a reliable and growing market place for unique and rare Indian Handmade products. You can buy and sell your products through Craftsia conveniently from the comfort of your home.

Linking in : Colours Dekor


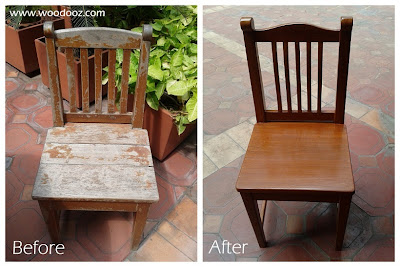
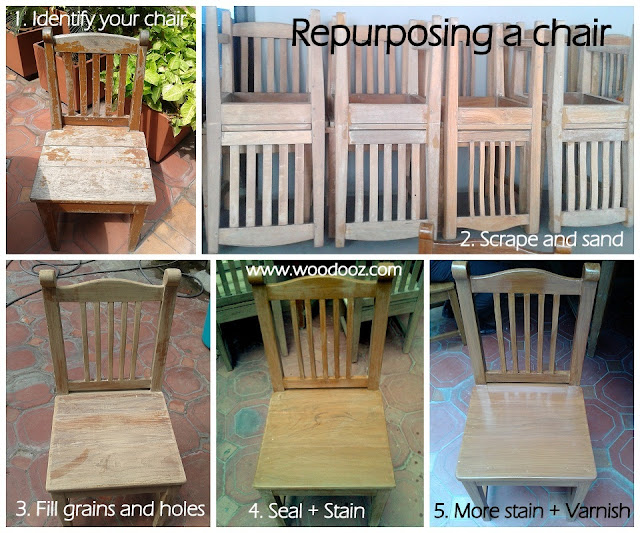
Only recently, I had the good fortune to watch a bunch of carpenters re-purpose a whole lot of chairs and tables. While this is what they had to say when I approached them with a question, they did not complain my being around and taking pictures.  As I mentioned earlier, most carpenters are hesitant about sharing trade secrets, but there is so much we can learn from mere observation.
Learn to repurpose chairs and tables
Re-purposed chair
For now, I shall leave you with pictures in the different stages of re-purposing a chair (Trust me: There may be more than many ways to do it. This is just one of them) . I shall certainly get back into working out detailed tutorials for each of these stages. Of course, you can always decide to choose between Paints and Stains for the look you desire, but all that and more in the coming days.
How to refinish your furniture
Re-finishing furniture
Meanwhile, if you have ever reworked on your home furniture, do share your comments on how you achieved that. It would certainly help me and others who would chance upon this post.

Did you like this post ? Enter your E-mail address and join our growing E-mail list

You may also be interested in


I was at my cousin’s during the weekend trying to help him with 6 dining chairs that had broken. He had bought 4 replacement steel chairs and yet was looking at means to repair the existing chairs.  Fortunately for him, only the joining screw hardware was broken which made it a lot easier to fix the issue. At this juncture, I thought it made sense to write about the hardware that is used to make flat pack ready-to-assemble furniture. Note : Most furniture in India, particularly dining chairs and tables, that are delivered and installed at home free of charge is made of these screws, called CROSS DOWELS

Allen key cross dowels are much like the regular bolt and nut, except that they are designed to look more elegant. The name “Allen key” comes from the fact that it was originally manufactured by Allen Manufacturing company. The cross dowels serve the same function as nails or screws. However, they can be easily removed from / put back into the wooden surfaces making it ideal for knock down furniture.

Cross Dowel
Allen Key Cross Dowel
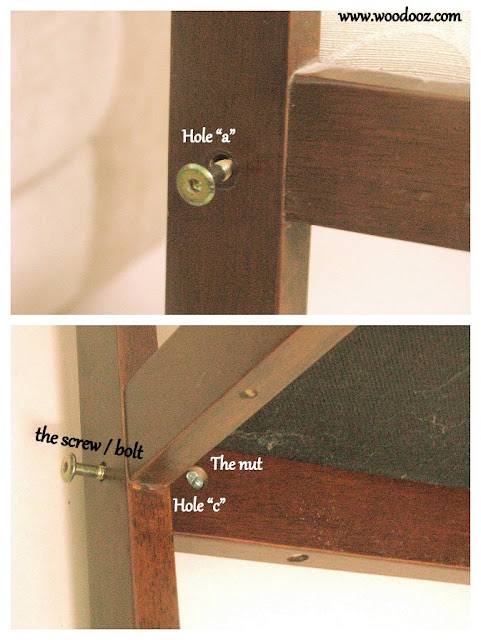
Fixing cross dowels is quite simple and all that it requires is a pilot hole drilled through both the wooden surfaces that are being fixed. This pilot hole will house the screw / bolt. For the nut, another hole is required that is drilled across the surface of one of the wooden substrate. This hole will run perpendicular to and directly across the earlier pilot holes drilled.

Cross dowel installation
How to install cross dowels
As illustrated below, the screw is driven through the pilot holes "a" and "b", while the nut is placed through the hole "c". As the screw is tightened through the nut, it brings the wooden surfaces together and holds them tight and secure. And naturally, unlike screws and nails, it can obviously be seen that the bolt is easier to remove and fix as needed.

Knock down furniture
Cross Dowel Installation
Most furniture that is home delivered and then installed at home is ready to assembly furniture and is built using these cross dowels. Don't believe me ? Just go across to your dining room and check out for the allen key heads.

Ready to assemble chairs
Knock down dining chairs
I know this is kind of a heavily technical post. Nonetheless, thought it is a very useful tip as most households have flat pack furniture and there may be a need in the near future to fix a broken chair. If you did like this post, remember to leave me a comment.


- Somu 
Did you like this post ? Enter your E-mail address and join our growing E-mail list


(Note : I have started a new series on how to make a Golu Padi. I explain the process in three steps. Do check out the 1st post in the series for a better understanding)

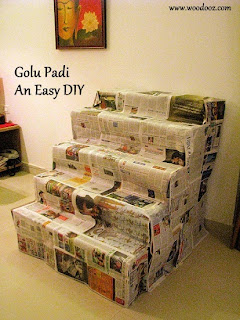
This time of the year, with everyone being busy with arrangements for Navarathri, one of the major task at almost every household is setting up the steps for arranging the dolls. If you have been setting up Golu for years together, am sure you would not have much of an issue with the steps. However, if you are doing it anew (like us) and have no major time at your disposal, here is a 5 step padi that you can build with planks, cardboards and everyday furniture around the house. 

We had leftover planks and card boards and the idea was to not spend time and money on Padi. Last year was the first time we kept Golu in our new home and maybe as we collect more dolls, we will look at a more permanent step arrangement. For now, the make shift one works good for us. Do share your thoughts in the comments section.

Golu  Padi Make it yourself
Make your own Golu Steps
Golu Padi - An Easy DIY
DIY Golu steps / Padi

1. Materials used for the steps

  • Bottom step - Center table
  • Step number 1 - Card board sheets (The ones I used for demo for my Clock DIY video)
  • Step number 2 - 6mm Plywood planks
  • Step number 3 - 19 mm Plywood planks
  • Top most step - OST sheets

2. Mounting the planks 

  • Bottom step - The center table itself formed the bottom most step
  • Step number 1 - Used two cardboard boxes (placed on the center table) on the corners and piles of papers to support the Carb board sheets
  • Step number 2 - Stacked up bricks (on the center table) on which the 6mm plywood planks were placed
  • Step number 3 - Placed dining chairs on opposite ends and supported the 19mm plank on the back rest
  • Top most step - Placed two modas on the dining chairs, added shoe boxes and books for height and for holding the OST sheets
Do it yourself Golu steps
Make your own Golu steps using planks and everyday furniture
The idea here was not to showcase any carpentry skills. The purpose was to build the steps with whatever we already had in ways that anyone can do. I know it doesn't look great on the inside. But it certainly serves the purpose after appropriately covering it up. We have for now covered the setup with news papers and we will soon use the traditional white dhoti on top. Work is still in progress and thought there is no better time than now to post this. 

How do you do your Golu steps ? Already have a knockdown setup ? Plan to get it done for the first time ? Leave us a comment.

Here is two DIY projects on Golu steps that we loved while browsing the net for ideas :


Making a video post has long been in my mind and I was shying away from it for various reasons.  Today, I decided to take the plunge and chose a very simple post just for me to get used to being in front of the camera.
In this video post, I am explaining the making of a sample DIY wall clock along with
  • the clock assembly,
  • the various materials that you can use for the clock face and 
  • how the assembly is fixed to the face.

This is my first attempt and hence looking forward to your feedback on the content and delivery, as it would help me improve the quality of the videos in future. Was it properly paced ? Was it too slow ? Was it too boring ? Was it too monotonous ? Was it too long ? Was it clearly understood ? Those are the kind of feedback am looking at.
Clock assembly and wall clock making
My DIY Wall Clocks
Meanwhile, I hope you find good use for this video post. This post is highly relevant considering we have a "Showcase" post coming up this week on building your own DIY clock at home by one of our readers.

Did you like this post ? Enter your E-mail address and join our growing E-mail list


If you liked this, you may also like

P.S. Did not find time to make a regular post on this topic along with the video. Will do it another time and update it as part of the same post.
Linking in : Colours Dekor


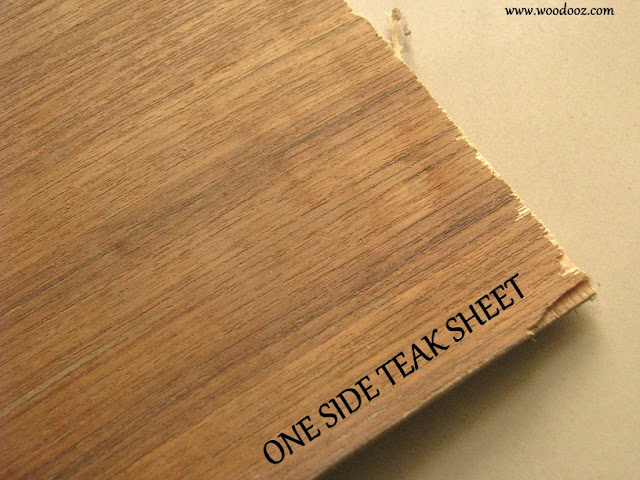
One of the many questions in a hobby woodworker in his beginning stages is if a finish can be directly applied on plywood. Will plywood be able to absorb paint or stain that results in a fulfilling finish? I had the same question when I made my first center table, and I sought the help of my friend who built my modular kitchen. He said, “Use OST on top of the ply”. From that point till now, I have grown really fond of One Side Teak sheets and have used them for many of my projects. Since I get few enquiries on what OST is, it made sense to make a post on it. So, here are some facts on OST:
  • One Side Teaks, naturally, have a teak finish to it, and only on one side
  • The rear of OST is plain and ordinary with random grain patterns
  • OSTs are 4mm in thickness
  • They are available in 8ft x 4 ft dimensions
  • They cost approximately about Rs.25 / Sq ft
  • They are not just ideal for your big furniture projects, but also come in handy for your small craft needs
  • They can be easily cut using Mica cutters
OST (One side teak)
One Side Teak (OST)
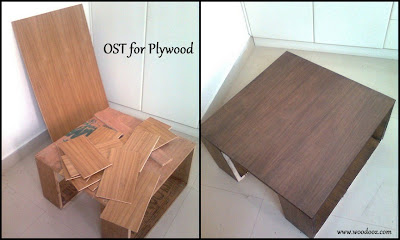
Wood veneers are relatively expensive and Laminates are not easily available (most take only bulk orders) and so OST was my natural choice for all my center tables. That it can be easily cut and glued onto the plywood top made it that much easier for me. The biggest challenge I had was to find a vendor who will be flexible to source OSTs based on my needs and not be hell bent on selling it as the 8ft x 4ft package. 

They can be sanded down for a smoother finish and look beautiful when left in their natural glory too.

Center table with OST finish
OST for my plywood tables
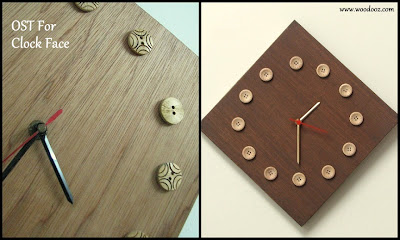
I preferred to use OSTs when I had a need to build a clock for our own use. For a change, I wanted to use the rear of the OST as the clock face for the one I built for use in my home. The random patterns looked enhanced after sanding and it brought out a fresh look. I used the teak side for the other clock I built which I stained to a walnut brown color.

Wall clock template
Wooden wall clock using One side teak
With rubber wood or teak wood or rose wood being slightly on the expensive side and not available in dimensions other than 8ft x 4ft, plywood would remain to be the most preferred raw material until such time the hobby takes off to the next level. That being the case, OST will remain to be a good option to achieve a classy finish on top of the coarse looking ply.

I intend to use it for many of the projects that I make in the future which I certainly shall update here. Until then, I would love to hear from you on your favorite raw material. What is the wooden substrate that you love working with ? How and where do you source it from ? Do share your thoughts as a comment.

- Somu
Did you like this post ? Enter your E-mail address and join our growing E-mail list


If you liked this, you may also like

Know more about us

About Us
Reviews
Media
Our showroom location
Return and refund policy
Review us on Google

Connect with us


Mail us
Subscribe to our newsletter

Our Address :
Woodooz Home Decors,
3/371, First floor,
Metukuppam, Thoraipakkam,
Old Mahabalipuram Road (OMR),
Chennai - 600097.
Ph : +91 9884070470
Email : contact@woodooz.com
Created By SoraTemplates & MyBloggerThemes