Category : Wall clock


I have always worked independently on all my projects. Of course, Preethi lends a helping hand, and that’s that. For once, I had a request from my very friendly neighbor(s) if I could help her with a wall clock. Surprisingly, it was the power of Google and my Wall Clock DIY tutorial that led them to me despite meeting and chatting up on a regular basis for the last 6 odd years. And I happily took up the opportunity.

A little background about Varsha. She is a fine arts student and needed to do this as part of one of her final year projects. To make a painting was the need, and the choice of the base was left to the students. She chose to showcase her painting on a clock. 

Do it yourself wall clocl
Beautiful hand painted DIY Wall Clock - By Varsha Sowmyanarayan
My role was to help her make the clock and so we started the project one Sunday evening. I chose to make it with wooden sticks for the frame and OST for the base much like all my other clock projects. It took us less than about couple of hours to get the clock base done. Most of these two hours were spent in waiting for the glue to dry. Once done, it was all left to Varsha to splash it with her creativity. The clock went with her to her home and so Preethi and I were left to wonder what the outcome was going to be like. We had no clue whatsoever, and so that added to the excitement. We didn’t have to wait for more than a day to see what she had done with the clock.

Wooden sticks and OST
Clock base using OST and wooden sticks

Rear of clock
Wall Clock rear side

These pictures were shared with me later. We only got to see the final product and trust me, we were so excited. My clocks mostly had printed images or wooden stain, and so you can understand the delight to see a wonderful painting.  Part of the excitement was about the options that acrylics on a wooden surface opened up for us. Guess, it was time we also gave up on wood paints and stains for a while.

Primer
Textured acrylic primer 

Outlining and base coat
Base coat and outlining

More detailing
More detailing using permanent marker

That she had the clock mechanism with her saved us much time. The clock hands were so beautiful and went so well with the theme of the painting. The usual black / gold ones that I used for my clocks looked more like a drab now.

Wall clock
DIY Wall Clock
It turned out to be a really beautiful clock. If you guys ever get a chance to cross the Stella Marys premises in Cathedral Road, look for the wall paintings outside the college premises. Varsha and her friends did that. This clock painting is only a tip of the ice berg. You will have to see her sketches, and caricatures, and water colors to truly understand the bundle of talent that she is. If you are a keen follower of art, you are sure to discover that later and from a different source.

Traditional Wall clock DIY
Finished Wall clock - Now fully functional

For now, am working on a lampshade and it is for another neighbor of mine. This is more like a workshop and we do hourly sessions based on mutual time conveniences. It is still work in progress and I will come back to talk about that too soon.


Yeah ! An afternoon well spent making my own DIY Wall Clock. Before I even say anything, I have to mention that the use of the DIY Square is completely free. You can walk in and have a hands-on tools experience with absolutely no sales pressure.

So, what is this DIY Square ? It is an activity center in Bangalore that allows hobbyists to work with power tools and experience the joy of hobby / DIY woodworking. It is an attempt by Bosch to reach out to interested DIYers by providing them with an environment to give wings to their creativity. It also houses a range of power tools and working materials that you can procure.

DIY Square Bangalore
Bosch Brand Store and DIY Square - A place to unwind DIYing
What turned out to be the highlight of my visit was the amount of fun that I had. I was like a kid in a candy store. While I was a little hesitant initially, Mr.Bhaskar at the Square gave me quite the needed push to try the Jigsaw and the power sanders. He along with Eesha ensured they took me through a DIY project in quick fire time. I was using these tools for the first time and I ended up having the confidence to believe I can use them with all ease. 

Interacting with Mr.Bhaskar
Mr. Bhaskar taking us through the tools
I was told that one can walk in to the square to execute his / her own ideas.  Picture wanting to build a small stool or a table or a shelf and also having someone to hand-hold you while you give life to your imagination! It is lovely place for anyone who has been contemplating DIY Woodworking for a long time, and didn’t know how to go about it.

First hand experience of using power tools
Trying to make my own clock and using the Jig Saw
To anyone who asks me how to get into DIY woodworking, I tell them to take a plunge. However, a visit to the DIY Square can be an intermediate step that can make your plunge seamless. You can get your queries clarified from an expert. You can get an idea on the kind of tools you may need. You can even feel, and use the tools (with expert supervision as needed) with no pressure of buying anything. Walk out making your own piece of art and show it off with friends and family.

Wooden Wall Clock
With my Wall Clock - Thanks Eesha and Bhaskar
Even better. You can visit the Square as a group. With friends. And with your family. Quite an appealing proposition right?  Which is why I need one in Chennai too.

Tools on display
Some tools on display on the activity table
It was a fruitful afternoon and a very humbling experience for me. I thought I can tame these tools at the first go. But then I realized practice and more of it is what will lead to mastering the use of any tool. I left with a sense of excitement. Maybe, it is the right kind of propulsion I needed. More projects have been there in mind. And now there is enough motivation to pursue them.

DIY Square
Kayvee Associates
Opp to Bosch Banerghatta Road,
Bangalore
Tel – 080 – 22109036 /65679561
Mon-Sun 10am-6pm DIY Square
Bosch Brand Store & DIY Square
62/2 Sarjapur Road Opposite Salarpuria Sanctity
Bangalore 560035
Tel – 080 – 42177732, Mob: 9886082223
Mon-Sun 11am-8pm
Disclaimer : My visit to DIY Square was sponsored by the event organizers. However, I was not asked or influenced in anyway to write this post. My opinion here is voluntarily written and is completely mine.


When Sumathi wrote me an E-mail, little did I know that we used to live in the same gated community until four months back. This is one instance when the blog proved that the world is indeed a small place. The E-mail had a query on where a clock mechanism can be bought and that is all I answered.

What you see here in this post is completely her work and I am awed by how this project has turned out. I hardly battled my eyelid before I asked her if I could feature her work and she was only too happy to share with you, the details on how this clock was made. Go ahead, read about it in her own words. 

Do check out the video post on how to use the clock assembly on any clock face first and then come back.
Photo Frame wall clock
Wall clock with photo frames
  1. Frame 12 photos of your choice
  2. At the watch shop, ask for Clock hands and movements.  Choose the size of clock hands depending on  Wall clock size that you prefer (i.e diameter of the circle)
  3. Cut chart sheet or thick paper (any color of your choice)  and make a hole  in the center, so the knob of the clock movement goes inside
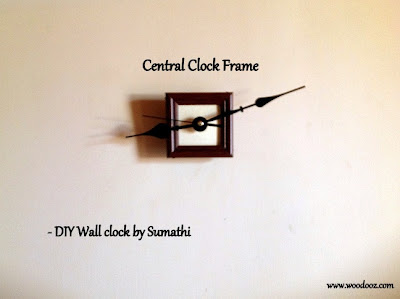
  4. Frame the  chart sheet (See Picture below) along with the clock movement ( Glued at the back side).  Fix hooks to hang on the wall.  The  center  frame (13th frame) is now ready
  5. Decide the diameter of the wall clock  and keep the 13th frame at the center.  Place the remaining pictures in the numerical order and you can try the same on the floor before nailing on the walls. Additionally you can also mark points on the wall for drilling using masking tapes.
  6. After finalizing the diameter, with the  help of the tape, mark the center as well as the ends of the horizontal line (i.e where you will be hanging the Number 3 and Number 9  picture)
  7. Do the same measurement vertically as well and mark the ends (i.e numbers 12 and 6)
  8. Do the same marking / nailing with the appropriate spacing and measurement for the remaining numbers*** ( Do diagonally opposite  marking so that they are in straight line)
  9. You can also try variations in the frame sizes (i.e 12, 3, 6,9 ) being in different shapes compared to other numbers
*** The numbers should be at an angle of 30 degrees from each other. If you do not have a protractor, you can simply take a  print out of this clock template and use it to mark the number points on the wall.

Wall clock with wooden frames
Clock Mechanism framed

Was that not a wonderful way to personalize a clock ? I so loved the way it has been built and I sincerely hope you loved reading Sumathi's DIY tutorial on how she made this clock. Do remember to check out what she did with Wall Decals at Colours Dekor too. Do leave a comment and let her know how much you liked her work.

- Somu

About the DIYer
Sumathi is a mother of 2 lovely boys (fighter-cocks:) who juggles well  between home and work. She is a Software Professional who is passionate about gardening and home decor.  In her spare time she enjoys being productive rather than to spend time on TV Soaps/movies. Currently she has a list of pending DIY projects in mind and is enjoying the process of learning to do things on her own.

Did you like this post ? Enter your E-mail address and join our growing E-mail list


If you liked this, you may also like


Making a video post has long been in my mind and I was shying away from it for various reasons.  Today, I decided to take the plunge and chose a very simple post just for me to get used to being in front of the camera.
In this video post, I am explaining the making of a sample DIY wall clock along with
  • the clock assembly,
  • the various materials that you can use for the clock face and 
  • how the assembly is fixed to the face.

This is my first attempt and hence looking forward to your feedback on the content and delivery, as it would help me improve the quality of the videos in future. Was it properly paced ? Was it too slow ? Was it too boring ? Was it too monotonous ? Was it too long ? Was it clearly understood ? Those are the kind of feedback am looking at.
Clock assembly and wall clock making
My DIY Wall Clocks
Meanwhile, I hope you find good use for this video post. This post is highly relevant considering we have a "Showcase" post coming up this week on building your own DIY clock at home by one of our readers.

Did you like this post ? Enter your E-mail address and join our growing E-mail list


If you liked this, you may also like

P.S. Did not find time to make a regular post on this topic along with the video. Will do it another time and update it as part of the same post.
Linking in : Colours Dekor


The template

I was super excited when a colleague wanted to custom order a clock to be given as a gift to someone special. Red and shaped like a diamond were the only specifications that were given. Ever since, I had been running the design in my mind. I wanted to build something simple, yet elegant and came out with the below template built using reaper sticks.
    Attention : If you came here looking for how to make a wall clock, I recommend that you watch my video post on Clock assembly, Materials to use and how to fix the clock mechanism
Wall clock template
The Clock Template

Clock assembly and the numbers

Once the template or the clock base is built, it becomes easier to assemble the rest of the clock. All my earlier clocks (DIY wooden wall clock 1 and DIY wall clock 2) had wooden buttons for numbers and so this time I wanted to consciously avoid them. After much deliberation, came out with a very simple idea of using something that is easily available around the house. Can you guess what we used for the numbers?

Clock template
The clock waiting to be assembled


Wall clocks and decor

Besides being purposeful, wall clocks are important accent items that can create a dramatic effect to a room. Just like a painting or a wall hanging, a wall clock can give a bare wall an eye-catching appearance. With so many varieties of wall clocks being available, you would only be spoilt for choices making it challenging to choose the right pieces that suit the décor of the room.
Make your own wall clock
Wooden DIY Wall Clock
    Attention : If you came here looking for how to make a wall clock, I recommend that you watch my video post on Clock assembly, Materials to use and how to fix the clock mechanism

Do and DIY

Ever since we started DIY as a hobby, we have tried to not shop for most of the items that we needed inside the house, and that includes wall clocks. With DIY wall clocks, it is easier to live up to the colour needs of the room, matching it with the other accessories. With a design and the required materials in place, it takes less than few hours to more than a day to make a wall clock depending on the intricacy of the design.
DIY Wall clock
DIY clock face template
    To know that there wouldn’t be a similar piece anywhere in the world sure gives a certain kick.

Variety and Exclusivity

DIY wall clocks can have a face made of wood, Plaster of Paris, Paper Mache, or even a decoupaged design. Wooden buttons, beads, wood scraps, screws and many more can serve as the numbers. The colour of the clock is what you decide it to be, the face can take any shape and these factors only provide for boundless creative options when it comes to making your own clock. To me, what is appealing is the exclusivity that is an outcome of any DIY. To know that there wouldn’t be a similar piece anywhere in the world sure gives a certain kick.

Your opinion matters

What do you think of the vivid effect created by the wooden buttons and the gold dials against the darker backdrop of this DIY wall clock? We love it. Do you too? Leave a comment and let us know what you think!

P.S. Linking in : Colours Dekor, Artsy Craftsy @ mindful meanderings


If you liked this wall clock and think someone you know might appreciate it, please do share this post. 


- Somu


DIY Wall Clock kits not being so commonly available here in Chennai makes such projects very exciting.
clock face template
Wall Clock Template

Make your own wall clock
DIY Wall Clock
Making this wall clock template was so much exciting as I went from one design to the other before finalizing on this green clock. Creating  DIY clock face templates is fun and it sure warrants a separate post.

This template was created using MS PowerPoint tool. I used the donut shape from the “Basic Shapes” in ppt onto which we placed the numbers (big fonts), each with a 30 degree angle between each other. I picked the background from internet (due credit to source is pending), and made the inner circle semi-transparent for the added effect.

This clock face was then printed onto an A2 poster paper and then neatly cut along the clock borders. The printed template was glued onto a 4mm think One Side Teak (OST) sheet (You can instead use 6mm plywood).  The OST was then given a border using 1cm x 1cm wooden sticks. The clock was inserted from the rear through a hole drilled in the centre of the OST sheet.

So, what do you think ? Do you like this clock ? Feel free to download and use the template. If you did like it, you may also be interested in this clock template built using OST and buttons and also this wooden clock that was eventually stained dark. 

DIY Wall Clock kits not being so commonly available here in Chennai makes such projects very exciting.  Just love the way it has turned out. We would be delivering the clock tomorrow and so are quite excited to know the reaction. :)

If you liked this clock, you may also be interested in our other clock projects:
DIY Wooden Wall Clock with template
Wall decor using Wooden Wall clock
- Somu


The need for a wall clock, finally fulfilled.  Decided to create it completely with wood and so chose my favorite raw material – the one side teak (OST) sheet for the clock face. Interestingly, we used the rear of the sheet which seemed to have a more natural wood feel to it with accentuated grains. The clock mechanism was bought at a nearby clock repair shop.
Wall clock template DIY
Wooden Wall Clock Template

Free Wall clock face template
Wall Clock Template
For the numbers, we used wooden buttons available at fancy stores (RS Fancy stores, LB Road, Adayar). The button placement was quite a challenge though, since we didn’t have a protractor. We printed out a clock face template from the internet and traced the 30 degree angles onto the OST.

The clock face was sanded with 80, 100,120,150,220 grit sand papers in that order for the smooth surface finish.  It was then sealed with wood sealer which highlighted the grains further. Used a flat wood bit to drill right in the center through which the clock mechanism was finally fixed.

So here it is - A simple wall clock that serves its purpose.

P.S. For all those interested in making a clock, here's a simple clock template. If you think using a protractor might be just a little painful, you can simply print out the template and trace the 30 deg angles on your clock face

If you liked this clock, you may also be interested in our other clock projects:
DIY Green Wall Clock
Wall decor using wooden wall clock

Linked to todayscreativeblog,Homemaker on a dime, lines across my face, Artsy Craftsy @ Mindful meanderings
- Somu

Know more about us

About Us
Reviews
Media
Our showroom location
Return and refund policy
Review us on Google

Connect with us


Mail us
Subscribe to our newsletter

Our Address :
Woodooz Home Decors,
3/371, First floor,
Metukuppam, Thoraipakkam,
Old Mahabalipuram Road (OMR),
Chennai - 600097.
Ph : +91 9884070470
Email : contact@woodooz.com
Created By SoraTemplates & MyBloggerThemes