Update : Join our DIY Woodworking group in Facebook. Discuss. Share. Take help. Raise queries. Some interesting discussions are happening at this very moment. JOIN NOW.

Ever since I started working on basic woodworking as a hobby, I have been on the lookout for workshops / classes that I can attend. It makes it easier to understand concepts from industry experts who are willing to part with their knowledge, than struggling to get answers from non-receptive carpenters or hardware store vendors. 

In Chennai, unfortunately, I was not able to find any such workshops. But Bangalore folks seem to be the lucky lot. I reached out to Hamsavardhan to know more about his woodworking workshop. Here’s what he had to say:
Carpentry class in India
Woodworking Workshop - Bangalore
Photo Courtesy : Esthete
1. Where is the workshop held ?
Workshop is held at Esthete studio, Tavarekere Road, Near Prestige St. John's Wood Apartments (1km from Forum Mall Koramangala).
2. What is the workshop all about ?
The agenda is to create awareness about wood and working with wood, carpentry, information on various types of wood and wood based products, such as plywood, MDF etc. The workshop will also cover basic tools and joinery techniques. It is an introductory lecture-demo on the science, craft and technology of wood and woodworking, carpentry and furniture making.
3. Who is the workshop for ?
It is a very informative and interactive session for anyone interested in understanding wood products, carpentry and furniture making.
4. How much does the workshop cost ?
This is a free class and is open to all.
5. Do the attendees have to bring anything along with them ?
A notebook to jot down points. Otherwise nothing.
6. When is the workshop normally held ?
The workshop is held on last Sundays of all months. You can “LIKE”  the Esthete Facebook page to get information on all upcoming events.
7. Contact information for any further details ?
Feel free to reach out to Hamsa Vardhan at +91 99020 59328.
The next workshop is on the 27th of Jan, 2013 between 1000 hrs and 1300 hrs. I hope Bangaloreans interested in understanding the nuances of woodworking would make good use of the opportunity. I am thinking of planning my next Bangalore trip with the workshop in mind.

Hope you found this post useful. I shall most certainly track other workshops around the country and provide details here for all to benefit from. Do leave a comment and let me know your opinion on this post.

- Somu

About Esthete and Hamsavardhan
Esthete is a design based company, specializing in Turnkey Interior Design and Execution, Complete Interior Decoration, Designing and Manufacturing of Customized furniture and accessories, Developing new and exciting designs in various materials, especially wood and suggesting space saving ideas for clients.

Hamsavardhan is Esthete’s Founder and Principal Designer. He started his design career as a furniture and interior designer specializing in children’s rooms, along with his partner, Mubina Vazirali, in the early 90’s. Their first clients were C.Krishniah Chetty Jewllers. Later he worked with Architect Omar Nisar as an architectural assistant. Know more about him in his official website.

Disclaimer
This is not a sponsored post. This blog post was written purely for bringing useful information / content to the readers of this blog. Also note that I have not attended this workshop and hence cannot provide any feedback at this point on the workshop itself.


CRAFTZINERS is a growing community of very highly imaginative and talented people who create art and crafts projects in their homes and communities. Craftziners is one of the most prolific art and craft  site providing a platform for new and upcoming talents and also a resource for how to create new art and crafts.
When Madhavi, the editor of the Craftziners magazine wanted to feature Woodooz and us in the January issue, we were thrilled beyond words can explain. Here are some excerpts from the interview. For the full interview, do check out the magazine. We are on the 10th page.

I was featured on Craftziners Magazine


Tell us more about Woodooz and how it all started ?
Woodooz right now is about everything (well almost) that one can do with simple hand tools. It is also about exploring creative outlets to escape the everyday routine, through arts and crafts. When we moved in to our new home and wanted to buy a center table, our search ended in vain and we did not find the right fit. It was Preethi's brainwave that we build the table ourselves with customized dimensions. We drove straight to a hardware store, bought a cheap electric drill, and it all started from there.
How did you decide on the brand name "woodooz"?
Working extensively with wood, which was our prime medium and with fabric, handmade papers and other media that added vibrancy to our work, we wanted our “brand name” to represent all that. So we derived the name from "Voodoo” that stands for black magic, only Woodooz is about the magic that is an outcome of a spectrum of colors, functionality, and the purposefulness of our work.
  • Do you still believe "Do what you love and the money will come" ?
  • How has blogging and the internet influenced your work as an artist?
  • What are your top 5 goals that you’d like to accomplish within the next 5 years?
These are some of the questions among many others that we so loved answering. Hope you like the read.

Thanks a lot Madhavi for the opportunity to be featured in your magazine. It is indeed very motivating and we wish you all the best in bringing small crafters and bloggers into limelight through your Website.

- Somu and Preethi


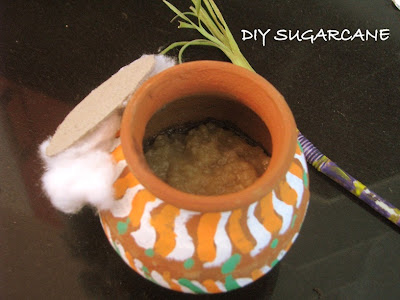
First and foremost, here's Happy Pongal wishes from both of us. This post was never intended, but the simplicity of the idea behind this DIY was so alluring, that we had to share it here. This little Pongal pot and the sugarcane was a gift from our Aunt Mrs.Kalyani Shankar when she visited us yesterday. The photo is self explanatory and hence we are going to leave you with the picture. 
An easy pongal craft
Pongal craft - DIY Sugarcane and a painted pot
A straw, colored paper and acrylic colors - It came in as amazing for us because we would never have thought of it. And what more, the pot even had yummy Pongal for us to relish. Well, unlike the sugarcane, the Pongal in the pot is real :)
Pongal DIY
DIY Pongal Craft
Do spare a moment to leave us your view on this sugarcane. And do let us know how your Pongal was.


When we worked on our first ever center table (which is also our first ever project), we had to stick a 4 mm sheet of One Side Team onto a plywood using synthetic resin glue. Because we had no means to hold the OST sheet in place and the glue required some drying time, we literally had to sit on either side of the table for a good 15 minutes. And we did this for the next few projects too. When it was a smaller work, like a DIY photo frame, I had to hold the sticks tightly together for a while before I was convinced that the glue has dried.
That is when I thought I should get my hands on C-Clamps (also called G-Clamps), purely for my gluing needs.
G Clamps
C-Clamps / G-Clamps
Clamps are wonderful tools for holding things together steadily in place while you are trying to work on them.  Whether it is for gluing two surfaces together or to nail them, the clamps come in handy to provide that firm grip which might otherwise not come from even steady hands. The clamps come in different sizes and it is important that you choose those that fit your needs.

I went for the smallest of ones that can open as wide as 1 inch and not more. Highly suited for surfaces of lesser thickness. I have ever since used these clamps successfully for making a wall clock and for laminating wooden surfaces.
Use for C Clamps
C Clamps for basic woodworking and DIY needs
I bought these clamps at Home Depot during my short visit to the US last year. I have also inquired here and these are available in hardware stores and tools shops. There are different types of clamps that are available and C-Clamps are just one of those. It has been an important accessory in my tool kit that has helped reduce the pressure on my fingers and deserved a special mention here.

Do you use clamps for your projects ? I believe they are extensively used even outside of woodworking. If you do use them for your crafting needs, share the details in the comments section. Will certainly love to hear about it.

- Somu


When the Chennai Crafters group decided to meet up, all of us wanted it to be one fruitful gathering besides  meeting up and discussing various crafts. And so when the admin suggested that we do a demonstration of one of the Woodooz products, we were quick to grab the opportunity. The lampshade was our natural choice for four reasons :
  1. It did not require complicated woodworking skills, expensive materials or any major tools
  2. It is relatively easier to demonstrate than the other products that we have here
  3. It is something everyone can go back home and try
  4. Light and color, we thought, would be appealing and interesting to everyone
Easy Lampshade DIY
DIY Lampshade
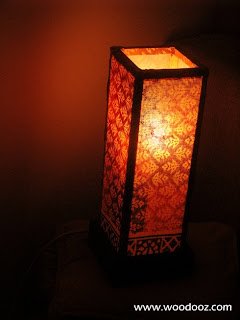
We decided to make a small (31 cm in height and 11 cm width), simple and yet a very colorful shade - something similar to the bedside lampshade that we made earlier. Red and orange with a green patterned border is what we finalized on. We also wanted to keep the base very simple, and used 19mm plywood edge banding sticks to build it.

We somehow did not bother to capture the step by step details of this shade because we were racing against time to be fully prepared for the demonstration. To save time, we had pre-built the frame and the base much before the actual demo.

Home-made lampshade
Handmade lampshade
Somu during the demo
We had just enough time to show how the fabric was wrapped around the frame.  What you see above (without the the light and after it is lit) is what we eventually came up with. Sooner or later, we certainly shall share the details on how the whole thing was built. For now, just going to leave you with the end product. Blame it on our photography skills, the photo below is not doing justice to how the shade really looks when lit. Nonetheless, do let us know how you like it.

We are happy that the shade was picked up by someone instantly after they saw what they saw. Certainly a boost to the efforts that we put into building this one. Leave us a comment. It is the much needed motivation for us in this online world.


2012 was an interesting year for Woodooz filled with lots of learning, sharing and showcasing. From focusing on producing helpful content to understanding the mysteries around SEO, it has been one hell of a ride. We worked with the purpose of bringing resourceful tutorials and DIY tips to whoever landed here and we hope to keep going with the same objective in mind. We built some goals around the blog and 2012 has sowed the seed for us to take baby steps towards those aspirations.  As we look back at the year that went by, and eagerly look forward to what lies ahead, here are some highlights.
Thank you note from Preethi and Somu

Some things new

Collage of paintings

Popular Posts

Number of organic hits, number of comments and number of Facebook likes were some of the indicators to what everyone loved in Woodooz this year
Woodworking DIY Projects

Featured posts

We opened the blog this year for others to feature their work and so far we have had some really wonderful projects that found their way into Woodooz
Featured posts

Tools and Accessories

Tools are the best things that we love investing in. Be it en electric drill or a small screw driver, each one has its own ways to make life easier for us.
  • The power screw driver was one such life saver that came as a gift from Indonesia.
  • We also lined up our tools for our readers to know what we owned and with what we made all our projects.

A live demonstration

For the first time ever we did a live demonstration of one of our products in front of an audience. When the Chennai Crafters team met up, it was an exciting opportunity for us to showcase and show everyone how we made, what we made. Meeting up with fellow crafters who are bestowed with varied, unique and exquisite talent by itself was an enriching experience. As we finish summarizing the highlights of Woodooz 2012, we will leave you with some pictures of the crafters meet.

Photos from Chennai crafters meet

As we set our foot into the forthcoming year, we want to come up with easy, innovative projects that everyone can make. We would like to bring to you the joy of working with wood and show you how much of a fun and useful hobby DIY can be. While we continue what we do with more focus on information and knowledge sharing, we long for your continued support, for, without you, this blog would merely be an online version of a personal journal that no one desires to read.

Please do come back for more and while you do so, have a happy, prosperous and a wonderful year ahead.


DIY as a hobby is so much fun. Being able to build things around the house by itself is a testament to the joy it brings. But what it also brings in with it is the eventual feeling of wanting to try everything yourself before really turning to a professional. And no. Am not talking about building a lampshade, or a center table, or a wall hanging. Am referring to leaking sinks, broken pipelines, overflowing flush, a flat tyre, a busted electrical fitting and more.
Home repair is largely never spoken about in Woodooz, but I wanted to mention how much it is part of everyday DIY activities and how much of trouble and money it can save us. These are things that I would have never tried if not for the love that I had developed for doing things myself.

Fixing a drain pipe

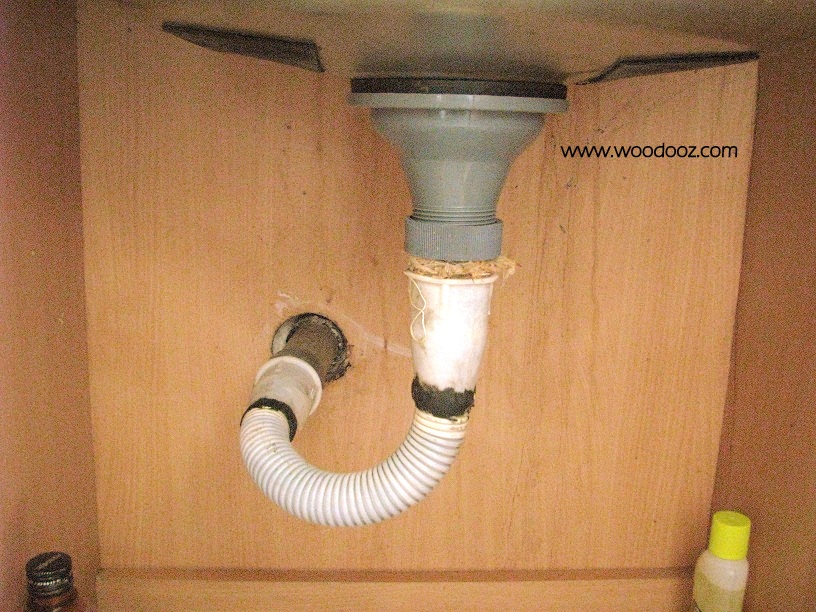
Take our kitchen drain pipe for instance. I moved my kitchen sink during installation to the corner of the counter. As a result the pipe outlet on the wall and the drain outlet were not aligned. The builder refused to move the wall outlet and hence the usual stainless steel pipeline could not be laid. What he installed was the plastic flexible pipe that required replacement every 4 months. Losing much of our patience we decided to do it ourselves. What transpired was a combination of PVC, plastic pipe and some M-Seal and a no replacement guarantee for a long time.
Fixing kitchen drain pipe
DIY Plumbing

Covering the pipeline duct

Rat menace was something that we could not live with. After a damaged sofa, catching 6 rats in 6 days and finding newly born pinky rats in the service area cabinet, we decided to block the pipeline duct (in the service area) from the terrace through which the rats were gaining access. We approached an aluminium window vendor who gave a quote for Rs.14,000 and a carpenter who gave a proposal for Rs.4000. Not wanting to spend so much, we decided to do it ourselves. With aluminium sheets and some duct tapes, we covered the opening for a mere  Rs.200. Not a pretty picture but never a rat ever after.
Closing the rat entry
Stopping access for rats to enter

Fixing a leaking sink

Have you ever felt the smell of damp wood hitting you on your face ? It happened every time we opened the kitchen cabinet below the sink. The grouting around the sink had caved in resulting in water leaking into the wood below. Despite having an in house plumber, we decided to fix it ourselves. All it took us was Rs.25 of white cement and about 20 minutes of work. Problem solved.
Kitchen sink leaking
Grouting around kitchen sink
Building things is fun, but I have come to realize fixing things is so much more fun. Being able to remedy an issue without having to go around looking for a professional is also much appreciated at home. Am sure many of you do it too and so might think what is the big deal. The fact is not many do it which  makes it really a big deal. That said it is also important to understand when to give up and really seek expert help.

Are you the kinds that changes his / her own flat tyres ? Fixes leaking sinks ? Rectifies a broken cabinet hinge ? Leave me a comment. Let me know your thoughts about how DIY home repair has saved you trouble, time and won you appreciation.


A cordless screwdriver was a perfect gift from my brother-in-law who just returned from Indonesia and is the latest addition to my tool kit.  I thought I was fine with the set of screw drivers that I had, but I was completely wrong. I just realized how much more convenient a power tool like this can make my life. I have been playing with it for the last couple of days and the  tool is really handy. I tried using it in place of the allen key wrench and it works like a charm. What I love is that it has driver bits for all possible screw heads and that means I do not need to keep track of each of the wrenches and hand drivers. I still feel that pre-drilling a pilot hole is essential as I was not able to generate enough power to directly drill the screw in. Maybe I need a self-drilling screw for that.
electric Cordless screwdriver
Cordless screwdriver, with the drill bit set
That said, it certainly eases the effort required by at least a good 40-50% and now am eagerly looking forward to work on my next project.

Here are some facts about this cordless screwdriver :
  • Rotates slower (180 RPMs) than the usual electric drill
  • The tool is strictly for running screws and bolts. It is not a drill
  • This one is single speed and rotates in both clockwise and anti-clockwise direction
  • Completely a DIY tool and unsuitable for professional and everyday prolonged use
  • It is not bulky. It is just as big as the size of my outstretched palm
  • Very easy on the hands and is completely safe to use, considering its lower RPM
  • It is battery operated and the power cord is for only charging the battery
  • Operates at 240V eliminating the need for a voltage step down transformer
  • Comes with 6 twist bits and 17 screwdriver bits 
Don't you think gifting something related to your hobby is a very thoughtful act ? I always ask for a tool when someone asks me what I need as a gift. What do you ask for ? Share your thoughts.

Did you like this post ? Enter your E-mail address and join our growing E-mail list

You may also be interested in


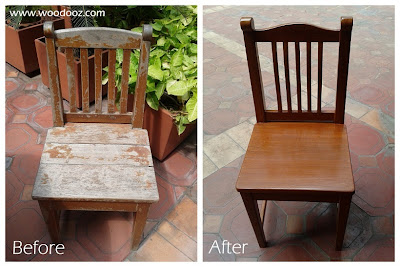
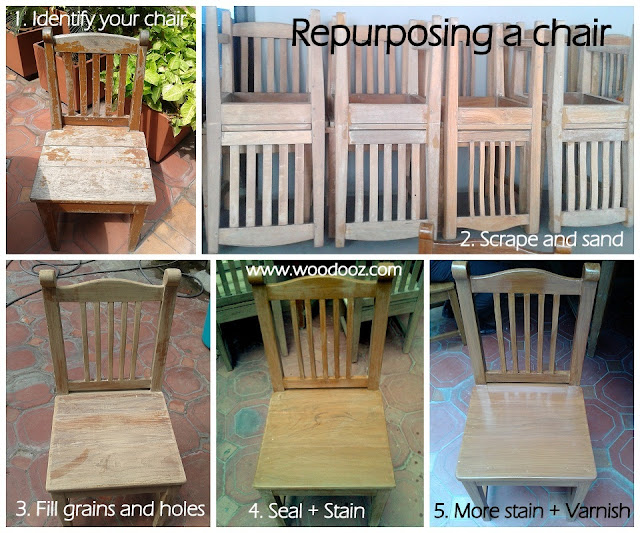
Only recently, I had the good fortune to watch a bunch of carpenters re-purpose a whole lot of chairs and tables. While this is what they had to say when I approached them with a question, they did not complain my being around and taking pictures.  As I mentioned earlier, most carpenters are hesitant about sharing trade secrets, but there is so much we can learn from mere observation.
Learn to repurpose chairs and tables
Re-purposed chair
For now, I shall leave you with pictures in the different stages of re-purposing a chair (Trust me: There may be more than many ways to do it. This is just one of them) . I shall certainly get back into working out detailed tutorials for each of these stages. Of course, you can always decide to choose between Paints and Stains for the look you desire, but all that and more in the coming days.
How to refinish your furniture
Re-finishing furniture
Meanwhile, if you have ever reworked on your home furniture, do share your comments on how you achieved that. It would certainly help me and others who would chance upon this post.

Did you like this post ? Enter your E-mail address and join our growing E-mail list

You may also be interested in


It was indeed an interesting weekend for me. Ever since we had started Woodooz, I have been blogging from the confines of our home and never ventured out to meet fellow bloggers. Blog meets are not new to me and I have made many a friends through this medium – Only, it was through my personal blog which is pretty much dormant now. 
The Chennai bloggers meet organized by Indiblogger and sponsored by ITC Grand Chola was a good start. Though I would love to network more at these meets, I am telling myself now to loosen up a bit from the next time on.
Bloggers meet in Chennai
Can you figure where I am ? (Photo courtesy : Indiblogger)
We had a guided tour of the entire ITC Grand Chola property and while there was so much splendor and sumptuousness and opulence everywhere (and I shall talk about that in a different context later), the DIYer in me was inadvertently drawn towards potential DIY inspirations. I have given new projects a break and this was a good opportunity for me to scout for ideas and garner some self-motivation. At the end of the meet, I walked out with 4 photos, and only 4 photos, on what I thought would be good, easy, doable projects to work on in the coming days. 

My love for lampshades drew me naturally to this beautiful one at the entrance of Grand Cholas Italian Restaurant, Ottimo Cucina Italiana. It was a simple cane enclosure placed on a high pedestal and it made up for a beautiful floor lamp. 

Make your own lampshade
DIY Lampshade
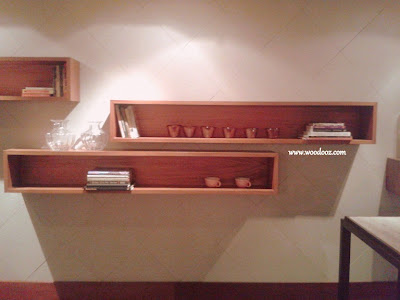
The wall above the master bedroom headboard is bare and white and needs some life. We have been discussing an enlarged canvas photo of us together. But now, Preethi wants to give this shelf (Clicked at ITC Grand Chola's Tranquebar) a second thought. An assortment of picture frames with a focus light can certainly be something refreshing. I have to go to Konica for the enlarged canvas photo, but this shelf, I can make. So you certainly know by now what am canvassing for.

Make your own shelf
Shelf I would love to make
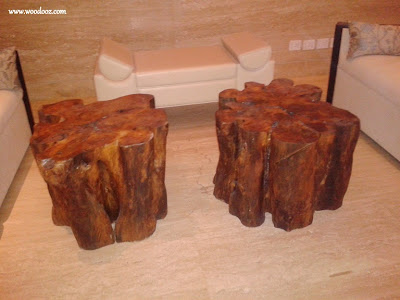
The tree trunk center table was rustic and yet classy and I could not let it pass. If not a center table, this is an idea I can execute to use as a small stool. Maybe something for the balcony. I have to find the source from a nearby lumber and am assuming it will require lot of sanding to smoothen the rough patches. If I ever get around to indulge in this, it would certainly be a very exciting project.

Tree trunk tabe
Tree Trunk Center Table
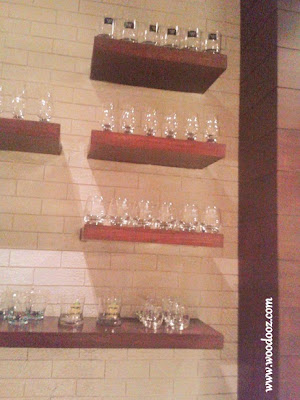
Floating shelves (Clicked at the The Cheroot Malt and Cigar Lounge) are something I want to do for the heck of it. For no rhyme. For no reason. The illusion of being on the wall without any apparent support is something very attention-grabbing. I still don’t know how it can be installed, especially with hardware constraints in Chennai, and that mystery only adds to the excitement value.

Do it yourself shelf - Floating
DIY Floating Shelves
The range of food was appealing to my sense of smell and taste. The visual extravaganza and the magnificence of the newly inaugurated ITC Grand Chola were alluring to my sense of sight. On the whole, it was a very fulfilling and rewarding experience. Now it is all about putting my action items into actual action.

Do you think these DIY projects are practicable? Have you ever been to a place of importance, but been drawn to accompanying objects of less interest to others, because you are passionate about them? Share your thoughts. Leave your comment.


I was at my cousin’s during the weekend trying to help him with 6 dining chairs that had broken. He had bought 4 replacement steel chairs and yet was looking at means to repair the existing chairs.  Fortunately for him, only the joining screw hardware was broken which made it a lot easier to fix the issue. At this juncture, I thought it made sense to write about the hardware that is used to make flat pack ready-to-assemble furniture. Note : Most furniture in India, particularly dining chairs and tables, that are delivered and installed at home free of charge is made of these screws, called CROSS DOWELS

Allen key cross dowels are much like the regular bolt and nut, except that they are designed to look more elegant. The name “Allen key” comes from the fact that it was originally manufactured by Allen Manufacturing company. The cross dowels serve the same function as nails or screws. However, they can be easily removed from / put back into the wooden surfaces making it ideal for knock down furniture.

Cross Dowel
Allen Key Cross Dowel
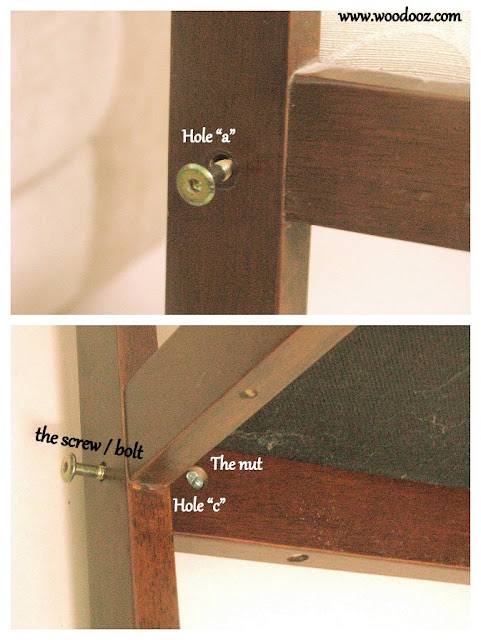
Fixing cross dowels is quite simple and all that it requires is a pilot hole drilled through both the wooden surfaces that are being fixed. This pilot hole will house the screw / bolt. For the nut, another hole is required that is drilled across the surface of one of the wooden substrate. This hole will run perpendicular to and directly across the earlier pilot holes drilled.

Cross dowel installation
How to install cross dowels
As illustrated below, the screw is driven through the pilot holes "a" and "b", while the nut is placed through the hole "c". As the screw is tightened through the nut, it brings the wooden surfaces together and holds them tight and secure. And naturally, unlike screws and nails, it can obviously be seen that the bolt is easier to remove and fix as needed.

Knock down furniture
Cross Dowel Installation
Most furniture that is home delivered and then installed at home is ready to assembly furniture and is built using these cross dowels. Don't believe me ? Just go across to your dining room and check out for the allen key heads.

Ready to assemble chairs
Knock down dining chairs
I know this is kind of a heavily technical post. Nonetheless, thought it is a very useful tip as most households have flat pack furniture and there may be a need in the near future to fix a broken chair. If you did like this post, remember to leave me a comment.


- Somu 
Did you like this post ? Enter your E-mail address and join our growing E-mail list


We have the internet, we have mod podge, we have millions of tutorials on decoupage, we know how to make our own glue, we have fellow crafters to turn to, and we are probably only reinventing the wheels. But imagine a time when all this was absolutely not available to us. Am talking about the 80s when all we  probably had was the desire to resourcefully spend our times, but no assistance in terms of tips and tutorials.
Bharani Decoupaged
 Decoupage using Fevicol

This decoupaged Bharani is vintage, comes from the 80s and is the handiwork of Suja Mohan. What really drew me to this project was the idea of decoupage (Passport size photographs) during a time when decoupage was not a known / popular concept at all, at least around here. With just an idea in mind, hear out how Suja Mohan came out with this brilliant finish (with little aid from Doordharshan - Remember that ?)  for her bharani using just Fevicol.
  • I used only fevicol. Can u believe it !
  • I soaked the picture in water for a while and removed the thick paper behind and separated it carefully.
  • Then I let it dry and stuck it onto the jar which was painted with enamel paint (maroon).
  • I then painted the rest of the jar with golden paint. I used black marker to draw some designs all round.
  • I also used a silver pen,which used to be availabe in those days. Now the paint has started peeling off, so i may change the background sometime in the future.
  • After the whole thing was done , I let it dry for a day and then applied clear varnish.
  • As simple as that and I had not even heard of Mod Podge in those days.
I so love this work for the sheer reason that the idea to decoupage completely stemmed from the need to use the photographs on a decorated Bharani. That, I believe, is really a high form of creativity. Agree / Not agree ? Either way leave your comment. This work deserves all your accolades.

About the crafter
Suja Mohan is a Dental Surgeon by qualification, though is more passionate about music and handicrafts of any kind. She is a crafter by heart  and loves working on needlework, glass painting and more. She loves to spend time productively when she is not catering to patients.

Did you like this post ? Enter your E-mail address and join our growing E-mail list

If you liked this, you may also like

- Somu
Linking in : Colours Dekor


(Note : I have started a new series on how to make a Golu Padi. I explain the process in three steps. Do check out the 1st post in the series for a better understanding)

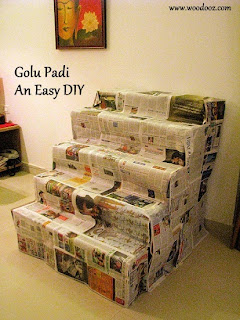
This time of the year, with everyone being busy with arrangements for Navarathri, one of the major task at almost every household is setting up the steps for arranging the dolls. If you have been setting up Golu for years together, am sure you would not have much of an issue with the steps. However, if you are doing it anew (like us) and have no major time at your disposal, here is a 5 step padi that you can build with planks, cardboards and everyday furniture around the house. 

We had leftover planks and card boards and the idea was to not spend time and money on Padi. Last year was the first time we kept Golu in our new home and maybe as we collect more dolls, we will look at a more permanent step arrangement. For now, the make shift one works good for us. Do share your thoughts in the comments section.

Golu  Padi Make it yourself
Make your own Golu Steps
Golu Padi - An Easy DIY
DIY Golu steps / Padi

1. Materials used for the steps

  • Bottom step - Center table
  • Step number 1 - Card board sheets (The ones I used for demo for my Clock DIY video)
  • Step number 2 - 6mm Plywood planks
  • Step number 3 - 19 mm Plywood planks
  • Top most step - OST sheets

2. Mounting the planks 

  • Bottom step - The center table itself formed the bottom most step
  • Step number 1 - Used two cardboard boxes (placed on the center table) on the corners and piles of papers to support the Carb board sheets
  • Step number 2 - Stacked up bricks (on the center table) on which the 6mm plywood planks were placed
  • Step number 3 - Placed dining chairs on opposite ends and supported the 19mm plank on the back rest
  • Top most step - Placed two modas on the dining chairs, added shoe boxes and books for height and for holding the OST sheets
Do it yourself Golu steps
Make your own Golu steps using planks and everyday furniture
The idea here was not to showcase any carpentry skills. The purpose was to build the steps with whatever we already had in ways that anyone can do. I know it doesn't look great on the inside. But it certainly serves the purpose after appropriately covering it up. We have for now covered the setup with news papers and we will soon use the traditional white dhoti on top. Work is still in progress and thought there is no better time than now to post this. 

How do you do your Golu steps ? Already have a knockdown setup ? Plan to get it done for the first time ? Leave us a comment.

Here is two DIY projects on Golu steps that we loved while browsing the net for ideas :


When Sumathi wrote me an E-mail, little did I know that we used to live in the same gated community until four months back. This is one instance when the blog proved that the world is indeed a small place. The E-mail had a query on where a clock mechanism can be bought and that is all I answered.

What you see here in this post is completely her work and I am awed by how this project has turned out. I hardly battled my eyelid before I asked her if I could feature her work and she was only too happy to share with you, the details on how this clock was made. Go ahead, read about it in her own words. 

Do check out the video post on how to use the clock assembly on any clock face first and then come back.
Photo Frame wall clock
Wall clock with photo frames
  1. Frame 12 photos of your choice
  2. At the watch shop, ask for Clock hands and movements.  Choose the size of clock hands depending on  Wall clock size that you prefer (i.e diameter of the circle)
  3. Cut chart sheet or thick paper (any color of your choice)  and make a hole  in the center, so the knob of the clock movement goes inside
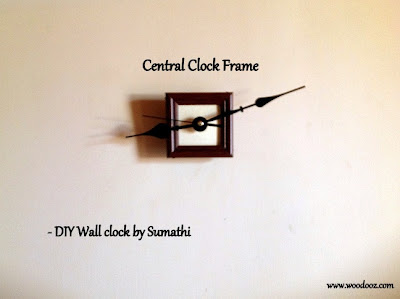
  4. Frame the  chart sheet (See Picture below) along with the clock movement ( Glued at the back side).  Fix hooks to hang on the wall.  The  center  frame (13th frame) is now ready
  5. Decide the diameter of the wall clock  and keep the 13th frame at the center.  Place the remaining pictures in the numerical order and you can try the same on the floor before nailing on the walls. Additionally you can also mark points on the wall for drilling using masking tapes.
  6. After finalizing the diameter, with the  help of the tape, mark the center as well as the ends of the horizontal line (i.e where you will be hanging the Number 3 and Number 9  picture)
  7. Do the same measurement vertically as well and mark the ends (i.e numbers 12 and 6)
  8. Do the same marking / nailing with the appropriate spacing and measurement for the remaining numbers*** ( Do diagonally opposite  marking so that they are in straight line)
  9. You can also try variations in the frame sizes (i.e 12, 3, 6,9 ) being in different shapes compared to other numbers
*** The numbers should be at an angle of 30 degrees from each other. If you do not have a protractor, you can simply take a  print out of this clock template and use it to mark the number points on the wall.

Wall clock with wooden frames
Clock Mechanism framed

Was that not a wonderful way to personalize a clock ? I so loved the way it has been built and I sincerely hope you loved reading Sumathi's DIY tutorial on how she made this clock. Do remember to check out what she did with Wall Decals at Colours Dekor too. Do leave a comment and let her know how much you liked her work.

- Somu

About the DIYer
Sumathi is a mother of 2 lovely boys (fighter-cocks:) who juggles well  between home and work. She is a Software Professional who is passionate about gardening and home decor.  In her spare time she enjoys being productive rather than to spend time on TV Soaps/movies. Currently she has a list of pending DIY projects in mind and is enjoying the process of learning to do things on her own.

Did you like this post ? Enter your E-mail address and join our growing E-mail list


If you liked this, you may also like


Know more about us

About Us
Reviews
Media
Our showroom location
Return and refund policy
Review us on Google

Connect with us


Mail us
Subscribe to our newsletter

Our Address :
Woodooz Home Decors,
3/371, First floor,
Metukuppam, Thoraipakkam,
Old Mahabalipuram Road (OMR),
Chennai - 600097.
Ph : +91 9884070470
Email : contact@woodooz.com
Created By SoraTemplates & MyBloggerThemes