Category : FAQ


(Note : I have started a new series on how to make a Golu Padi. I explain the process in three steps. Do check out the 1st post in the series for a better understanding)

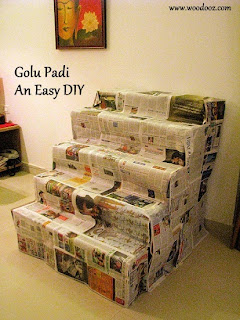
This time of the year, with everyone being busy with arrangements for Navarathri, one of the major task at almost every household is setting up the steps for arranging the dolls. If you have been setting up Golu for years together, am sure you would not have much of an issue with the steps. However, if you are doing it anew (like us) and have no major time at your disposal, here is a 5 step padi that you can build with planks, cardboards and everyday furniture around the house. 

We had leftover planks and card boards and the idea was to not spend time and money on Padi. Last year was the first time we kept Golu in our new home and maybe as we collect more dolls, we will look at a more permanent step arrangement. For now, the make shift one works good for us. Do share your thoughts in the comments section.

Golu  Padi Make it yourself
Make your own Golu Steps
Golu Padi - An Easy DIY
DIY Golu steps / Padi

1. Materials used for the steps

  • Bottom step - Center table
  • Step number 1 - Card board sheets (The ones I used for demo for my Clock DIY video)
  • Step number 2 - 6mm Plywood planks
  • Step number 3 - 19 mm Plywood planks
  • Top most step - OST sheets

2. Mounting the planks 

  • Bottom step - The center table itself formed the bottom most step
  • Step number 1 - Used two cardboard boxes (placed on the center table) on the corners and piles of papers to support the Carb board sheets
  • Step number 2 - Stacked up bricks (on the center table) on which the 6mm plywood planks were placed
  • Step number 3 - Placed dining chairs on opposite ends and supported the 19mm plank on the back rest
  • Top most step - Placed two modas on the dining chairs, added shoe boxes and books for height and for holding the OST sheets
Do it yourself Golu steps
Make your own Golu steps using planks and everyday furniture
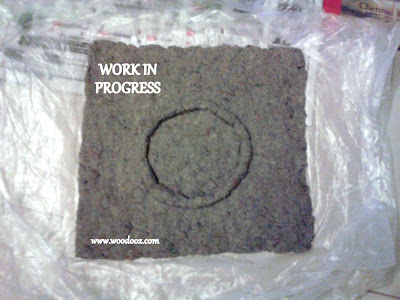
The idea here was not to showcase any carpentry skills. The purpose was to build the steps with whatever we already had in ways that anyone can do. I know it doesn't look great on the inside. But it certainly serves the purpose after appropriately covering it up. We have for now covered the setup with news papers and we will soon use the traditional white dhoti on top. Work is still in progress and thought there is no better time than now to post this. 

How do you do your Golu steps ? Already have a knockdown setup ? Plan to get it done for the first time ? Leave us a comment.

Here is two DIY projects on Golu steps that we loved while browsing the net for ideas :


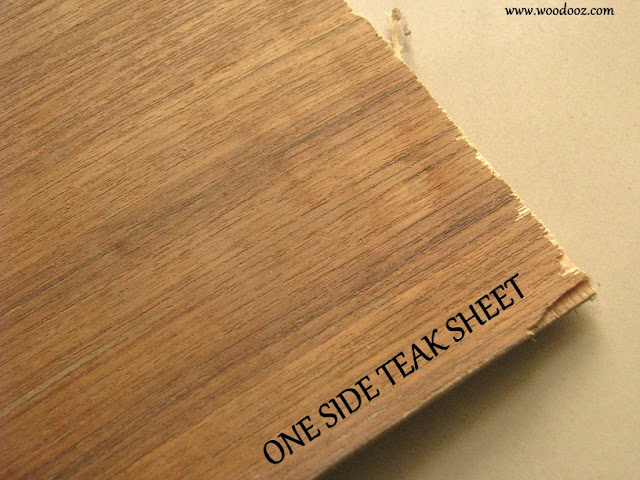
One of the many questions in a hobby woodworker in his beginning stages is if a finish can be directly applied on plywood. Will plywood be able to absorb paint or stain that results in a fulfilling finish? I had the same question when I made my first center table, and I sought the help of my friend who built my modular kitchen. He said, “Use OST on top of the ply”. From that point till now, I have grown really fond of One Side Teak sheets and have used them for many of my projects. Since I get few enquiries on what OST is, it made sense to make a post on it. So, here are some facts on OST:
  • One Side Teaks, naturally, have a teak finish to it, and only on one side
  • The rear of OST is plain and ordinary with random grain patterns
  • OSTs are 4mm in thickness
  • They are available in 8ft x 4 ft dimensions
  • They cost approximately about Rs.25 / Sq ft
  • They are not just ideal for your big furniture projects, but also come in handy for your small craft needs
  • They can be easily cut using Mica cutters
OST (One side teak)
One Side Teak (OST)
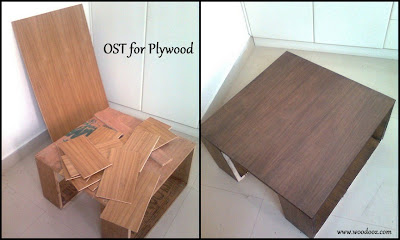
Wood veneers are relatively expensive and Laminates are not easily available (most take only bulk orders) and so OST was my natural choice for all my center tables. That it can be easily cut and glued onto the plywood top made it that much easier for me. The biggest challenge I had was to find a vendor who will be flexible to source OSTs based on my needs and not be hell bent on selling it as the 8ft x 4ft package. 

They can be sanded down for a smoother finish and look beautiful when left in their natural glory too.

Center table with OST finish
OST for my plywood tables
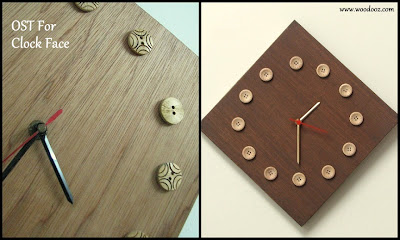
I preferred to use OSTs when I had a need to build a clock for our own use. For a change, I wanted to use the rear of the OST as the clock face for the one I built for use in my home. The random patterns looked enhanced after sanding and it brought out a fresh look. I used the teak side for the other clock I built which I stained to a walnut brown color.

Wall clock template
Wooden wall clock using One side teak
With rubber wood or teak wood or rose wood being slightly on the expensive side and not available in dimensions other than 8ft x 4ft, plywood would remain to be the most preferred raw material until such time the hobby takes off to the next level. That being the case, OST will remain to be a good option to achieve a classy finish on top of the coarse looking ply.

I intend to use it for many of the projects that I make in the future which I certainly shall update here. Until then, I would love to hear from you on your favorite raw material. What is the wooden substrate that you love working with ? How and where do you source it from ? Do share your thoughts as a comment.

- Somu
Did you like this post ? Enter your E-mail address and join our growing E-mail list


If you liked this, you may also like


Have you bought a power tool or appliance from US and brought it to India ? Like me, were you tempted to plug it in at the first available opportunity ? Well, never do that. Never. In the best interest of your tool / electronics, you need to ensure they are readily suited for use under Indian Power conditions. If not, there are few things that you are expected to know and adhere to. First and foremost, understand the power requirements of the tool from the manual. 
Voltage and Wattage specification
Power requirements
And here are the questions you need to ask and understand before you can plug in that tool / appliance of yours.

1. The specification in the tool manual says 120v. Does it make my tool readily usable in India ?
No. The operating voltage in India is 240v. And since the tool requirement is only 120v, there is every bit chance that it might not work or go kaput if you directly plug it in.
2. How do I then use the tool here in India ?
Stepdown voltage transformers are available in your local electronics store, specifically for requirements like this. They help in converting the 240V power into 120v.
3. Is voltage the only parameter I need to look at ?
No. You need to look at the wattage specification as well. Your transformer wattage should necessarily be equal to or more than the value mentioned in the manual.
4. There is no watt mentioned in the manual. What do I do ?
Look for amps specification and as high school physics would have taught you, Watt = volt X amps. So in the above case, the wattage is 120 x 1.8 = 216 W. That means the transformer should support wattage greater than 216 W.
5. What is the cost of a step down transformer ?
The transformers for lower watt requirements are available as plug in adaptors and cost about Rs.300 to Rs.350. The one you see in the picture below (250W) costed me Rs.950 and looks like a mini stabilizer. So, anywhere between Rs.300 to Rs.1200 depending on your requirement.
Voltage transformer
240v to 120v step down transformer
This is basic physics that I didn't know and had trouble doing my research when I received a power tool as a gift. So hoping this post is of some help to someone with a new tool and the desire to DIY.

Have you used a tool or appliance in India, bought and brought from anywhere outside? Is there anything else that one needs to take care of  besides this ? Leave me your comment. Also, do let me know if you found this post useful.

~Somu


All these tools were bought on a need basis as and when I required them for a specific purpose. These tools largely serve your basic DIY woodworking needs and will certainly help you make those little projects around the house. (Note: This is a repost)
Safety is of prime concern and so you should take necessary precautions. If certain tools need supervision or you are not sure of their application, try to get it done through professionals. Better safe than sorry.
Woodworking hobby tools
Woodworking hobby tools - Electric Drill

Electric Drill

This is certainly a must have tool in the house if you are a DIY lover. It helps serve multiple needs. Be it hanging a painting on the wall, or making a center table, it is the electric drill that paves way by creating that much needed pilot hole. I have used this to install cabinet doors too. The one I use costed me about Rs.700 and comes with very basic features of single speed and clockwise rotation.

Associated Drill bits

The following are the drill bits that I bought over a period of time. All of these cost between Rs.10 to Rs.30 if you buy them separately.
·  Masonry bit for drilling into concrete / brick walls
·  Twist bits for drilling pilot holes
·  Flat wood bit which I used as a counter sink bit
·  Forstner bit for installing European style hinges for cabinets
Tools for DIY
DIY Woodworking tools

Claw Hammer

The use of a hammer is quite obvious. Since the only nails I use are the headless nails, I use the hammer mostly for pounding them into the piece of wood. You can use the claw to pull out any nail or screw.
Oh ! Did I tell you that it doubles up as a kitchen accessory? I use it to break coconuts.

Cutting pliers

I use them for holding the nails in place when I am hammering them into wood. Helps protect my fingers from being smashed.  I also use them to strip off the plastic sheath from the wires while installing my DIY lampshades.

Screw Driver Set

Again another useful tool to have inside the house. Not just for the purpose of woodworking, but also for other requirements at home, these are very helpful. A kitchen hinge that is loose, a glass door that needs installation or a key holder that is not in place can be easily fixed. The entire set costed me only Rs.80.
Essential woodworking hand tools
More tools

Wood Rasp

I remove all the sharp edges in my work using the Rasp. It helps give a slight curve to the edges. For the cabinet door that I installed, I used the rasp to give the edge a half round shape.

Measuring tape

Your projects will never have the symmetry you desire if not for the measuring tape. Sometimes even a couple of mm offset can make your project look awkward and so it is essential you get used to using the tape accurately. Sometimes it is also needed that you are able to quickly shift between mm and inches as the unit of measurement depending on the situation.

L Square

Perfect tool for drawing right angled vertical and horizontal lines.

Hacksaw blade

Serves all my cutting purposes. Again, the wood that I decide to cut is always of minimal thickness for which the hacksaw is very ideal. Not really suited for cutting wood that is beyond 6 mm in thickness. Not that it is impossible, but really makes it difficult to get that clean cut.

Mica / Laminate cutter

If you work regularly with Mica or laminate, this is a very useful tool. I also use it extensively for cutting 4mm One Side Teak sheet. Beyond 4 mm, this tool is ineffective for cutting.
So that’s about the handtools (with the exception of power drill) that I use. All my projects have been built using these basic tools. Will keep adding more tools and accessories to this list in due course.

What are your favorite tools ? I am not referring to just the ones you use for Woodworking. What are the tools that you use for your arts and crafts projects too ? Share your thoughts.

Did you like this post ? Enter your E-mail address and join our growing E-mail list
Linking in : Colours Dekor

Having a virtual group of like minded people to discuss your line of interest is a boon. While it provides the opportunity to network, it also aids in learning new ideas, having purposeful exchanges and making new friends.
Some of the online DIY Woodworking discussion boards tend to get overwhelming with surplus information up for grabs. While information is good, it gets muddled when the language and jargons used have local significance. It would be absolutely great if I have a network where I can discuss my queries, issues, and my work besides other things in a manner than I can better relate to and understand. And that is what “Anything is DIYable” has to offer.
DIY Woodworking discussion board - India
DIY Woodworking forum in India
It is a medium for folks with a strong inclination towards all things DIYable. This forum, in their own words, is home to Indian DIYers and Hobbyists. The growing member list is very enthusiastic and is made of multifaceted individuals with interest towards various activities around the house that one can attempt to do oneself. From home appliances, to Audio video, to Automobiles, to computers, gadgets, plumbing, tiling, to woodworking and carpentry - works are showcased, and ideas are exchanged.

And what makes the forum appealing is the fact that it is completely Indian. I also believe that the group gets together once in a while and have workshops on a topic of interest. If any of the categories mentioned above interest you, you should check out DIYable.

- Somu
Did you like this post ? Enter your E-mail address and join our growing E-mail list


You may also be interested in:


When I made my first paper mache craft in Woodooz, the process of making the paste was very brief that many found it not so handy. Since then there have been many online and offline requests and so I decided to make a descriptive post on how to make the paper mache clay.  The DIY nameboard  and the paper mache tribal masks were made using the very same process described below.

1. Materials Required

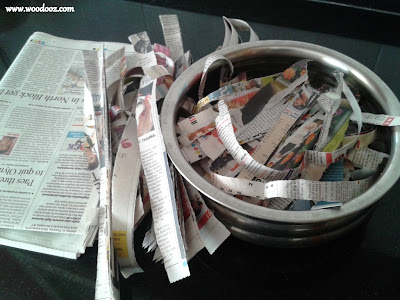
  • News Paper strips
  • Flour (Maida)
  • Salt

2. Start with the paper

  • Cut the news paper into small strips
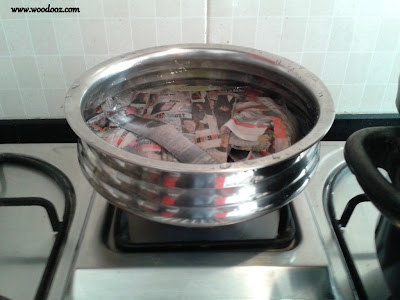
  • Soak the strips in water. Allow it to be in water over night (Atleast about 8-10 hours)
  • The strips should be completely soggy
  • Alternatively, you can boil the strips in water to quicken the process
Make strips
Cut the paper into strips
Boil the strips in water
Soak the strips in water and boil

3. Grind the boiled strips

  • Allow for the strips to be soaked in water (at least 30 mins) after boiling
  • Take the strips and drain the water
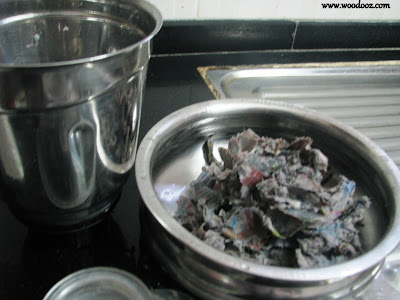
  • Grind the strips in a mixer 
  • The picture below is after the strips were ground
The clay should be ground
Grind in mixer

4. Add maida (flour)

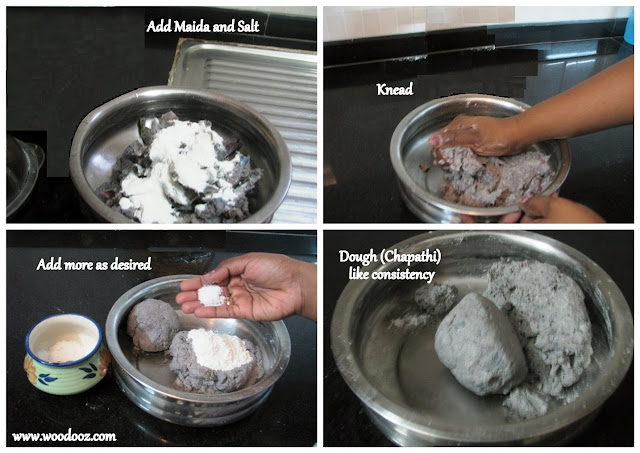
  • Slowly add maida and salt to the ground mix
  • The need for maida is to provide the necessary consistency to convert the mix into a clay like paste
  • Keep adding maida and salt as you knead the mixture until you get a dough (Chapathi) like consistency
  • For this demonstration, I used two sheets of news paper and 250 grams of maida
  • The key here is the dough like consistency and so you would know when to stop adding the maida
Add maida and knead
How to make paper mache pulp

5. Use the clay

  • Once you reach the desired consistency, your clay is ready to use
  • Lay it on a plastic sheet so that it does not get sticky
  • Make the shapes that you want to make using the paper mache clay
  • Allow it to dry for more than 24 hours
  • Once dried the shape you have made is ready to be painted. Use an acrylic primer base if required
  • Unleash your creativity and add colour to your paper mache project
Paper Mache Project
Make your paper mache project
Just ensure that you do not disturb your project while it is dryingOnce dried, it becomes very strong and stiff. And so, that's how you make the paper mache paste. I have something in mind for this project which I shall save for another day after it is complete. For now, it is just work in progress.

Do leave me your comment and let me know if there is anything amiss. Let me know if you used a different method to make this clay. If you do use this tutorial and make your paper mache project, let me know. I would love to know how it turned out.

~ Preethi
Join us in Facebook


If you liked this post, you may also like


  • Do you prefer a designated space for your phone ?
  • Do you find it hard to hold your phone while watching a video on Youtube ?
  • Do you place the phone face up on the table and barely hear your alarm because the speaker is in the rear ?
  • Like me, do you get into the habit of looking for your phone under the couch, under the pillow, or in the balcony, because you don't know where you kept it ?
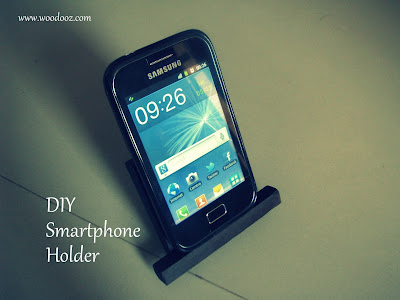
Here's an easy to do Smartphone holder that you can build yourself to keep your phone safely in one place. Remember the over-sized mobile phone charger holder that didn't need any nailing down ? This time I wanted to make a right-sized holder for my smartphone.

Smartphone Holder DIY
DIY Smartphone Holder / Stand
This is a simple DIY that uses wooden sticks. Scroll below to find out how you can make a smartphone holder.

Smartphone stand
Make your own smartphone holder

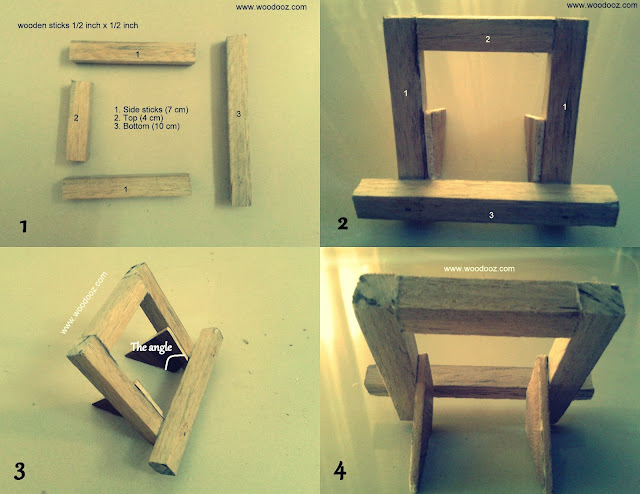
Materials Required - Picture 1

    • I used 1/2 inch x 1/2 inch sticks (The same sticks that I used for this bedside lampshade base)
    • Used wooden board (4mm) for the supporting rear (You can also use thick card or cork board)

Cut and glue the sticks together - Picture 2

    • Cut the sticks to your required dimensions. The dimensions should be such that it should be able to hold the phone vertically and horizontally
    • Glue them together. Notice how stick 2 is in line with sticks 1, while the base (stick 3) that will hold your phone is glued on top of the side sticks ?
Smartphone holder - DIY
Smartphone holder - Do it yourself

Make the triangular rear support - Picture 3

    • Cut a triangle out of the card board and stick on the inner sides of sticks 1 
    • This board will support the holder while it is leaning backwards. The backward lean is required to prevent the phone from slipping off.
    • The angle of the backward lean is decided by the angle between the two inner sides of the triangle. 

Make sure your speaker is not hidden - Picture 4

    • Make sure the dimensions of the sticks are such that they do not hide the speaker when the phone is placed on the holder. 
    • So, here it is, a smartphone holder for less than Rs.10. Yeah, really. Less than Rs.10
    • Paint, stain or do whatever you want to give your holder color.
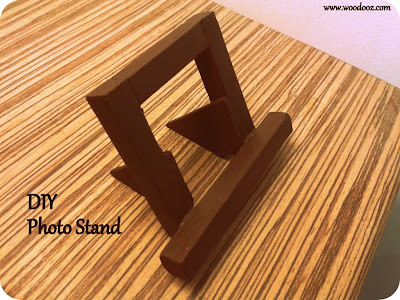
You can also additionally use it as photo holder, or greeting card holder. Works out to be a neat alternative to DIY photo frames.
DIY Photo Stand
Photo stand DIY - Place your photos on the base :)
So, how did you like this simple DIY? Where do you place your Smartphones? Much like me, are you just as careless and never bother about how you handle your phones ? Leave a comment.
Subscribe to our RSS feed. It is just a click away
Woodooz

If you liked this DIY tip, you may also be interested in our other posts :

Linking in : Colours Dekor, Made with Love Party
- Somu


We live in an apartment. Every space outside our humble abode is common space. That means I have to do all my work inside the house.
  • To cut a piece of wood I use the center table in the living room.
  • To bore a hole into wood I use the little space in the guest room
  • To Paint or stain wood I use either of the balconies
  • And my tools are all in the service area
Clean up the mess
This is only a fraction of the mess I make
Now, here's the downside to not having a dedicated work space. There is going to be lots of scrap wood, saw dust, dirty cloth, screws, nails, sand papers and tools all strewn across every square inch of where you work. What is even worse is the spilled paint / stain or the quick bonding fevicol on the tiles that takes lot of work to remove. And trust me, tidying up is the most boring task of any woodworking project. Sanding only comes second.

Here are some useful tips that you can follow to make things easier for yourself:
  1. Try to work in one place. Makes cleaning up easier even if you generate lot of mess
  2. Move your tools closer to your place of work. Reduces moving around while in the middle of a project.  I moved most of mine into an empty shelf in the guest room wardrobe.
  3. Spread news papers across the floor. When you are done, rather than picking up the bits and pieces, you can just carefully remove the papers and dispose them off. You may also want to do it on the wall. Paints and stains on wall are quite impossible to remove.
  4. Have thinner with you all the time. Any spills can be managed immediately by wiping off the stains from the tiles using thinners
  5. Try to finish your work before the maid gets to work. The sweeping and mopping will take care of most troubles you create.
  6. Wear latex gloves while using paint. They are inexpensive and can be thrown off after use. Also reduces effort spent on cleaning up your fingers. In Chennai, you can get these gloves for Rs.3 a pair at Nilgiris.
  7. Use inexpensive containers for mixing paints, sealants etc… Again reduces clean up work as you can straight away dispose them after use.
Most importantly, make sure you wear these essential safety gears while indulging in a woodworking DIY project. Mess can be cleaned up. But a broken finger may take time to heal.

Your turn now : 
  • Do you make a lot of mess while indulging in DIY ?
  • Do you enjoy the clean up process ?
  • Do you have other clean up tips to share ?

Linking in : Colours Dekor
- Somu


When we made a post on a DIY laptop stand, Vinay Oommen from House on the Rock asked : "Hi Can you post sometime on how to work with laminate : How to cut it, paste it and precautions to be taken, tools to use and avoid etc." So here goes.
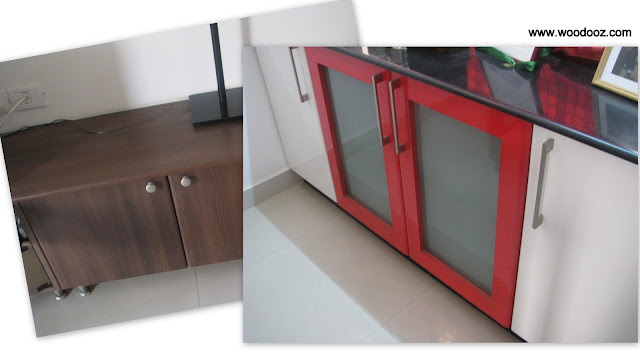
Wooden laminate, a popular choice for wardrobes and kitchen cabinets, is ideal for your small woodworking furniture projects. Laminates provide a whole range of options in terms of color, texture and patterns adding the much needed variety to your home DIY projects. You can check out Merino Laminates or Greenlam India to get an idea.

Laminates for wardrobes and cabinets
Cabinets installed with laminates


This tutorial only addresses simple installation of laminates using Fevicol SH synthetic resin glue for “small” projects that you do inside your home. Their industrial applications and factory installation using presses are not handled here. This DIY also has nothing to do with wooden floor laminates.

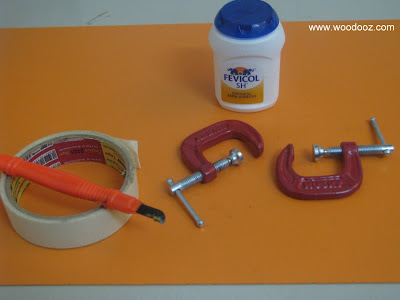
Step 1: What you need

Laminate installation - materials required
Materials required for laminate installation

  • Laminate (May be available only in 8ftx4ft or similar standard dimensions. You will have to check with your supplier if he will have left over stuff)
  • Cutter (A mica cutter or an xacto knife)
  • Glue (Fevicol SH Synthetic resin glue)
  • Masking tape or clamps


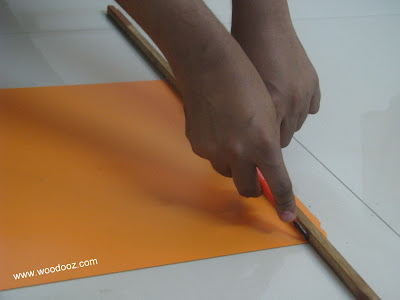
Step 2: Cutting the laminate

Laminate being cut using a mica cutter
Cutting laminate using mica cutter / Xacto knife

  • The laminates are only 1mm thick which makes it easy to cut them to the desired size using a mica cutter (shown above) or an xacto knife.
  • They can be cut much like how you would cut a sheet of cardboard using a pencil knife.
  • Run the knife or the cutter along the cutting line couple of times before breaking the laminate off.


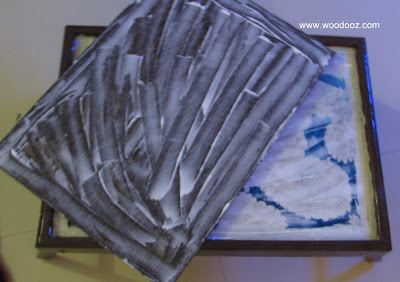
Step 3: Applying glue

Glue application for laminate installation
Glue applied on the rough underside and on the wood surface

  • Have you seen tiles being installed on a smooth wall?  Before the installation, the wall is chipped a little along the area of installation to make it rough. This makes it easy for the cemented tile to have a strong hold.
  • Similarly, laminates and Mica sheets come with a very rough underside enabling a strong bond to be created with the surface it is being stuck on to.
  • Apply glue generously on the underside and also on the wooden surface. Give it a minute.


Step 4: Installing the sheet

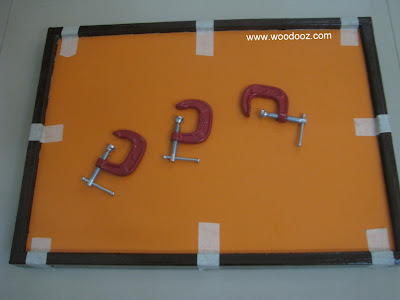
Laminate held onto the wood using masking tape
Use masking tape and clamps to hold laminate in place

  • Remember I mentioned that they are only about 1mm in thickness? It means that they have a natural tendency to bend (will break beyond a certain point). Because of this bend, they may not sit properly when the glued underside is placed on the wooden surface.
  • To overcome to issue, it is important to hold the laminate tightly pressed onto the wooden surface until the glue dries.
  • Use a masking tape (Click here for other practical uses for the masking tape) or C-Clamps to keep the laminate in place. Allow enough time for drying (Be safe and wait 8 hrs at least)

Did you like this post ? Enter your E-mail address and join our growing E-mail list


Any protrusion of the laminate can be trimmed using the xacto knife to ensure it is neatly aligned along the edge of the wooden surface.

So there you go. Try it out. My plywood supplier has lots of leftover laminate sheets in different sizes. He does not have much use for them because there may not be takers and so is always happy to part with them for an amount. You just need to be lucky enough to find the colors of your choice just as I found the orange laminate for my DIY laptop stand.


It's your turn now
  • Have you worked with laminates before? 
  • Have you used it for your wardrobes and kitchen cabinets ? 
  • Did you have a tough time choosing from the variety of available designs ? 
  • Share your thoughts.

Linking in : Colours Dekor
- Somu


DIY Laptop Stand

Working from home is turning out to be more resourceful especially considering the commute distance. The low center table  has always been where we laid the laptop while working. However, there are times during a call when we needed to work from the room, and it was not possible to move the table. And so the need to make a portable DIY laptop stand. While it was intended to be used as a laptop stand, here are other functional uses for this piece of furniture.
Make your own DIY laptop stand
DIY Laptop stand


Have you turned on Timeline for your Facebook page ?   We are crossing a milestone today with this being our 50th post and so turned on Timeline (go ahead, check us out, like us and make our day) and are totally in love with it. All Facebook pages will be mandatorily moved to the new format on the 30th of March, and here are some key points for you to consider before the shift.
50th Blog post

 Use a cover photo to make that critical first impression

The exact dimension of the cover photo is 850x315. Facebook will stretch or crop your photo should it be of a different dimension. And no, you cannot just have anything on your cover. Facebook has formulated set of rules for the cover photo which cannot have, among others, price information, contact / website details, and calls to action. Check out some really cool and creative Facebook cover photos for inspiration

Important : Only the bottom portion of the cover photo will be directly visible. The user will have to manually scroll to view the top portion. So, make sure you capture the most important detail in this bottom visible portion. 
Facebook Profile and Cover photo


Seriously. Why make your own Mod Podge when it is readily available !

In Chennai, until sometime back, Pidilite’s Hobby Ideas Glue ‘n’ Gloss was the only decoupage glue (that I am aware of) available in crafts stores. But recently, when my search for Glue 'n' Gloss hit a roadblock, I was given to understand they have decided to stop its production. And hence the need to make my own Mod Podge from easily available resources.
A decoupage on wine bottle using Hobby Ideas Glue n Gloss
Click to view our decoupage post
After a bit of research on the net, here’s what I found. This is a quick DIY using Fevicol. I tested it on a piece of wood using news paper bits and it did work. However, be aware that this is only a cheap alternative (not in cost but in quality) to Mod Podge.

Quick tutorial on how to make your own Mod Podge

  • Get Fevicol MR from your near by hardware / crafts store
  • Mix equal parts of water to it (50-50 mixture). You can also use Camel’s acrylic gloss medium instead of water
  • Shake / stir well until the glue and water form a dilute homogeneous mixture
  • Use it the way you would use Mod Podge 
  • Apply few layers of clear varnish to protect your work. Fevicol + Water cannot provide the same kind of protection Mod Podge can 
Make your own Mod Podge
How to make Mod Podge at home

Some Caveats

  • The classy effect of Glue ‘n’ Gloss is blatantly missing. 
  • And to play the devil's advocate, here's a blog post on why this method is not recommended for long lasting effect
  • So, use your discretion. Make this DIY decoupage glue only because Mod Podge is not available in your locality. 
I wrote to Pidilite about this and they were kind enough to call back. Glue ‘n’ Gloss is officially going out of production and their Hobbyideas ModPodge is available in select stores (Chennai unfortunately is not in that list). Here’s the address of two stores, besides many others, that are stocking the Mod Podge

HOBBY IDEAS
Kemps Corner,
Noah's Art,Ground Flr,
Kwality House,Kemps Corner,
Mumbai – 400036
912223825621/ 912222937776
HOBBY IDEAS (STAPLES)
East Land Holdings Pvt. Ltd.
Muncipal No. 102, Hosur Road,
Opp. Big Bazaar, Koramangala,
Bangalore – 560001
080 - 40928005


The next time I am in Bangalore, I know where I am going to be shopping. Meanwhile, if you are in Chennai, do you know places where I can get Mod Podge. Until then I am going to try this home made Mod Podge recipe.

Update : Click here for the complete list of stores in India where Mod Podge is available.

References :
SHARE YOUR THOUGHTS
If you have used this DIY glue, do let me know your experience with it

Linking in : Colours Dekor
- Somu

Know more about us

About Us
Reviews
Media
Our showroom location
Return and refund policy
Review us on Google

Connect with us


Mail us
Subscribe to our newsletter

Our Address :
Woodooz Home Decors,
3/371, First floor,
Metukuppam, Thoraipakkam,
Old Mahabalipuram Road (OMR),
Chennai - 600097.
Ph : +91 9884070470
Email : contact@woodooz.com
Created By SoraTemplates & MyBloggerThemes