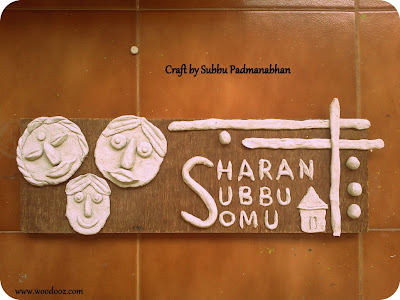
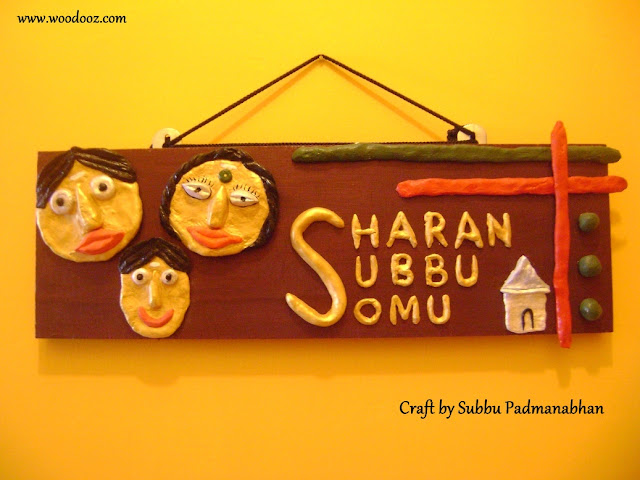
Second in our series of WOODOOZ SHOWCASE, we bring to you a craft project by Subbu Padmanabhan. We once did two tribal face masks and then a personalized name board using paper mache. Here’s a paper mache craft idea that combines the faces and the name plate into one beautiful welcome board for the entrance.

Read more to know what Subbu has to say about her project, in her own words.

"I had a spare wooden plank and lots of time during my son’s summer vacation and wanted to use them resourcefully. One of the many things I made was this name board for my home in Bangalore.

I wanted to make a home, faces to represent the occupants of the home and then our names. Making the paper mache paste is easy and you can find a detailed step by step description of how Preethi made the paper mache paste here in Woodooz. One additional thing I did was add chalk paste putty when I ran short of flour."

Paper Mache Faces
Paper Mache faces

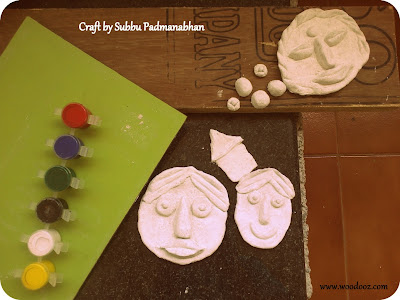
"The grey color is because of the water in the mix. Once the figures are made, they need to be allowed to dry for a minimum of 24 hours before you can do anything with it. Once dried, it takes a lighter color with all the water drained off. I made the letters separately and then set it on the plank."
Paper Machie DIY
Arranged to be glued
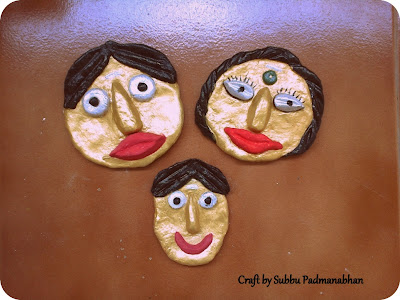
"Once I was happy with the arrangement, I set out to color the faces and the letters. I used acrylic colors to give the entire project some life."
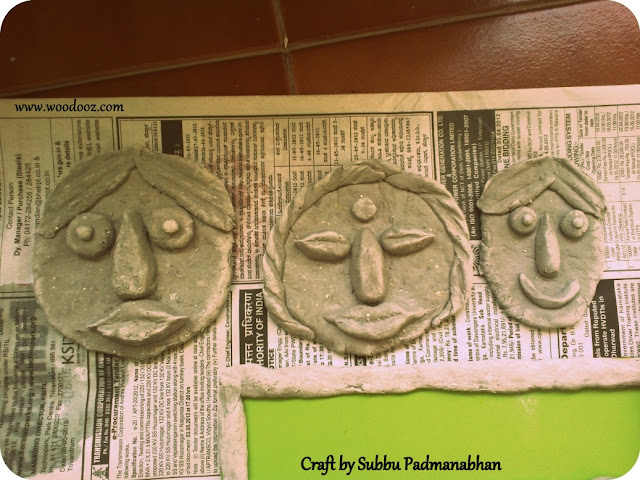
Acrylic colors for painting paper mache
Acrylic colors for painting
"You can use acrylic primer as a base coat as it also allows for hiding the pores in the figures."

Paper mache masks
Paper mache faces painted
"Once the coloring was done, I used fevicol to stick everything onto the 6mm plywood plank. While you can use wood paint to prime and paint the wood I used acrylic color to give it uniform texture as the faces. I used gold predominantly to go well with the contrasting brown color of the backdrop. After giving the glue time to dry up, the plank was up on my entrance wall."

DIY Paper mache craft
DIY Paper Mache Craft
"How do you like it?  Do you think something is amiss ? Let me know your thoughts. Leave a comment."

By the way, her friends in the apartment loved the name plate so much that one of them wanted to learn how it was made and another wanted to custom make a plate similar to this one. Isn’t that wonderful ?

About the Artist
Subbu Padmanabhan is a mom to a 3 something year old boy, and works as faculty in a premier play school. She likes to indulge in mini crafts projects, for the school and her home, during her spare time. The wall art that you see in the backdrop of this bedside lamp is her handiwork too. She lives in Bangalore.

You may also be interested in

Linking in : Colours Dekor
- Somu


How does a big, bad, broken nose on an absolutely beautiful, freckle-less face look?

Our Blog Woodooz
Our contacts contact@woodooz.com
preethi@woodooz.com
somu@woodooz.com 
Our Facebook handle /woodooz
Our Pinterest account /woodooz
Our feedburner RSS /woodooz
Our Twitter placeholder /woodoozmagic (The big, bad, broken nose @#$%^)
That’s just how our Twitter placeholder @woodoozmagic looked amidst all those other social networking handles. When we chose Woodooz for our blog, we loved it so much that we didn’t research on its availability on the virtual world. And unfortunately for us the handle was already taken for Gmail and Twitter. That’s how @woodoozmagic came into existence.

We managed the gmail situation by moving to our own custom domain. But this Twitter thing was surely an irking factor. What made it even worse was the handle @woodooz was lying idle with absolutely no updates, besides a hello for the last 2 years.


It was at this point that my friend Sai, brought to my notice on how I can report an account for brand impersonation and how Twitter helps win the handle back if the reasons and evidences provided are genuine.

It has always been our wish to build a uniform brand identity for WOODOOZ across the virtual world. So, with an open mind and a hopeful heart, I registered a case of account impersonation with Twitter.

After few mail exchanges, and more than a month’s wait, Twitter delivered the good news in our inbox today. It is indeed incredible because at one point we thought we will have to live with this asymmetry for ever.

We are now officially WOODOOZ across all Social Networking sites that matter Go ahead and join us on Twitter. It would be wonderful to have you around.

Leave a comment and share your views on what you think about uniform branding across all social networking sites. 

- Somu and Preethi

You may also be interested in

Linking in : Colours Dekor


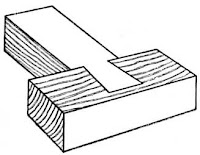
The woodworking workshop class in my 1st year engineering always spelt boredom. Back then, I was taught to use the planer to smoothen the surface of the wood. I had to work with saw, hammer and chisel to make dovetail joints (exactly like the one you see in the image). There was also foundry as part of the class where I had to file metal and make joints.

In hindsight, I wish I had made the most use of it. But in reality, I never really enjoyed my workshop class and always looked at means to avoid it.

I take immense pleasure in doing the same things now. But what was so different and difficult back then?
A dovetail joint
Dovetail Joint
Img courtesy :
basiccarpentrytechniques

What made it uninteresting for me?

First and foremost, I had to make dove tail joints without getting an opportunity to see those dovetails on a finished product. In a sense, I did not understand the rationale behind a joint. I understood planing wood resulted in a smooth surface, but never realized the consequences of the otherwise.

I did not build a cabinet or a table and in the process learn the technicalities. Maybe then, I might have understood its use better. On the contrary, a dovetail joint is all that I had to make.

It was like learning alphabets, and not using them to construct sensible sentences or like learning recursive loops, and not using them to write practical programs.

Just a funny cartoon
Looks like the same logic works for complex math too
img courtesy : loldaddy

What would have otherwise made it interesting for me?

Personally, planing wood or making joints is still so boring that I would rather not indulge in it. But what makes it interesting and necessary is the associated outcome. I need to really look at a stained finish with and without sanding for me to appreciate the need for sanding.  And it takes a wobbly cabinet to make me understand the value of a joint in the overall process of woodworking.

Rather than gaining perspectives on just the techniques, learning to make a functional product and in the process understanding the underlying principles makes learning woodworking more enjoyable for me.

I have never been bothered by the intricacies of a product. It is always about durability and good looks and it does not largely matter how one has implemented it (at least until sometime ago). Which is why to me, making a handy piece of furniture end to end, and then to work backwards to learn the specifics that went into building it, would have made more sense

Your opinion matters

What is your opinion? Have you ever had to make batter in your home economics class, but never got the chance to bake a cake? How does that feel? J Leave me a comment.

- Somu

Subscribe to our RSS feed

You may find the below projects interesting. Do check them out.

Linking in : Colours Dekor


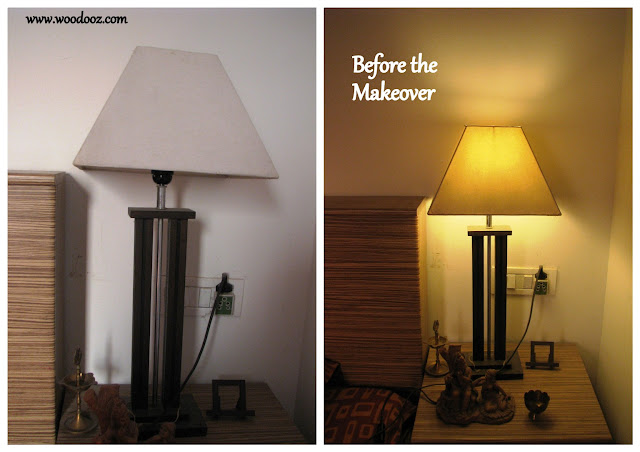
A plain white lampshade is like an empty canvas. You make what you want to make out of it. I received this really nice table lamp as a wedding gift and have long been wanting to give it some color. If you have been reading our blog, you would by now know how much we love making our own DIY lampshades. And so, I wanted to do something about a lampshade that didn't have the Woodooz stamp.

Before the makeover

The shade was made of plain white cotton fabric and that made it much easier for me. I wanted this to be a really short and easy effort like the 15 minute lampshade DIY and so went with a very simple design.
Lampshade before the makeover
Lampshade - Before the makeover

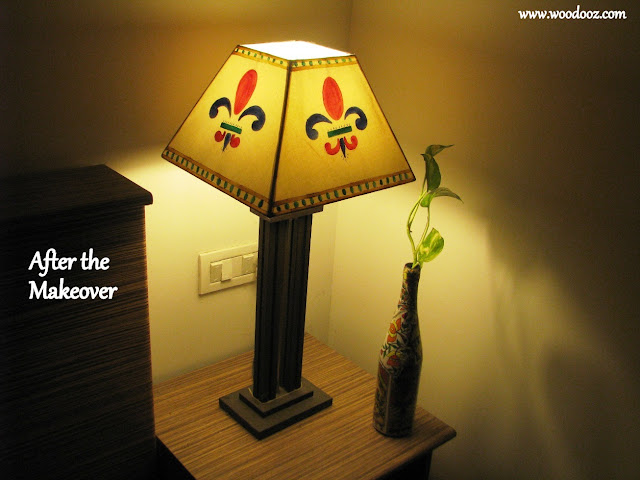
After the Makeover

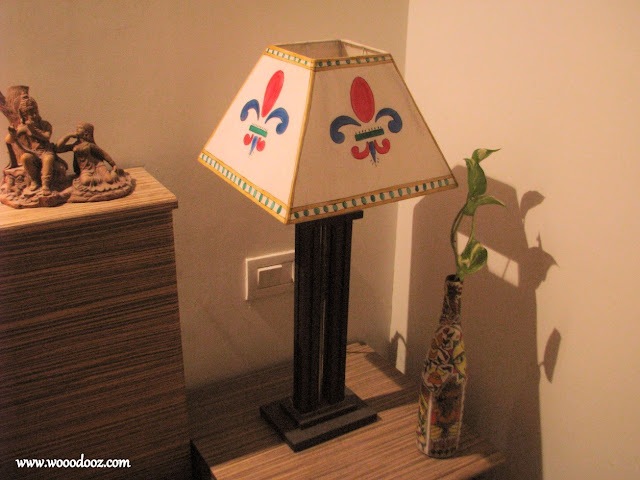
I used acrylic colors to fill the design and so, this is how it ended up looking. I am still undecided about the amount of white space in the shade. For now, I loved the simplicity of it and thought will add more designs and colors later.  I used all the primary colors just so it enables me to play around with the bedspread and the curtain colors in the future.

Lampshade - After the makeover
Lampshade Makeover DIY

Lampshade DIY
After the makeover
Let me know what you think ? Do you think I should have added more elements ? Please leave your comments and make my day. While you do that, I would also request you to join us on our Facebook page. Somu and I promise not to spam your wall.

~ Preethi


Have you read our other Lampshade posts ? 

Linking in : Colours Dekor
- Somu


A triangle, a circle, a square and some lines.  The tribal women of Maharashtra used just these figures to create a traditional folk art popularly known as Warli.

These paintings depict the social life of these tribes and are predominantly painted in white on mud walls. As is evident from many Warli paintings you may come across, they portray human figures that are dancing, farming, hunting or indulging in other such regular activities.
Now, why am I talking about Warli all of a sudden ? I recently noticed Warli art in the walls of my favorite restaurants in Chennai, and I was mighty impressed at where and how they had used it. Considering I found it in a space where I least expected to see an ancient art, I wanted to share it here. Even from the central figure in the art below, I can bet my bottom dollar that you cannot guess where the below picture was taken.
Wall art using Warli
Warli art on the wall
Would it surprise you if I said I clicked this in the men's room ? I don’t know if it is any desecration of an age old art, but I sure know someone really put his / her creative mind into good use here. Seeing this, I could not stifle my chuckle, and in all the urgency I had, I managed to stop and click this picture J
Warli Painting
Indian Warli on a European closet
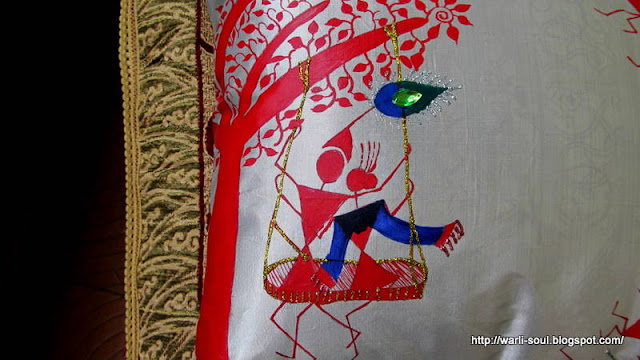
Talking about Warli and creativity, I am reminded of Aparna of Warli-Soul and so wanted to dedicate this space to  mention her work. They say Warli does not depict mythological characters or images of deities, but here is someone who stretches her imagination to create beautiful art out of the same Triangles, Circles and squares.
Indian art Indian God
Radha and Krishna on Warli - By Aparna
I so love niche blogs and I believed Warli as a niche had very limited scope for variety. I have time and again been proven otherwise by her work. She is a trained Warli artist who portrays these stick figures in newer, modern backdrops. Patricia of Colours Dekor also carried a feature of this lovely blog under the blog finds category. I strongly recommend that you check her blog Warli-soul to know what I am talking about. 
Warli Painting - by Aparna

Subscribe to our RSS feed

Meanwhile, I am going to have Preethi do a Warli on one of the walls at home. Help me convince her :)

You may also be interested in

Linking in : Colours Dekor
- Somu


Some of the common search terms that bring traffic to Woodooz are :
  1. Can I use fevicol as Mod Podge ? (In short, NO. However you can make Mod Podge out of Fevicol sans the quality of a decoupage glue)
  2. What glue to use for furniture making ?
  3. Is white adhesive same as Mod Podge ? (In short, NO)
I have never been sure if my earlier posts have addressed these queries convincingly. So, today I thought I would spend few moments writing about the adhesives that I use for my projects and in a way try to answer the above questions. Before you go any further, it is important to understand that I was neither contacted by Fevicol / Pidilite nor is this post sponsored. Much like the various woodworking tools that I use and write about, am writing about one other tool / accessory that I love working with.

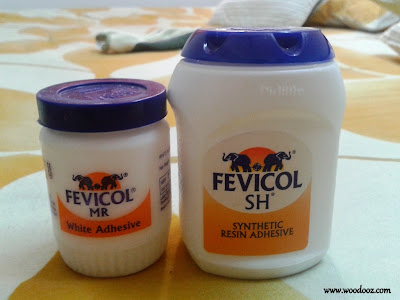
Fevicol MR (White Adhesive)

Because of the various tutorials on the net on how Mod Podge can be made out of white adhesive, it is very common to think Fevicol MR is an alternative to Mod Podge. The truth is, it is not. Fevicol MR is viscous much unlike Mod Podge and though they dry to form an invisible layer, they hardly offer the glossy "protective" finish of Decoupage glue.

This is highly recommended and used for arts and crafts projects. It can be used for joining thin and light weight materials that are less likely to exert too much of opposing force. These are also materials that are mostly handled gently with care.

Papers, cloths, buttons, Sequins, are just about some of the examples.
Fevicol - MR and SH
Fevicol synthetic resin for woodworking / Furniture projects

Fevicol SH (Synthetic Resin Glue)

When you need glue for your wooden joineries, it is better that you use one that is touted as the carpenter's glue. This synthetic resin glue is what I use for all my woodworking projects. Be it for gluing laminate or a 4mm sheet of teak, this has always worked wonders for me. 

It does not offer an instantaneous bond and hence you may have to provide the necessary pressure on the glued surfaces for a while. But once the glue dries, the bond that it creates is very strong. Since I also use only butt joints (apparently the weakest) for my projects, the glue helps prevent the wobble that might otherwise be missing in other strong joinery techniques.
Subscribe to our RSS feed. It is just a click away
Woodooz
Though there are other adhesives like hot glues, contact adhesives that are available, these are the only two that I currently use. And since they serve my purpose for the moment, I have not tried exploring other options that are available.

Update from reader comment:

Here's  the gist of what Kittu, a woodworking hobbyist for 6 years from Deccan Woodworking, had to say about the other types of adhesives available:
  1. Normally wood glue used in US and Europe is called PVA glue. This is  similar in texture to the white adhesive, only it is pale yellow in color. In fact it is referred to as yellow glue in general. Titebond is the most popular brand. Some of the PVA glues have newer versions which are considered water proof.
  2. The other type used is Polyurethane which gives out lots of smell and fumes but it is considered water proof and a must for outdoor applications.
  3. Then we have epoxy glues which are two part resin and activator and mixed just prior to application.
  4. Cyanoacrylate glues are the instant bonding type and occasionally used in wood working. It is more popular with wood turners to seal the surface.
Thanks Kittu for sharing your views. Check out the entire update from Kittu in the comments section.

What do you use ? Think I should try using something else for the bond am looking for ? Leave a comment.

You may also like :

Linking in : Colours Dekor
- Somu


Madhubani - Kalamkari Ganesha on hand made paper

This is not an original painting. It is a reproduction of Naatiya Ganesha I came across in the exotic Indian art gallery.
Somu and I have been wanting to put up a home tour for the last 2 years. Some how I have been postponing it as I am yet to fill up some walls with something interesting. One such wall is the entrance foyer and I finally managed to paint for it. I decided on Madhubani which has always been my favorite art style.
Madubani - Kalamkari Painting
Dancing Ganesha - Madhubani design on hand made paper
This time I chose madhubani style with kalamkari color combination on some left over hand made paper. For my earlier Ram - Seetha madubani painting, I had used acrylic colors. So it was quite easy this time. Acrylic works the best on handmade paper as the density is not as heavy as oil or as low as water colors.
Madhubani design of Ganesha
Madhubani  painting - A closer View
As for the thinner, I prefer acrylic gloss medium  as it prevents blotting of hand made paper. The outline on the entire image was made using black felt tip pen. So here goes - Madhubani Dancing Ganesha in our entrance foyer. 
Ganesha Acrylic painting on handmade paper
Ganesha - Acrylic painting
We wanted to save some time and did not want to indulge in DIY photo framing. Since we wanted the frame to match the rest of the framing that we did for the other paintings at home, we gave that task to our regular framing vendor. 

Your turn now : Tell me how you like the painting. Good, bad or otherwise, please leave your comment. It will fuel my passion and make me want to do more.

~ Preethi

You may also be interested in our other works in the entrance foyer

Linking in : Colours Dekor


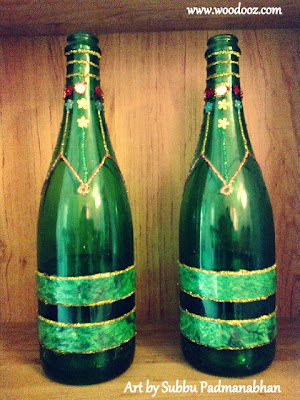
So far, Woodooz has always been about our works. We thought it is about time that we also use this platform to showcase arts and crafts by others, particularly those that do not have a blog to write about their work. In the recent days, we have been reaching out to talented friends and family and the first in this series of Woodooz Showcase is a DIY bottle art by my sister Subbu Padmanabhan.
Preethi and I have always been fascinated by wine bottle art, and so when we laid our eyes on these bottles during our last visit to Bangalore, we wanted to know how it was done.
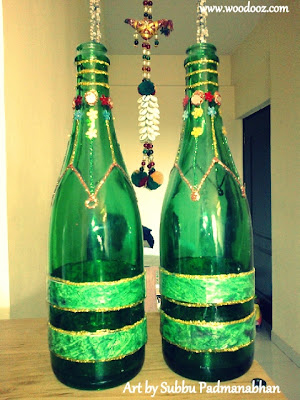
DIY Wine Bottle art
DIY Wine Bottle Art
Woodooz Showcase
               Art by Subbu Padmanabhan
So here it is, in her own words : 
"I wanted to keep it simple and so went for a minimalist design. The green wraps that you see in the bottom is handmade paper, bordered with glitters. I stuck the paper on to the bottle using cellotape."
Yeah, Cellotape. No fancy decoupage glue used. 
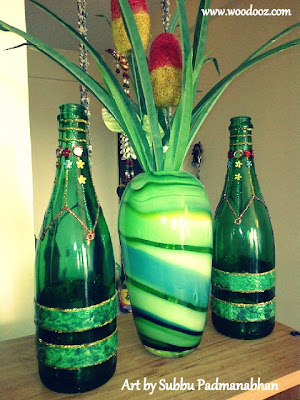
How to recycle wine bottles
Wine Bottles - Recycled
"For the top, I again chose a simple design, and had it drawn lightly using a pencil. I filled up the line drawing with Fevicryl 3D glitters. I then completed the design by gluing sequins around the top of the bottle"
Wine bottle Craft ideas
Craft idea for your Wine bottles
"I left most of the surface area of the bottle blank, because the green backdrop was by itself enhancing the look.  And now this pair of bottles lay right where everyone can see them - In the living room."

So how did you like it ? Sometimes overcrowding can be an overkill, and we thought it is the simplicity of the design that makes it stand out. Leave your comments and let the artist know what you think of her work.
Another wine bottle idea that we loved : 
by Sarmistha Roy 

About the Artist
Subbu Padmanabhan is a mom to a 3 something year old boy, and works as faculty in a premier play school. She likes to indulge in mini crafts projects, for the school and her home, during her spare time. The wall art that you see in the backdrop of this bedside lamp is her handiwork too. She lives in Bangalore.

You may also like :

Linking in : Made with Love PartyColours Dekor
- Somu


  • Do you prefer a designated space for your phone ?
  • Do you find it hard to hold your phone while watching a video on Youtube ?
  • Do you place the phone face up on the table and barely hear your alarm because the speaker is in the rear ?
  • Like me, do you get into the habit of looking for your phone under the couch, under the pillow, or in the balcony, because you don't know where you kept it ?
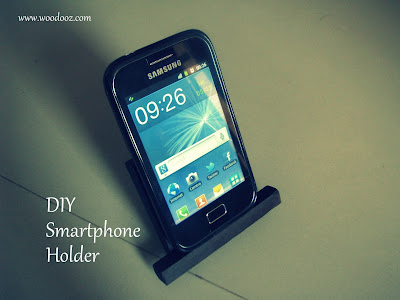
Here's an easy to do Smartphone holder that you can build yourself to keep your phone safely in one place. Remember the over-sized mobile phone charger holder that didn't need any nailing down ? This time I wanted to make a right-sized holder for my smartphone.

Smartphone Holder DIY
DIY Smartphone Holder / Stand
This is a simple DIY that uses wooden sticks. Scroll below to find out how you can make a smartphone holder.

Smartphone stand
Make your own smartphone holder

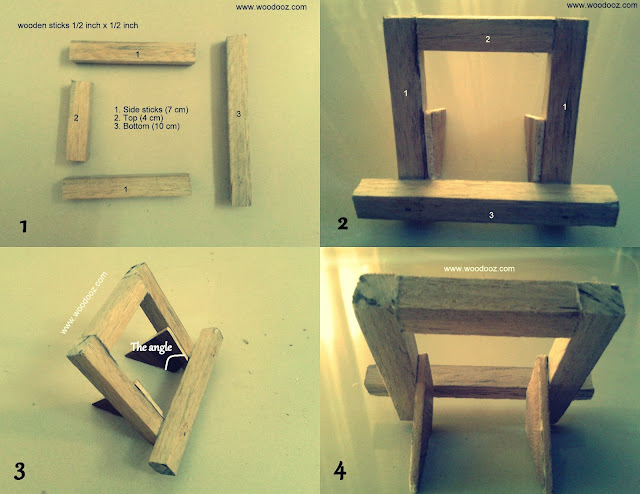
Materials Required - Picture 1

    • I used 1/2 inch x 1/2 inch sticks (The same sticks that I used for this bedside lampshade base)
    • Used wooden board (4mm) for the supporting rear (You can also use thick card or cork board)

Cut and glue the sticks together - Picture 2

    • Cut the sticks to your required dimensions. The dimensions should be such that it should be able to hold the phone vertically and horizontally
    • Glue them together. Notice how stick 2 is in line with sticks 1, while the base (stick 3) that will hold your phone is glued on top of the side sticks ?
Smartphone holder - DIY
Smartphone holder - Do it yourself

Make the triangular rear support - Picture 3

    • Cut a triangle out of the card board and stick on the inner sides of sticks 1 
    • This board will support the holder while it is leaning backwards. The backward lean is required to prevent the phone from slipping off.
    • The angle of the backward lean is decided by the angle between the two inner sides of the triangle. 

Make sure your speaker is not hidden - Picture 4

    • Make sure the dimensions of the sticks are such that they do not hide the speaker when the phone is placed on the holder. 
    • So, here it is, a smartphone holder for less than Rs.10. Yeah, really. Less than Rs.10
    • Paint, stain or do whatever you want to give your holder color.
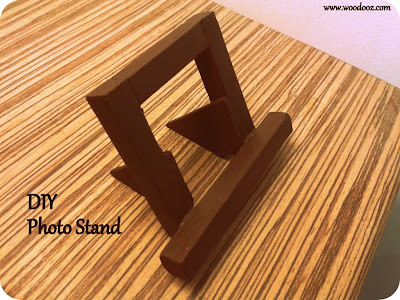
You can also additionally use it as photo holder, or greeting card holder. Works out to be a neat alternative to DIY photo frames.
DIY Photo Stand
Photo stand DIY - Place your photos on the base :)
So, how did you like this simple DIY? Where do you place your Smartphones? Much like me, are you just as careless and never bother about how you handle your phones ? Leave a comment.
Subscribe to our RSS feed. It is just a click away
Woodooz

If you liked this DIY tip, you may also be interested in our other posts :

Linking in : Colours Dekor, Made with Love Party
- Somu


When I wanted to professionally learn art to hone my skills, I turned to Mrs.Jebamani Elango who is our friend's mom and also the art teacher in Somu's school. Both uncle and aunty are amazing professional artists, and were kind enough to accommodate my request to help me with improving my skills.
Though it was oil painting (Check out Buddha on Canvas and an Aravind Kolapkar reproduction) that I wanted to particularly learn, they advised me to start with Oil Pastel to better understand the fundamentals. While all the paintings below are my own handiwork, the credit to the originals go to Mr. and Mrs. Elango (Wish I could link them here. But they are not on any social media) whose work I merely reproduced. 
Oil Pastels
Art book and oil pastels
The below scenery apparently is a place in Kodai. This was uncle's work and he gave it to me to start off my learning process. Lot of corrections were suggested and I learnt how to give depth to a painting.

Scenery using oil pastel
A serene place in Kodai captured in Oil Pastel
I followed it up with another scenery of the woods. I learnt more about giving depth to a painting. Again this is a view of one of the many beautiful places in Kodai.

Woods - Oil Pastel
Woods - Oil Pastel

Know more about us

About Us
Reviews
Media
Our showroom location
Return and refund policy
Review us on Google

Connect with us


Mail us
Subscribe to our newsletter

Our Address :
Woodooz Home Decors,
3/371, First floor,
Metukuppam, Thoraipakkam,
Old Mahabalipuram Road (OMR),
Chennai - 600097.
Ph : +91 9884070470
Email : contact@woodooz.com
Created By SoraTemplates & MyBloggerThemes