When I started indulging in woodworking DIYs, I wanted a platform to showcase all that I did. Besides being a showcase, I also wanted to use the platform to reach out to other woodworking hobbyists. Most (in fact all) of what I do is learnt from the plethora of information that is available on the net. However, nothing comes anywhere close to garnering inputs from someone directly. 

When local carpenters were not too keen on revealing their trade secrets, I started seriously looking for fellow hobbyists. DIY woodworking not being a popular hobby in India, there were not many blogs that I came across in this niche (in India that is). There were two though that I was happy to discover and wanted to present them here. 

Indian DIY and Woodworker

This blog run by Indranil Banerjie is all about hardcore woodworking. Here he talks about his home work shop, use of various power tools, and other woodworking tips. In his own words, “ I will offer my advice and relate my experience with DIY and woodworking issues in this blog and hopefully this might motivate you to join the movement”. 

House on the Rock

Vinay Oommen, who is a doctor by profession, runs the House on the Rock. Vinay shares his woodworking projects like the simple bookshelf, key chain holder, kid’s table and more that he made for his home. He is pretty new to blogging and has a keen sense of humor which is evident from this post of his. In his own words, “This website aims to provide those interested with tips and pointers on starting woodworking from scratch”.


In the coming weeks, we also want to list our favorite arts, crafts and home decor blogs that we ardently follow every day. Meanwhile, do visit these woodworking blogs and let these gentlemen know what you think of their work. I would love to add more such Indian Woodworking blogs onto this list and so, if you know a certain blog , do leave a comment. Even otherwise, leave a comment :)

If you like Woodworking, you will certainly like these other posts too

  - Somu


We live in an apartment. Every space outside our humble abode is common space. That means I have to do all my work inside the house.
  • To cut a piece of wood I use the center table in the living room.
  • To bore a hole into wood I use the little space in the guest room
  • To Paint or stain wood I use either of the balconies
  • And my tools are all in the service area
Clean up the mess
This is only a fraction of the mess I make
Now, here's the downside to not having a dedicated work space. There is going to be lots of scrap wood, saw dust, dirty cloth, screws, nails, sand papers and tools all strewn across every square inch of where you work. What is even worse is the spilled paint / stain or the quick bonding fevicol on the tiles that takes lot of work to remove. And trust me, tidying up is the most boring task of any woodworking project. Sanding only comes second.

Here are some useful tips that you can follow to make things easier for yourself:
  1. Try to work in one place. Makes cleaning up easier even if you generate lot of mess
  2. Move your tools closer to your place of work. Reduces moving around while in the middle of a project.  I moved most of mine into an empty shelf in the guest room wardrobe.
  3. Spread news papers across the floor. When you are done, rather than picking up the bits and pieces, you can just carefully remove the papers and dispose them off. You may also want to do it on the wall. Paints and stains on wall are quite impossible to remove.
  4. Have thinner with you all the time. Any spills can be managed immediately by wiping off the stains from the tiles using thinners
  5. Try to finish your work before the maid gets to work. The sweeping and mopping will take care of most troubles you create.
  6. Wear latex gloves while using paint. They are inexpensive and can be thrown off after use. Also reduces effort spent on cleaning up your fingers. In Chennai, you can get these gloves for Rs.3 a pair at Nilgiris.
  7. Use inexpensive containers for mixing paints, sealants etc… Again reduces clean up work as you can straight away dispose them after use.
Most importantly, make sure you wear these essential safety gears while indulging in a woodworking DIY project. Mess can be cleaned up. But a broken finger may take time to heal.

Your turn now : 
  • Do you make a lot of mess while indulging in DIY ?
  • Do you enjoy the clean up process ?
  • Do you have other clean up tips to share ?

Linking in : Colours Dekor
- Somu


If you have not noticed yet, we have moved on from blogger (woodooz.blogspot.com)  to a custom domain (www.woodooz.com). Today, we take a certain amount of pride in having effected this migration to a custom domain. All credits to you for relentlessly visiting us and giving us your words of encouragement through your comments and visits. There are few reasons why we were compelled to move to a custom domain and we thought it is only apt we share it here.

1. We are serious about Woodooz

While we started making projects for our own use, we were also happy to honor requests from friends and family, who incidentally were willing to pay for it. We realized we were in love with this obsession and noticed we were putting in more seriousness, passion and commitment into what we were doing. Thought this was a way to show the world too that we are indeed serious about Woodooz.

2. We didn't like our E-mail address

woodoozmagic@gmail.com it was. Though we would have preferred Woodooz, it was sadly taken by someone else :( We believed in having the same identity across platforms and somehow this email thing was irking. But now, we have contact@woodooz.com for general queries and we thought it will give the blog a more professional distinction.


When we made a post on a DIY laptop stand, Vinay Oommen from House on the Rock asked : "Hi Can you post sometime on how to work with laminate : How to cut it, paste it and precautions to be taken, tools to use and avoid etc." So here goes.
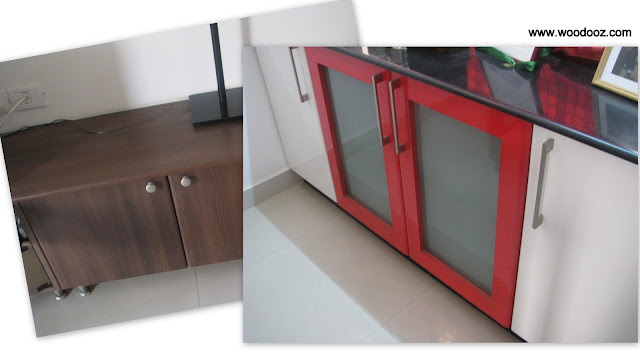
Wooden laminate, a popular choice for wardrobes and kitchen cabinets, is ideal for your small woodworking furniture projects. Laminates provide a whole range of options in terms of color, texture and patterns adding the much needed variety to your home DIY projects. You can check out Merino Laminates or Greenlam India to get an idea.

Laminates for wardrobes and cabinets
Cabinets installed with laminates


This tutorial only addresses simple installation of laminates using Fevicol SH synthetic resin glue for “small” projects that you do inside your home. Their industrial applications and factory installation using presses are not handled here. This DIY also has nothing to do with wooden floor laminates.

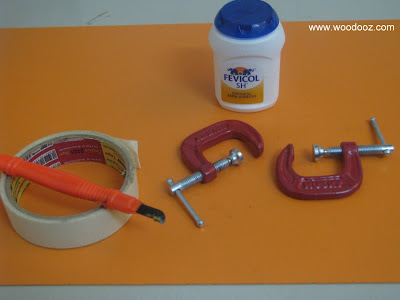
Step 1: What you need

Laminate installation - materials required
Materials required for laminate installation

  • Laminate (May be available only in 8ftx4ft or similar standard dimensions. You will have to check with your supplier if he will have left over stuff)
  • Cutter (A mica cutter or an xacto knife)
  • Glue (Fevicol SH Synthetic resin glue)
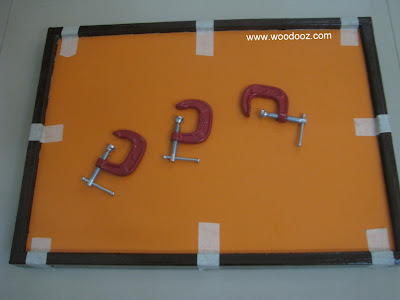
  • Masking tape or clamps


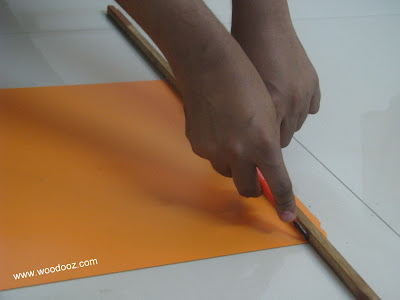
Step 2: Cutting the laminate

Laminate being cut using a mica cutter
Cutting laminate using mica cutter / Xacto knife

  • The laminates are only 1mm thick which makes it easy to cut them to the desired size using a mica cutter (shown above) or an xacto knife.
  • They can be cut much like how you would cut a sheet of cardboard using a pencil knife.
  • Run the knife or the cutter along the cutting line couple of times before breaking the laminate off.


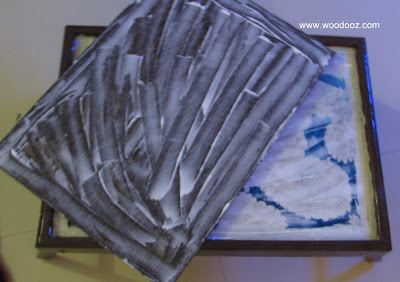
Step 3: Applying glue

Glue application for laminate installation
Glue applied on the rough underside and on the wood surface

  • Have you seen tiles being installed on a smooth wall?  Before the installation, the wall is chipped a little along the area of installation to make it rough. This makes it easy for the cemented tile to have a strong hold.
  • Similarly, laminates and Mica sheets come with a very rough underside enabling a strong bond to be created with the surface it is being stuck on to.
  • Apply glue generously on the underside and also on the wooden surface. Give it a minute.


Step 4: Installing the sheet

Laminate held onto the wood using masking tape
Use masking tape and clamps to hold laminate in place

  • Remember I mentioned that they are only about 1mm in thickness? It means that they have a natural tendency to bend (will break beyond a certain point). Because of this bend, they may not sit properly when the glued underside is placed on the wooden surface.
  • To overcome to issue, it is important to hold the laminate tightly pressed onto the wooden surface until the glue dries.
  • Use a masking tape (Click here for other practical uses for the masking tape) or C-Clamps to keep the laminate in place. Allow enough time for drying (Be safe and wait 8 hrs at least)

Did you like this post ? Enter your E-mail address and join our growing E-mail list


Any protrusion of the laminate can be trimmed using the xacto knife to ensure it is neatly aligned along the edge of the wooden surface.

So there you go. Try it out. My plywood supplier has lots of leftover laminate sheets in different sizes. He does not have much use for them because there may not be takers and so is always happy to part with them for an amount. You just need to be lucky enough to find the colors of your choice just as I found the orange laminate for my DIY laptop stand.


It's your turn now
  • Have you worked with laminates before? 
  • Have you used it for your wardrobes and kitchen cabinets ? 
  • Did you have a tough time choosing from the variety of available designs ? 
  • Share your thoughts.

Linking in : Colours Dekor
- Somu


The template

I was super excited when a colleague wanted to custom order a clock to be given as a gift to someone special. Red and shaped like a diamond were the only specifications that were given. Ever since, I had been running the design in my mind. I wanted to build something simple, yet elegant and came out with the below template built using reaper sticks.
    Attention : If you came here looking for how to make a wall clock, I recommend that you watch my video post on Clock assembly, Materials to use and how to fix the clock mechanism
Wall clock template
The Clock Template

Clock assembly and the numbers

Once the template or the clock base is built, it becomes easier to assemble the rest of the clock. All my earlier clocks (DIY wooden wall clock 1 and DIY wall clock 2) had wooden buttons for numbers and so this time I wanted to consciously avoid them. After much deliberation, came out with a very simple idea of using something that is easily available around the house. Can you guess what we used for the numbers?

Clock template
The clock waiting to be assembled


DIY Laptop Stand

Working from home is turning out to be more resourceful especially considering the commute distance. The low center table  has always been where we laid the laptop while working. However, there are times during a call when we needed to work from the room, and it was not possible to move the table. And so the need to make a portable DIY laptop stand. While it was intended to be used as a laptop stand, here are other functional uses for this piece of furniture.
Make your own DIY laptop stand
DIY Laptop stand


Have you turned on Timeline for your Facebook page ?   We are crossing a milestone today with this being our 50th post and so turned on Timeline (go ahead, check us out, like us and make our day) and are totally in love with it. All Facebook pages will be mandatorily moved to the new format on the 30th of March, and here are some key points for you to consider before the shift.
50th Blog post

 Use a cover photo to make that critical first impression

The exact dimension of the cover photo is 850x315. Facebook will stretch or crop your photo should it be of a different dimension. And no, you cannot just have anything on your cover. Facebook has formulated set of rules for the cover photo which cannot have, among others, price information, contact / website details, and calls to action. Check out some really cool and creative Facebook cover photos for inspiration

Important : Only the bottom portion of the cover photo will be directly visible. The user will have to manually scroll to view the top portion. So, make sure you capture the most important detail in this bottom visible portion. 
Facebook Profile and Cover photo


Seriously. Why make your own Mod Podge when it is readily available !

In Chennai, until sometime back, Pidilite’s Hobby Ideas Glue ‘n’ Gloss was the only decoupage glue (that I am aware of) available in crafts stores. But recently, when my search for Glue 'n' Gloss hit a roadblock, I was given to understand they have decided to stop its production. And hence the need to make my own Mod Podge from easily available resources.
A decoupage on wine bottle using Hobby Ideas Glue n Gloss
Click to view our decoupage post
After a bit of research on the net, here’s what I found. This is a quick DIY using Fevicol. I tested it on a piece of wood using news paper bits and it did work. However, be aware that this is only a cheap alternative (not in cost but in quality) to Mod Podge.

Quick tutorial on how to make your own Mod Podge

  • Get Fevicol MR from your near by hardware / crafts store
  • Mix equal parts of water to it (50-50 mixture). You can also use Camel’s acrylic gloss medium instead of water
  • Shake / stir well until the glue and water form a dilute homogeneous mixture
  • Use it the way you would use Mod Podge 
  • Apply few layers of clear varnish to protect your work. Fevicol + Water cannot provide the same kind of protection Mod Podge can 
Make your own Mod Podge
How to make Mod Podge at home

Some Caveats

  • The classy effect of Glue ‘n’ Gloss is blatantly missing. 
  • And to play the devil's advocate, here's a blog post on why this method is not recommended for long lasting effect
  • So, use your discretion. Make this DIY decoupage glue only because Mod Podge is not available in your locality. 
I wrote to Pidilite about this and they were kind enough to call back. Glue ‘n’ Gloss is officially going out of production and their Hobbyideas ModPodge is available in select stores (Chennai unfortunately is not in that list). Here’s the address of two stores, besides many others, that are stocking the Mod Podge

HOBBY IDEAS
Kemps Corner,
Noah's Art,Ground Flr,
Kwality House,Kemps Corner,
Mumbai – 400036
912223825621/ 912222937776
HOBBY IDEAS (STAPLES)
East Land Holdings Pvt. Ltd.
Muncipal No. 102, Hosur Road,
Opp. Big Bazaar, Koramangala,
Bangalore – 560001
080 - 40928005


The next time I am in Bangalore, I know where I am going to be shopping. Meanwhile, if you are in Chennai, do you know places where I can get Mod Podge. Until then I am going to try this home made Mod Podge recipe.

Update : Click here for the complete list of stores in India where Mod Podge is available.

References :
SHARE YOUR THOUGHTS
If you have used this DIY glue, do let me know your experience with it

Linking in : Colours Dekor
- Somu


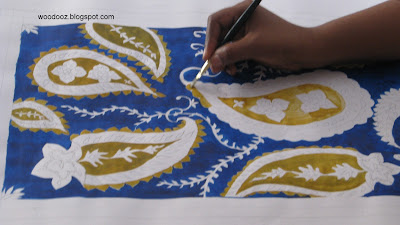
A painting after a long time. I painted this for a specific purpose and chose paisley patterns after lot of deliberation. I love the simplicity of these patterns and the ethnicity that they exude. To me, the shape of mango is what comes to mind when I see these patterns, which is how I was taught to draw a mango back in my good old school days.
Paisley Pattern
Paisley patterns - Work in Progress
I wanted bright colors and hence chose prussian blue for the back drop as I thought the yellow ochre I chose for the patterns would easily stand out. Yellow ochre is also something I loved from my earlier Buddha painting on canvas. Used water color on an A2 executive bond.

Paisley Motif
Paisley motif
For the uninitiated, "Paisley pattern is a droplet shaped vegetable motif of Persian or Indian origin. Resembling a twisted tear drop or a kidney, it derives its western name from the town of Paisley, in Central Scotland. In Tamil the design is known as Mankolam and has been long used in India. " (Source : Wikipedia) The strokes are visible at a closer look, but will hopefully disappear when we do what we eventually do with the painting.
Paisley Pattern Painting
We are trying to put this painting to good use and still brainstorming on how we can have it displayed. Meanwhile, we would love a little help  from you. Take this poll and let us know what you think we should do with this painting.

PREETHI

Click here to SHARE YOUR THOUGHTS
What does paisley remind you of ? Mangoes it is for me.

If you liked this, you may also be interested in:

First things first. We are really happy to share with you that we were featured as Blogadda's notable newbie of the week.  Quite a proud moment for us in this blogging journey. We really loved what they had to say about us. Sincere thanks to every one of you for your encouragement through your visits and comments.


Linking in : Colours Dekor
- Somu


So, how do you install curtains,
  • When your landlord does not allow for drilling on walls in your rented apartment ?
  • When you don't have the necessary tools to drill on wall ?
  • When you don't want to puncture a hidden water pipeline or electrical duct ?

how to install a curtain rod
How to install a curtain rod without drilling on wall
Here's how you can install curtain rods using adhesive hooks, without having to drill holes on your wall. This is an easy to do installation and anyone can try this out at home.


I did write a little about how Google Sketchup is a wonderful, easy to use free tool for furniture designing. With Google introducing the ability to embed models using html (Visit our Gallery), I thought it deserved a much detailed post. Sketchup is a freely downloadable application for creating 3D models and has a simple to understand interface.

Google sketchup as a design tool

The interface comes with a patented push and pull technology which makes creation of 3 dimensional images a cakewalk. Quoting Wiki, “Images can be created in 2D and these 2 dimensional planar faces can then be pushed or pulled by editing tools within the environment to easily and intuitively model 3D volumes and geometrics”.

The interface also has the axes in place which makes drawing a certain line or an image along a particular axis much easier. 
Google Sketchup interface


Below are some practical uses for the Sketchup interface. The images below are embedded directly from my Google Sketchup warehouse - a feature that enables home decor and design bloggers to showcase their design work with a 3D perspective to their readersYou can rotate the images below along the Y-axis, and have a 180 degree view, while the Google Sketchup application allows for rotation along any which axis that you desire. 

Understand the color schemes that can be used for the furniture. The interface allows for various colors as well as textures to be applied onto the image faces. This enables experimenting with colors / textures, especially when you are making your own furniture or custom making it, before taking a decision
Design the interior of a room (in our case a kitchen). Play around with cabinet / couch / table / draw / shelf etc... placements, especially when the piece of furniture is a permanent fixture and cannot be moved around. You want to do a feature wall and want to know how it will affect the overall look ? This is a tool for you. Take a moment to let us know how the image looks in comparison to the actual red and while kitchen below.

Provide the end user with a 3D visual of what you are building for him / her. It allows for discussion and enables the user to modify any aspect of the design that he / she may not like. The user can also give his stamp of approval of the design and any contention at a later stage on the end result can be amicably handled.
Convert the approved design into a 3D skeletal view. This is more so useful to understand the number of planks required and at what dimensions. This allows for estimating raw material required and for evaluating cost. Also to understand where additional reinforcements, in terms of screws and glue, are required.

Pin It
red and white kitchen
Red and White Kitchen
These are only some of the uses that I have encountered for my personal requirements. However, this tool is extensively used in automobile design, architecture, interior designing, etc... with an ability to contribute and share your models with friends. The 3D warehouse also has a load of  models from other designers that can be downloaded and modified per your requirements. The options are limitless and I have listed only a very limited aspect of it.  Certainly an alternative tool to Autocad. Try it out. It is bound to be lot of fun.


SHARE YOUR THOUGHTS
  • How do you plan your designs before implementing them?
  • Be it decorating your room, or building a piece of furniture, do you visualize what you want and how you want through an interface besides your mind ?
  • What tools do you use ?
  • Or do you love the traditional way of capturing your visuals in a paper ?
  • What do you think of the 3D image of the kitchen in comparison to its original counterpart ?          >>>>>>>

P.S. I also intend to provide a detailed DIY tutorial of this center table and this garden corner shelf using the Google Sketchup tool. Be back for more or just stay in touch through our FACEBOOK FAN PAGE.


Linking in : Lines Across My FaceColours Dekor - Somu


Here is a short DIY tutorial on how to make your own wooden DIY photo / picture frame . These photo frames are built completely with wood materials that are easily available at the local plywood store.

All the materials, supplies and tools required were bought at a local hardware store in Chennai. Only tool that is used is a hack saw blade which is available for Rs.2/- at the hardware shop. Ready made wooden frame moulds are also available which come with the groove for glass / picture insertion.
Photo frame DIY
Wooden DIY Photo Frame
Home made picture frame
DIY Photo frame

How to make a picture frame
Make your own photo frame

1. Materials, supplies and tools required

  • Wooden sticks (1/2"x1/2")
  • Plywood beading (Usually used for edge banding and available in different designs. We have used the curvy edge banding for this frame
  • Glue (Fevibond / fevicol)
  • Hack Saw blade
  • Set square (To mark the 45 degree miter joint)
  • X-acto knife or a pencil knife

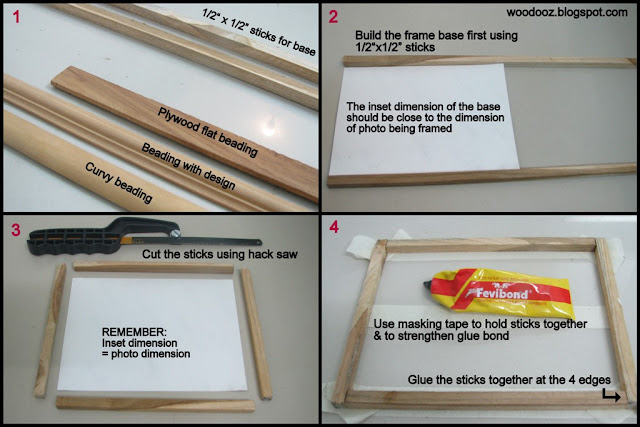
2. The wooden stick base

    The wooden stick will form the base of the photo frame and will not be visible from the front. The frame face (Beading) will be glued onto this base.

3. Cut the wooden sticks

    Cut the wooden sticks to the desired length using a hack saw blade. These cut sticks will be glued to each other to form a rectangular base onto which the frame face will be glued. The inset dimension of the rectangular base should be equal to or slightly higher than the dimension of the photo being framed, else the photo will not fit into the frame.

4. Glue the sticks together

    Generously apply glue on the edges of the wooden sticks and glue them together. Use masking tape to hold the sticks together while the glue is drying. Allow for at least 3 hours before the glue can completely dry. Allowing it to dry ensures the glue bond is much stronger.
Useful tip: Use a masking tape to hold the sticks together. This will ensure the sticks do not move away from each other and will also provide enough pressure to strengthen the glue bond
Do it yourself photo frame
Learn to make a wooden photo frame

5. Build the frame face using plywood beading

    Now cut the frame face. The outer edge of the frame should align with the outer edge of the base. The frame will look good if it is joined together on the edges using a miter joint (the edges are at a 45 degree angle)

6. Mark the 45 degree angle

    Before cutting the frame, mark the 45 degree angle using a set square. To ensure the hack saw blade cuts along the 45 degree line, create a ridge or groove along the line using an Xacto knife / pencil knife or a mica cutter. This will ensure the blade does not slip while cutting and will result in an almost perfect 45 degree cut.

7. Cut the wooden frame

    Cut the 4 frame sticks to the desired dimension using the hacksaw blade. 

8. Glue the frame to the base

    Generously apply glue both on the rear of the frame and the rectangular base. Use masking tape to hold the frame tightly onto the wooden base. Allow for at least 3 hours of drying time.
Useful tip: Make a ridge or groove along the 45 degree line to ensure the hacksaw blade does not slip and stays on the cutting line resulting in an almost perfect cut
How to make a photo frame using wood
Wooden photo frame - Do it yourself

9. Clear view of the frame face being glued onto the wooden base

10. Rabbet

    Rabbet is a step-shaped recess cut along the edge or in the face of a piece of wood, typically forming a match to the edge or tongue of another piece. The additional width of the frame stuck to the wooden base forms a recess or groove (called rabbet) at the rear, onto which the picture will be housed

11. House the photo in the rabbet

    Overturn the picture and place it neatly on the recess formed at the rear of the frame.

12. Your wooden photo frame is ready to be showcased and showed off

FAQ: What is Miter Joint?
A Miter Joint (mitre in British English), sometimes shortened to miter, is a joint made by bevelling each two parts to be joined, usually at a 45 deg angle, to form a corner, usually a 90 deg angle. Common applications : Picture frames, pipes and molding.
Source: Wikipedia


Curious to know how the photo frame has been made to stand  upright on the table ? Join us on FACEBOOK just so you don't miss the follow up post on making the stand using wood / cardboard / cork board and a hinge.

Meanwhile, let me know what you think of this DIY. Do you think there is a better way to do this ? Are there alternatives to a wooden stick for making the frame ? Have you done a DIY frame post yourself ? Do share the link. Would love to know your methods.

Linking in : Lines Across my Face, Colours Dekor


A Pilot hole is a small hole that is drilled into wood, before driving a screw, a larger drill bit or a nail. Following are the common reasons why a pilot hole is required:


  • It is not possible to generate enough power using ones hands to drive a screw directly into wood, unless a power screw driver is used. Pilot holes make it easier to drive screws using a hand screw driver


  • When a screw / nail is driven directly into wood, it might possibly split the wood. The chances are very high if the screw / nail is used along the corners / edges of the wood. Pilot holes help prevent tension on the wood making it easier for screws to be sunk without causing any damage


  • When using a larger drill bit, it is possible for the drill to slip while it is being driven. The pilot hole increases accuracy by acting as the guiding fissure into which a larger screw / drill bit can be easily and precisely driven
What is a pilot hole?
Pilot hole for driving a screw in wood
Pilot holes have to be lesser in diameter and depth than the screw that is being driven into it. Larger holes will not create enough grip around them for the screw to tightly hold on to the wooden surface.

Pilot holes are commonly used within the house for installing a bathroom hanger, key holders, hanger rods for the wardrobe etc… while they are also extensively used in furniture making, cabinetry, and other woodworking needs where screws and nails are predominantly used.

If you liked this post, you may also be interested in
What is sanding ?
What is the difference between Wood stain and paint ?
How to install Euro hinges ?
How to install a glass door ?

P.S. Linking in : Lines Across my face
- Somu


Painter’s Masking tape is commonly used during painting of walls, particularly a feature wall. Considering the adjoining walls have a different colour, the masking tapes help prevent bleeding / dripping of paint onto the other walls on the edges and also to get that perfect much needed straight line effect. This is also used to cover wooden trims, switch panels and plug points.

Prevent bleeding of paint

The masking tape is also a very useful tool while painting wooden furniture or even small wooden crafts. It is especially useful to prevent paint or varnish from dripping onto other surfaces. Both these media are highly viscous and hence any ignored drip can form a blob which will be difficult to eliminate later.
Masking tape on wood
Painter's Masking tape - Avoid dripping / bleeding


Before getting into the how tos of Priming and Painting wood, it helps to understand a little bit about the difference between wood paints and stains. This tutorial is particularly useful for your everyday small wooden DIY projects while it can also be extended to bigger ones like your furniture.
Note: This post only addresses painting on bare wood. The technique is different when an already finished wood needs to be repainted.

Why is priming required on wood ? (Back to Top)                                                                                           

  • Priming is essential to provide the undercoat and topcoat of paint an even surface
  • It allows for uniform absorption of paint, helps cover the grains and pores and thereby enables a flat, opaque, and smoother finish.
Some safety pre-requisites (Back to Top)                                                                                          


Primer and paint give out strong fumes. It irritates the eyes and can also cause certain discomfort if inhaled. You may want to be better prepared with woodworking safety equipments like face masks and eyegears while indulging in this activity.

Materials and consumables required (Back to Top)

Primer allows for uniform absorption of paint, helps cover the grains and enables a flat and smoother finish
Wood primer and paint
Primer, Paint and Brush


Drilling nail on the wall is not a viable solution for every requirement, particularly when you are looking for a stand for light weight appliances like mobile phones or IPODs.

Did you come here looking for a Smart phone holder ?  Click on the link for an incredibly easy DIY that will cost you not more than Rs.10 

The hanging stand:

The mobile phone charger holderis a wonderful alternative to permanent fixture stands and is useful for holding mobile phones, PDAs, IPODs, and broadband modems. Only requirement for such holders is that they need a charger plug as a support system. The holder hangs on the charger plug itself and does not require any additional hinge support. This is a much better option than to have the phones lay on the floor or a counter or hanging from the charger while charging.

Mobile phone charger holder - The hanging stand

The Inspiration:

This DIY was heavily inspired by a mobile phone charger holderthat I stumbled upon in a duty free shop. However, since it was meant for our broadband modem, I made it slightly bigger. It turned out to be a perfect substitute for placing our broadband modem on a small stool. It was space saving, eliminated the need for a side table and also helped easily hide the clutter of the cables.

Here's a very creative mobile phone charger holder that I just stumbled upon in Pintrest @ makeit-loveit. Amazingly creative.

P.S. Linking in : Line Across My Face, Colours Dekor

- Somu

Know more about us

About Us
Reviews
Media
Our showroom location
Return and refund policy
Review us on Google

Connect with us


Mail us
Subscribe to our newsletter

Our Address :
Woodooz Home Decors,
3/371, First floor,
Metukuppam, Thoraipakkam,
Old Mahabalipuram Road (OMR),
Chennai - 600097.
Ph : +91 9884070470
Email : contact@woodooz.com
Created By SoraTemplates & MyBloggerThemes