 |
| Wooden DIY Photo Frame |
 |
| DIY Photo frame |
 |
| Make your own photo frame |
1. Materials, supplies and tools required
- Wooden sticks (1/2"x1/2")
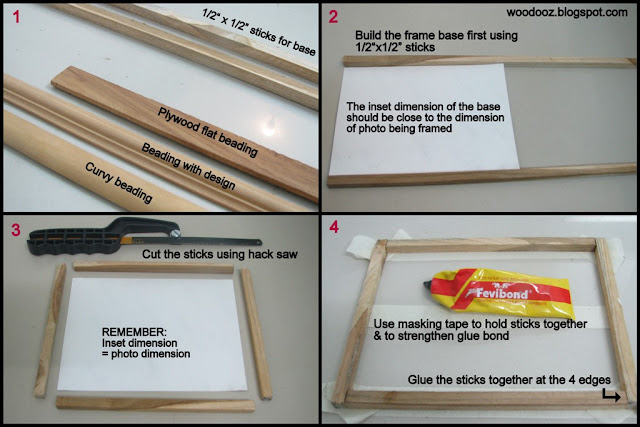
- Plywood beading (Usually used for edge banding and available in different designs. We have used the curvy edge banding for this frame
- Glue (Fevibond / fevicol)
- Hack Saw blade
- Set square (To mark the 45 degree miter joint)
- X-acto knife or a pencil knife
2. The wooden stick base
The wooden stick will form the base of the photo frame and will not be visible from the front. The frame face (Beading) will be glued onto this base.
3. Cut the wooden sticks
Cut the wooden sticks to the desired length using a hack saw blade. These cut sticks will be glued to each other to form a rectangular base onto which the frame face will be glued. The inset dimension of the rectangular base should be equal to or slightly higher than the dimension of the photo being framed, else the photo will not fit into the frame.
4. Glue the sticks together
Generously apply glue on the edges of the wooden sticks and glue them together. Use masking tape to hold the sticks together while the glue is drying. Allow for at least 3 hours before the glue can completely dry. Allowing it to dry ensures the glue bond is much stronger.
| Useful tip: Use a masking tape to hold the sticks together. This will ensure the sticks do not move away from each other and will also provide enough pressure to strengthen the glue bond |
 |
Learn to make a wooden photo frame
|
5. Build the frame face using plywood beading
Now cut the frame face. The outer edge of the frame should align with the outer edge of the base. The frame will look good if it is joined together on the edges using a miter joint (the edges are at a 45 degree angle)
6. Mark the 45 degree angle
Before cutting the frame, mark the 45 degree angle using a set square. To ensure the hack saw blade cuts along the 45 degree line, create a ridge or groove along the line using an Xacto knife / pencil knife or a mica cutter. This will ensure the blade does not slip while cutting and will result in an almost perfect 45 degree cut.
7. Cut the wooden frame
Cut the 4 frame sticks to the desired dimension using the hacksaw blade.
8. Glue the frame to the base
Generously apply glue both on the rear of the frame and the rectangular base. Use masking tape to hold the frame tightly onto the wooden base. Allow for at least 3 hours of drying time.
| Useful tip: Make a ridge or groove along the 45 degree line to ensure the hacksaw blade does not slip and stays on the cutting line resulting in an almost perfect cut |
 |
| Wooden photo frame - Do it yourself |
9. Clear view of the frame face being glued onto the wooden base
10. Rabbet
Rabbet is a step-shaped recess cut along the edge or in the face of a piece of wood, typically forming a match to the edge or tongue of another piece. The additional width of the frame stuck to the wooden base forms a recess or groove (called rabbet) at the rear, onto which the picture will be housed
11. House the photo in the rabbet
Overturn the picture and place it neatly on the recess formed at the rear of the frame.
12. Your wooden photo frame is ready to be showcased and showed off
FAQ: What is Miter Joint?
A Miter Joint (mitre in British English), sometimes shortened to miter, is a joint made by bevelling each two parts to be joined, usually at a 45 deg angle, to form a corner, usually a 90 deg angle. Common applications : Picture frames, pipes and molding.
Source: Wikipedia |
Curious to know how the photo frame has been made to stand upright on the table ? Join us on FACEBOOK just so you don't miss the follow up post on making the stand using wood / cardboard / cork board and a hinge.
Meanwhile, let me know what you think of this DIY. Do you think there is a better way to do this ? Are there alternatives to a wooden stick for making the frame ? Have you done a DIY frame post yourself ? Do share the link. Would love to know your methods.
Linking in :
Lines Across my Face, Colours Dekor


