Category : Blog


It was indeed an interesting weekend for me. Ever since we had started Woodooz, I have been blogging from the confines of our home and never ventured out to meet fellow bloggers. Blog meets are not new to me and I have made many a friends through this medium – Only, it was through my personal blog which is pretty much dormant now. 
The Chennai bloggers meet organized by Indiblogger and sponsored by ITC Grand Chola was a good start. Though I would love to network more at these meets, I am telling myself now to loosen up a bit from the next time on.
Bloggers meet in Chennai
Can you figure where I am ? (Photo courtesy : Indiblogger)
We had a guided tour of the entire ITC Grand Chola property and while there was so much splendor and sumptuousness and opulence everywhere (and I shall talk about that in a different context later), the DIYer in me was inadvertently drawn towards potential DIY inspirations. I have given new projects a break and this was a good opportunity for me to scout for ideas and garner some self-motivation. At the end of the meet, I walked out with 4 photos, and only 4 photos, on what I thought would be good, easy, doable projects to work on in the coming days. 

My love for lampshades drew me naturally to this beautiful one at the entrance of Grand Cholas Italian Restaurant, Ottimo Cucina Italiana. It was a simple cane enclosure placed on a high pedestal and it made up for a beautiful floor lamp. 
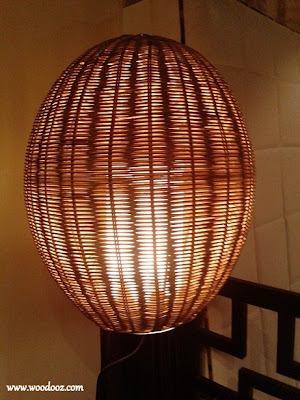
Make your own lampshade
DIY Lampshade
The wall above the master bedroom headboard is bare and white and needs some life. We have been discussing an enlarged canvas photo of us together. But now, Preethi wants to give this shelf (Clicked at ITC Grand Chola's Tranquebar) a second thought. An assortment of picture frames with a focus light can certainly be something refreshing. I have to go to Konica for the enlarged canvas photo, but this shelf, I can make. So you certainly know by now what am canvassing for.
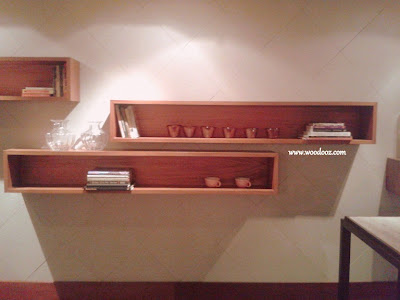
Make your own shelf
Shelf I would love to make
The tree trunk center table was rustic and yet classy and I could not let it pass. If not a center table, this is an idea I can execute to use as a small stool. Maybe something for the balcony. I have to find the source from a nearby lumber and am assuming it will require lot of sanding to smoothen the rough patches. If I ever get around to indulge in this, it would certainly be a very exciting project.
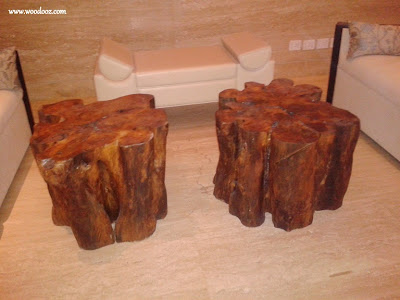
Tree trunk tabe
Tree Trunk Center Table
Floating shelves (Clicked at the The Cheroot Malt and Cigar Lounge) are something I want to do for the heck of it. For no rhyme. For no reason. The illusion of being on the wall without any apparent support is something very attention-grabbing. I still don’t know how it can be installed, especially with hardware constraints in Chennai, and that mystery only adds to the excitement value.
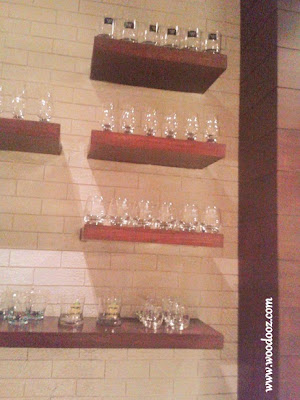
Do it yourself shelf - Floating
DIY Floating Shelves
The range of food was appealing to my sense of smell and taste. The visual extravaganza and the magnificence of the newly inaugurated ITC Grand Chola were alluring to my sense of sight. On the whole, it was a very fulfilling and rewarding experience. Now it is all about putting my action items into actual action.

Do you think these DIY projects are practicable? Have you ever been to a place of importance, but been drawn to accompanying objects of less interest to others, because you are passionate about them? Share your thoughts. Leave your comment.


I was at my cousin’s during the weekend trying to help him with 6 dining chairs that had broken. He had bought 4 replacement steel chairs and yet was looking at means to repair the existing chairs.  Fortunately for him, only the joining screw hardware was broken which made it a lot easier to fix the issue. At this juncture, I thought it made sense to write about the hardware that is used to make flat pack ready-to-assemble furniture. Note : Most furniture in India, particularly dining chairs and tables, that are delivered and installed at home free of charge is made of these screws, called CROSS DOWELS

Allen key cross dowels are much like the regular bolt and nut, except that they are designed to look more elegant. The name “Allen key” comes from the fact that it was originally manufactured by Allen Manufacturing company. The cross dowels serve the same function as nails or screws. However, they can be easily removed from / put back into the wooden surfaces making it ideal for knock down furniture.

Cross Dowel
Allen Key Cross Dowel
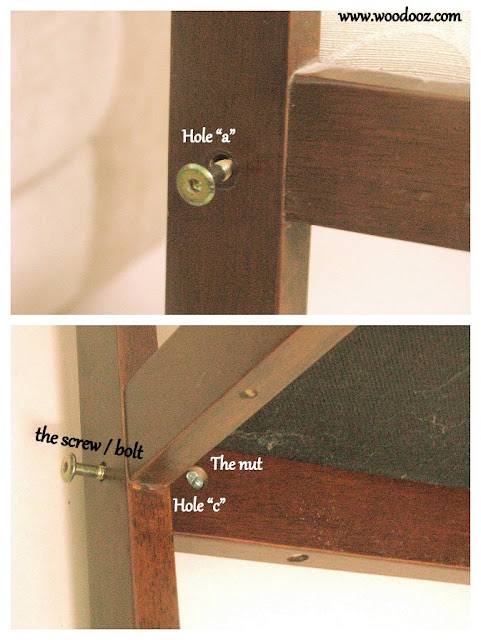
Fixing cross dowels is quite simple and all that it requires is a pilot hole drilled through both the wooden surfaces that are being fixed. This pilot hole will house the screw / bolt. For the nut, another hole is required that is drilled across the surface of one of the wooden substrate. This hole will run perpendicular to and directly across the earlier pilot holes drilled.

Cross dowel installation
How to install cross dowels
As illustrated below, the screw is driven through the pilot holes "a" and "b", while the nut is placed through the hole "c". As the screw is tightened through the nut, it brings the wooden surfaces together and holds them tight and secure. And naturally, unlike screws and nails, it can obviously be seen that the bolt is easier to remove and fix as needed.

Knock down furniture
Cross Dowel Installation
Most furniture that is home delivered and then installed at home is ready to assembly furniture and is built using these cross dowels. Don't believe me ? Just go across to your dining room and check out for the allen key heads.

Ready to assemble chairs
Knock down dining chairs
I know this is kind of a heavily technical post. Nonetheless, thought it is a very useful tip as most households have flat pack furniture and there may be a need in the near future to fix a broken chair. If you did like this post, remember to leave me a comment.


- Somu 
Did you like this post ? Enter your E-mail address and join our growing E-mail list


We have the internet, we have mod podge, we have millions of tutorials on decoupage, we know how to make our own glue, we have fellow crafters to turn to, and we are probably only reinventing the wheels. But imagine a time when all this was absolutely not available to us. Am talking about the 80s when all we  probably had was the desire to resourcefully spend our times, but no assistance in terms of tips and tutorials.
Bharani Decoupaged
 Decoupage using Fevicol

This decoupaged Bharani is vintage, comes from the 80s and is the handiwork of Suja Mohan. What really drew me to this project was the idea of decoupage (Passport size photographs) during a time when decoupage was not a known / popular concept at all, at least around here. With just an idea in mind, hear out how Suja Mohan came out with this brilliant finish (with little aid from Doordharshan - Remember that ?)  for her bharani using just Fevicol.
  • I used only fevicol. Can u believe it !
  • I soaked the picture in water for a while and removed the thick paper behind and separated it carefully.
  • Then I let it dry and stuck it onto the jar which was painted with enamel paint (maroon).
  • I then painted the rest of the jar with golden paint. I used black marker to draw some designs all round.
  • I also used a silver pen,which used to be availabe in those days. Now the paint has started peeling off, so i may change the background sometime in the future.
  • After the whole thing was done , I let it dry for a day and then applied clear varnish.
  • As simple as that and I had not even heard of Mod Podge in those days.
I so love this work for the sheer reason that the idea to decoupage completely stemmed from the need to use the photographs on a decorated Bharani. That, I believe, is really a high form of creativity. Agree / Not agree ? Either way leave your comment. This work deserves all your accolades.

About the crafter
Suja Mohan is a Dental Surgeon by qualification, though is more passionate about music and handicrafts of any kind. She is a crafter by heart  and loves working on needlework, glass painting and more. She loves to spend time productively when she is not catering to patients.

Did you like this post ? Enter your E-mail address and join our growing E-mail list

If you liked this, you may also like

- Somu
Linking in : Colours Dekor


(Note : I have started a new series on how to make a Golu Padi. I explain the process in three steps. Do check out the 1st post in the series for a better understanding)

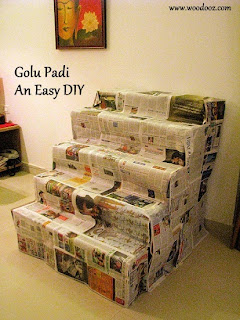
This time of the year, with everyone being busy with arrangements for Navarathri, one of the major task at almost every household is setting up the steps for arranging the dolls. If you have been setting up Golu for years together, am sure you would not have much of an issue with the steps. However, if you are doing it anew (like us) and have no major time at your disposal, here is a 5 step padi that you can build with planks, cardboards and everyday furniture around the house. 

We had leftover planks and card boards and the idea was to not spend time and money on Padi. Last year was the first time we kept Golu in our new home and maybe as we collect more dolls, we will look at a more permanent step arrangement. For now, the make shift one works good for us. Do share your thoughts in the comments section.

Golu  Padi Make it yourself
Make your own Golu Steps
Golu Padi - An Easy DIY
DIY Golu steps / Padi

1. Materials used for the steps

  • Bottom step - Center table
  • Step number 1 - Card board sheets (The ones I used for demo for my Clock DIY video)
  • Step number 2 - 6mm Plywood planks
  • Step number 3 - 19 mm Plywood planks
  • Top most step - OST sheets

2. Mounting the planks 

  • Bottom step - The center table itself formed the bottom most step
  • Step number 1 - Used two cardboard boxes (placed on the center table) on the corners and piles of papers to support the Carb board sheets
  • Step number 2 - Stacked up bricks (on the center table) on which the 6mm plywood planks were placed
  • Step number 3 - Placed dining chairs on opposite ends and supported the 19mm plank on the back rest
  • Top most step - Placed two modas on the dining chairs, added shoe boxes and books for height and for holding the OST sheets
Do it yourself Golu steps
Make your own Golu steps using planks and everyday furniture
The idea here was not to showcase any carpentry skills. The purpose was to build the steps with whatever we already had in ways that anyone can do. I know it doesn't look great on the inside. But it certainly serves the purpose after appropriately covering it up. We have for now covered the setup with news papers and we will soon use the traditional white dhoti on top. Work is still in progress and thought there is no better time than now to post this. 

How do you do your Golu steps ? Already have a knockdown setup ? Plan to get it done for the first time ? Leave us a comment.

Here is two DIY projects on Golu steps that we loved while browsing the net for ideas :


When Sumathi wrote me an E-mail, little did I know that we used to live in the same gated community until four months back. This is one instance when the blog proved that the world is indeed a small place. The E-mail had a query on where a clock mechanism can be bought and that is all I answered.

What you see here in this post is completely her work and I am awed by how this project has turned out. I hardly battled my eyelid before I asked her if I could feature her work and she was only too happy to share with you, the details on how this clock was made. Go ahead, read about it in her own words. 

Do check out the video post on how to use the clock assembly on any clock face first and then come back.
Photo Frame wall clock
Wall clock with photo frames
  1. Frame 12 photos of your choice
  2. At the watch shop, ask for Clock hands and movements.  Choose the size of clock hands depending on  Wall clock size that you prefer (i.e diameter of the circle)
  3. Cut chart sheet or thick paper (any color of your choice)  and make a hole  in the center, so the knob of the clock movement goes inside
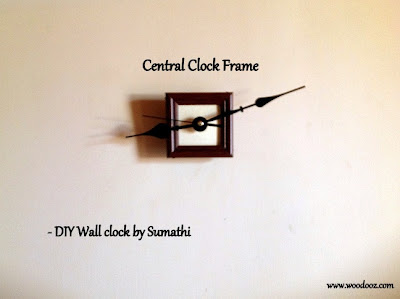
  4. Frame the  chart sheet (See Picture below) along with the clock movement ( Glued at the back side).  Fix hooks to hang on the wall.  The  center  frame (13th frame) is now ready
  5. Decide the diameter of the wall clock  and keep the 13th frame at the center.  Place the remaining pictures in the numerical order and you can try the same on the floor before nailing on the walls. Additionally you can also mark points on the wall for drilling using masking tapes.
  6. After finalizing the diameter, with the  help of the tape, mark the center as well as the ends of the horizontal line (i.e where you will be hanging the Number 3 and Number 9  picture)
  7. Do the same measurement vertically as well and mark the ends (i.e numbers 12 and 6)
  8. Do the same marking / nailing with the appropriate spacing and measurement for the remaining numbers*** ( Do diagonally opposite  marking so that they are in straight line)
  9. You can also try variations in the frame sizes (i.e 12, 3, 6,9 ) being in different shapes compared to other numbers
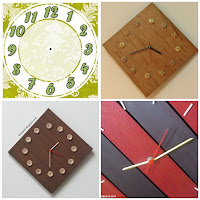
*** The numbers should be at an angle of 30 degrees from each other. If you do not have a protractor, you can simply take a  print out of this clock template and use it to mark the number points on the wall.

Wall clock with wooden frames
Clock Mechanism framed

Was that not a wonderful way to personalize a clock ? I so loved the way it has been built and I sincerely hope you loved reading Sumathi's DIY tutorial on how she made this clock. Do remember to check out what she did with Wall Decals at Colours Dekor too. Do leave a comment and let her know how much you liked her work.

- Somu

About the DIYer
Sumathi is a mother of 2 lovely boys (fighter-cocks:) who juggles well  between home and work. She is a Software Professional who is passionate about gardening and home decor.  In her spare time she enjoys being productive rather than to spend time on TV Soaps/movies. Currently she has a list of pending DIY projects in mind and is enjoying the process of learning to do things on her own.

Did you like this post ? Enter your E-mail address and join our growing E-mail list


If you liked this, you may also like


Making a video post has long been in my mind and I was shying away from it for various reasons.  Today, I decided to take the plunge and chose a very simple post just for me to get used to being in front of the camera.
In this video post, I am explaining the making of a sample DIY wall clock along with
  • the clock assembly,
  • the various materials that you can use for the clock face and 
  • how the assembly is fixed to the face.

This is my first attempt and hence looking forward to your feedback on the content and delivery, as it would help me improve the quality of the videos in future. Was it properly paced ? Was it too slow ? Was it too boring ? Was it too monotonous ? Was it too long ? Was it clearly understood ? Those are the kind of feedback am looking at.
Clock assembly and wall clock making
My DIY Wall Clocks
Meanwhile, I hope you find good use for this video post. This post is highly relevant considering we have a "Showcase" post coming up this week on building your own DIY clock at home by one of our readers.

Did you like this post ? Enter your E-mail address and join our growing E-mail list


If you liked this, you may also like

P.S. Did not find time to make a regular post on this topic along with the video. Will do it another time and update it as part of the same post.
Linking in : Colours Dekor


Hobby woodworking is not so much of a well-known domain in IndiaEasy access to labor, lack of readily available DIY kits, lack of awareness, absence of an active hobby community, lack of time are some of the reasons why this terrain is largely unexplored. Or so I thought. When I started my first project, I was skeptical because of these same reasons. However, it was a revelation as I moved on and have now come  to enjoy it with fervor. Here is the list of four things that created a block in my mind that I strongly believe are merely myths.

Myth 1: Tools are not available

Tools required depend on the project that one is undertaking. Hobby woodworking can also relate to smaller projects which eliminates the need for high end tools or machinery. However, knowing what tool one needs for a certain activity is essential. Unlike the western countries where you can walk through aisles in retail outlets to pick and choose your tool of choice, in India, the challenge is to specifically ask the hardware vendor what you need. From what I have seen, there is absolutely no dearth to the kind of tools that get sold in Indian hardware stores.

Myth 2:  Information is not available

In this world of Internet era, no amount of information is beyond the reach of an individual. Youtube and Google can throw millions and millions of tutorials for you to choose from. Right from how to buy a tool to how to use it to how to build a certain piece of furniture, everything you can imagine is available at a detailed level. Woodworking DIY is an established concept elsewhere and you would find what you need in every corner of the WWW.

Besides that, local carpenters carry a wealth of information with them. Though they are hesitant to share their trade secrets with hobbyists, there is so much that you can learn through observation. Also, of late, woodworking workshops for enthusiasts (will save the details for another day) have also sprung up in some cities.

Myth 3: Labor is inexpensive, so why sweat?

Hobby woodworking is most certainly not an alternative to cheap labour. It is like any other hobby. You don’t paint a canvas because buying an original Picasso is expensive. It is about being passionate and taking pleasure in your indulgences that enable you to explore your creative potential. On a different note, labour is indeed not cheap. Some of the quotes that I have received : Rs 500 for painting a 2 ft x 2ft low table, Rs 800 for installing glass doors for my TV unitRs. 1500 for erecting a frame around the cot (for mosquito netting).

Myth 4: There is no active community

I realized over a period of time that the number of Indian blogs in this niche is limited. However, that was no indication to the number of folks indulging in Woodworking. I found out that there are indeed people to whom I can reach out.
  • The DIY Woodworking India group is now becoming a very active Facebook group with hobbyists, enthusiasts and experts exchanging their WIP projects and expert tips. If you are looking to join an online community, THIS IS IT.
  • Indranil Banerjie is from Noida and manages a hardcore woodworking blog. Some of his projects are big and very very functional
  • Vinay is another blogger from Vellore and makes some really fun projects like wooden toys and Wooden Wagons for kids. 
  • Am sure at least one or two of you would now say,"Hey ! my father was never a blogger. But he was way into carpentry and did everything that he could inside our home."
  • And that is the point. There are more and more individuals who have always been into carpentry and there are many who show keen interest towards it.  Just that they never had / have a blog.
Woodworking is fulfilling and functional at the same time. If you are indeed thinking about hobby woodworking, Good luck. Start with smaller projects before you can venture into the bigger ones. Do not let these myths hold you back. Explore and experiment. India has all things in place for you to quench your thirst for DIY woodworking.

Do you agree with my views ? Do share your thoughts. I am game for a healthy debate on this topic. And think there are other myths too ? Leave a comment.


Among the many things I like about DIY,  I like it most for
  • The functional requirements that it helps serve and
  • The ability to make things that may not be available in the market.
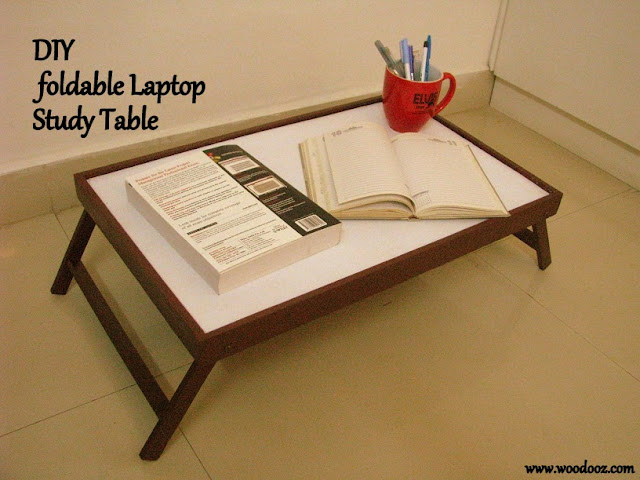
The foldable laptop stand that I made earlier is available in the market in almost the same dimensions. However, when my nephew wanted a similar study table that can hold his observation  and record books, the smaller dimensions did not serve the purpose. This is where DIY came in handy.
Study Desk
Foldable Laptop Study Table
This was a simpler project as I just had to replicate my earlier work with just bigger dimensions. This study table is 2 ft in length and 1.5 ft in breadth. Here are the other specifications :
  • Used paint power mixed with Woodlac Sealer for the color
  • Used Woodlac polish for the final coat
  • Used a plain white laminate for the table top
Click here to check out the step by step “how to” of making tables such as these. Use it for studying or for finishing off your art work.
Laptop Stand
Mini Study Desk with foldable legs
This was a long pending project and I felt the sense of urgency when my nephew mentioned that he has already finished off his quarterly exams and pretty sooner, he may find no need for it. And so it was a fun Sunday working on something after ages.
Laptop Sutdy desk
The other side of the Laptop Stand
How do you like this table ? Do leave your comments. Also, do enter your e-mail address below to get our updates delivered into your inbox as soon as we have a post here.

- Somu
Did you like this post ? Enter your E-mail address and join our growing E-mail list


If you liked this, you may also like

Linking in : Colours Dekor


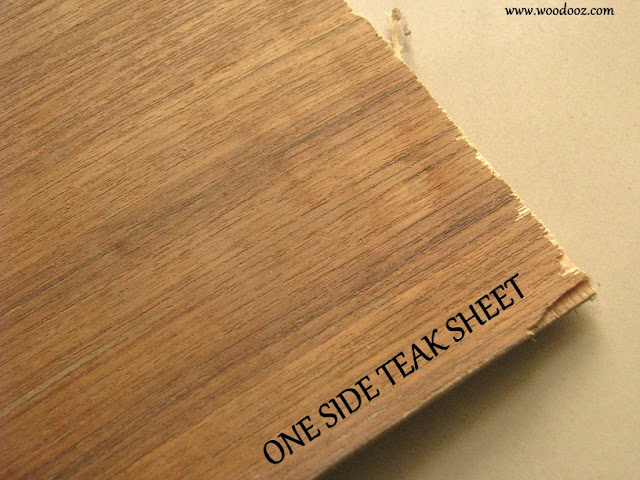
One of the many questions in a hobby woodworker in his beginning stages is if a finish can be directly applied on plywood. Will plywood be able to absorb paint or stain that results in a fulfilling finish? I had the same question when I made my first center table, and I sought the help of my friend who built my modular kitchen. He said, “Use OST on top of the ply”. From that point till now, I have grown really fond of One Side Teak sheets and have used them for many of my projects. Since I get few enquiries on what OST is, it made sense to make a post on it. So, here are some facts on OST:
  • One Side Teaks, naturally, have a teak finish to it, and only on one side
  • The rear of OST is plain and ordinary with random grain patterns
  • OSTs are 4mm in thickness
  • They are available in 8ft x 4 ft dimensions
  • They cost approximately about Rs.25 / Sq ft
  • They are not just ideal for your big furniture projects, but also come in handy for your small craft needs
  • They can be easily cut using Mica cutters
OST (One side teak)
One Side Teak (OST)
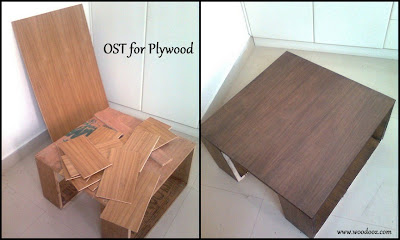
Wood veneers are relatively expensive and Laminates are not easily available (most take only bulk orders) and so OST was my natural choice for all my center tables. That it can be easily cut and glued onto the plywood top made it that much easier for me. The biggest challenge I had was to find a vendor who will be flexible to source OSTs based on my needs and not be hell bent on selling it as the 8ft x 4ft package. 

They can be sanded down for a smoother finish and look beautiful when left in their natural glory too.

Center table with OST finish
OST for my plywood tables
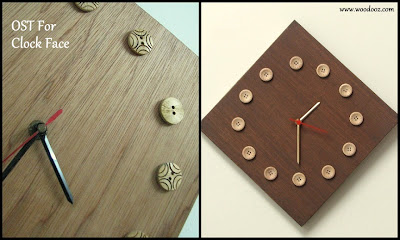
I preferred to use OSTs when I had a need to build a clock for our own use. For a change, I wanted to use the rear of the OST as the clock face for the one I built for use in my home. The random patterns looked enhanced after sanding and it brought out a fresh look. I used the teak side for the other clock I built which I stained to a walnut brown color.

Wall clock template
Wooden wall clock using One side teak
With rubber wood or teak wood or rose wood being slightly on the expensive side and not available in dimensions other than 8ft x 4ft, plywood would remain to be the most preferred raw material until such time the hobby takes off to the next level. That being the case, OST will remain to be a good option to achieve a classy finish on top of the coarse looking ply.

I intend to use it for many of the projects that I make in the future which I certainly shall update here. Until then, I would love to hear from you on your favorite raw material. What is the wooden substrate that you love working with ? How and where do you source it from ? Do share your thoughts as a comment.

- Somu
Did you like this post ? Enter your E-mail address and join our growing E-mail list


If you liked this, you may also like


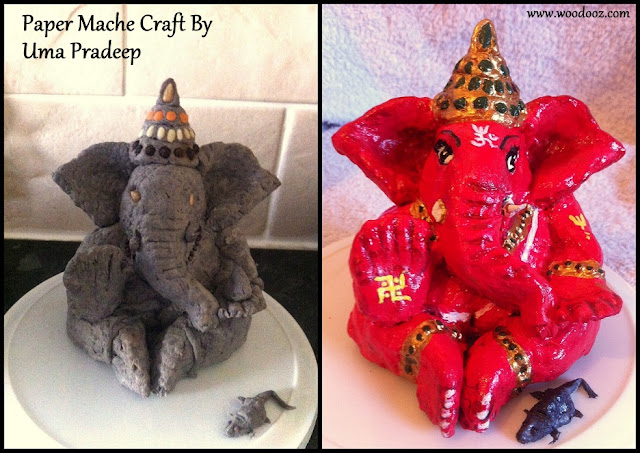
The truest testament to a DIY tutorial is when someone follows your instructions, improvises and comes out with their own project. When we posted the complete guide to making a paper mache clay, I had few friends write to me about the how to process. One of them was Uma Pradeep, who is a big follower of Woodooz. She had been telling me how much she wanted to make something out of paper mache, and finally managed to make this idol of Lord Ganesha at the most opportune time.  

These pictures have come all the way from Edinburgh, Scotland and I shall let Uma tell you more about this project herself. 

Paper Mache Do it yourself
Make your own Ganesha idol for Ganesh Chathurthy
First of all, this is something that was very effective in keeping my kids engaged for as long as we were making this idol. They were keenly looking forward to helping me with ripping the papers off.

I did some research after I was done with this, and found that the roughness in the outcome can be avoided if soft tissues are used instead of news papers. It takes time to dry and patience is very key.

I also found that it is better if the final product is dried using a hair drier for getting a better density Small amounts (One spoon) of bleaching powder can be used on the idol after it is done to prevent formation of any moulds.
I used a base coat of poster paint and then layered it with three more coats of poster paint. The last coat was made with glossy poster paint.
I was only glad that I was able to complete this just in time for Ganesh Chathurthy. It is indeed quite a fun craft to work on and I intend to make more such stuff in some time. Of course, I also intend to apply my new learnings. Hope you like it. Do leave me a comment and let me know what you think.
Paper mache craft for 3D figurines
Lord Ganesh with his little mouse
We take a lot of pride in showcasing this post and work of Uma Pradeep. It is not so often that we have someone expressing their thoughts on the utility value of this blog, and this is one of those moments. Hope you loved this post and project just as much as we did. Remember to leave your comments. Also, Do let us know how your Ganesh Chathurthy celebrations went.

And here is a couple of Lord Ganesh DIY posts that we loved reading in the blog world.

                                 Join us in Facebook

About the crafter:
Uma Pradeep is a mother to two very active twins and gives vent to her busy schedule through her passion for painting. She is a trained artist in Tanjore painting. She holds a full time job as a delivery manager with Accenture and lives in Edinburgh, Scotland.

If you liked this post, you will also like the other showcases :

Linking in : Colours Dekor, ArtsyCraftsyMom


In School

Get good grades. Study well. Aim for that elusive first rank. Keep studying. History. Civics. Geography. And the whole thing all over again. While this was the expectation that was set upon me during my early days in school, I was also encouraged to pursue painting as a pastime. I sought every opportunity to spend my spare time with water colors trying to reproduce the painting in the back of Reader’s Digest. This diversion gave me that much needed time off from the nerve-wracking quarterlies, half-yearlies and finals. I was never good at painting (I have hoards of participation certificates, but no prize :P) and  at some point, I realized this is not for me and gave up my aspiration, but the scores of joy it gave me are quite unforgettable.

Water color painting
My 21 year old water color paintings

In college

GRE. TOEFL. MS vs MBA Vs a corporate job. Peer pressure. In the midst of all this, I found a haven in writing – an interest I discovered while writing slam books for my friends in school. I took refuge in poetry and it saw me through all my years in college. It taught me to be my own friend, helped me explore my inner self, and it enabled me to make a verse out of every worse situation. My fervor for writing was never past its best despite the trying outcomes demanded by Engineering. Back in school I had cricket and football to supplement my leisure needs, but in college, I found solace only in poetry. It eventually led me to blogging, blog meets, blog friends and a new social life that I would have otherwise not known. Eventually I gave that up too.

Love poem
Just another poem on Love

And now

In due course, I moved on from the comforts of my bed from where I used to write. And I took my place in the balcony where I now toil with nails and screws, wood and timber, hammers and pliers. The fascination that I have developed, for what I would call, the basic levels of woodworking is no less than the appeal that writing had in it for me. The idea of building something from scratch (though triggered by a totally different reason), fixing something that is broken, or redoing something that has lost its sheen gives me a kick now. Today, this kick  relieves me from the anxieties and stress that are a result of  all the meetings, travel, calls, projects and the deadlines.

Carpentry as hobby
Woodworking as a passion
In all this I realize that as I transitioned from one phase in my life to another, my likes and dislikes changed. And how much ever exciting life is, it is quite easy to get tied up in the routine that it has to offer and a leisure pastime is always required to unshackle oneself from that routine. I have learnt that it didn't matter what hobbies you pursue, but as long as you are focussed, engrossed and excited, it helps entangle you from the tiring, monotonous and sometimes taxing regimen.  

Share your thoughts on this post. Have you ever given up a passion of yours ? How do you break free from your tedious schedule ? What are the favorite activities that you love indulging in ?
Did you like this post ? Enter your E-mail address and join our growing E-mail list


Have you bought a power tool or appliance from US and brought it to India ? Like me, were you tempted to plug it in at the first available opportunity ? Well, never do that. Never. In the best interest of your tool / electronics, you need to ensure they are readily suited for use under Indian Power conditions. If not, there are few things that you are expected to know and adhere to. First and foremost, understand the power requirements of the tool from the manual. 
Voltage and Wattage specification
Power requirements
And here are the questions you need to ask and understand before you can plug in that tool / appliance of yours.

1. The specification in the tool manual says 120v. Does it make my tool readily usable in India ?
No. The operating voltage in India is 240v. And since the tool requirement is only 120v, there is every bit chance that it might not work or go kaput if you directly plug it in.
2. How do I then use the tool here in India ?
Stepdown voltage transformers are available in your local electronics store, specifically for requirements like this. They help in converting the 240V power into 120v.
3. Is voltage the only parameter I need to look at ?
No. You need to look at the wattage specification as well. Your transformer wattage should necessarily be equal to or more than the value mentioned in the manual.
4. There is no watt mentioned in the manual. What do I do ?
Look for amps specification and as high school physics would have taught you, Watt = volt X amps. So in the above case, the wattage is 120 x 1.8 = 216 W. That means the transformer should support wattage greater than 216 W.
5. What is the cost of a step down transformer ?
The transformers for lower watt requirements are available as plug in adaptors and cost about Rs.300 to Rs.350. The one you see in the picture below (250W) costed me Rs.950 and looks like a mini stabilizer. So, anywhere between Rs.300 to Rs.1200 depending on your requirement.
Voltage transformer
240v to 120v step down transformer
This is basic physics that I didn't know and had trouble doing my research when I received a power tool as a gift. So hoping this post is of some help to someone with a new tool and the desire to DIY.

Have you used a tool or appliance in India, bought and brought from anywhere outside? Is there anything else that one needs to take care of  besides this ? Leave me your comment. Also, do let me know if you found this post useful.

~Somu


This pickle jar that was given to me recently comes with a lot of legacy. It comes from my Mother-in-Law's collection of traditional pickle containers otherwise known as Jaadi in Tamil. So in a sense, it is special to both of us and gave me enough reasons to preserve it well and right.
Pickle Jar
Pickle Jar
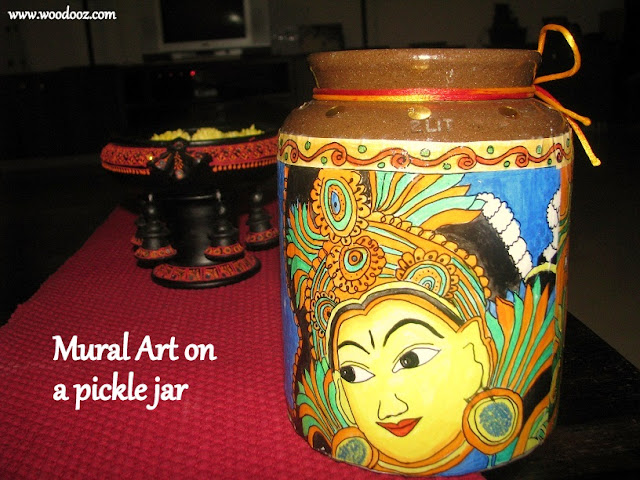
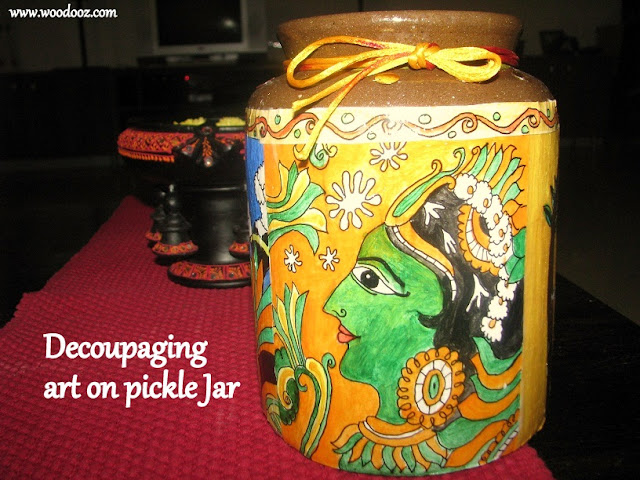
Not wanting to let it store pickles and be stacked inside a cabinet, I decided to embellish it with traditional art and showcase it somewhere in the open. I have been wanting to learn Kerala style mural paintings and so used up this opportunity. I also settled for decoupaging on the jaadi.

To save me some time, I chose to reproduce sketches (duly credited at the bottom of this post) that were already available on the net and added my own choice of colors to the sketches.
Sketch
The sketch
Mural Painting - Work in Progress
Mural Painting and Decoupage - Work in Progress
The paintings themselves did not take much time which made it less time consuming to complete the entire work, though I did it in phases. Just as how Mod Podge is supposed to be used, I was very generous in smearing my paintings with the glue.

Mod Podge
Smearing the decoupage glue
I did not want to complicate it much and so left the top portion of the jar in its natural glory. When I tried decoupage on water colors for an earlier project, I had issues with smudging. This time I was careful enough to use acrylic paint to avoid any blotching.

Kerala Mural Painting
Mural Art on a Pickle Jar
Mural Keral style art
Jar embellished with Kerala Mural Painting
I should thank my sister-in-law for sending me a bottle of Mod Podge from Bangalore. Since I was able to source the decoupage glue, I did not have to resort to Somu’s cheap method of making his own Mod Podge.

I would love to try different styles of painting and your words of engouragement will certainly up my motivation levels. Do leave me a comment and let me know what you think of this work. It would mean a lot.  Also, enter you e-mail address below to subscribe to updates just so you do not miss out on our forthcoming blog posts.

Painting Credits :
I have been true to the sources from where I picked the paintings. If these are not the original sources, I would be happy to make the necessary corrections.

Linking in : Colours Dekor

Know more about us

About Us
Reviews
Media
Our showroom location
Return and refund policy
Review us on Google

Connect with us


Mail us
Subscribe to our newsletter

Our Address :
Woodooz Home Decors,
3/371, First floor,
Metukuppam, Thoraipakkam,
Old Mahabalipuram Road (OMR),
Chennai - 600097.
Ph : +91 9884070470
Email : contact@woodooz.com
Created By SoraTemplates & MyBloggerThemes