This is one post that I have been raring to post for a long time. Just wanted April to pass and wanted to ensure due permissions are in place. This was the first time that Woodooz has been featured in the print media and that has been keeping us on cloud 9 all along.

The background : 

The week - Smartlife was doing an article on DIY in India and wanted the opinion of few hobbyists. I had the wonderful opportunity to voice my thoughts along with other DIYers and the article was published last month in the monthly edition of Smartlife.

Thanks to Nisha Ramchandani for being constantly showing interest in what we have been doing in Woodooz and also for referring the blog and our work to Monty who was writing the article.

Thanks to Monty Majeed of The Week for reaching out and for patiently listening to me on the phone for close to 20 odd minutes. Special thanks for wonderfully paraphrasing the conversation.

Thanks to Nathan G of nathangphotography for braving the distance and coming all the way to our place for a mini photo shoot. It was nice meeting up and to hear his inspiring story of how he gave up a plush IT profession to pursue his passion for photography. 

Without further ado, will leave you with the scanned images of the article. If you are the types that prefer the text version, you can read the entire article here.

Idea of DIY in India
DIY as a hobby
Indranil at work
Indranil of IndianDIY
Woodworking DIY
Sudhakar Prabhu
The blog as been idle for a long time and the last few posts have not been centered around our work. This little motivation has pepped us up quite a bit and we wish to push ourselves to indulge in lots of pending DIY around the home. A lampshade is waiting to be completed, a painting is just half done, and need to start work on a small cabinet to house my tools. And very soon, will populate these projects here. 

Do you agree with the article. What is your opinion on DIY woodworking catching up as a popular hobby ? What do you see as the hurdle in you wanting to jump into this wonderful activity ? Do leave me a comment. 


Honestly speaking, not much DIY is happening at home. Chennai is at its hottest best and sadly the worst is yet to come. Locking ourselves up in an air conditioned room is the most popular activity that is going on for some time and that gave us the chance to catch up with few horror movies we always enjoy watching together. Meanwhile, Bosch India invited entries from DIY enthusiasts to showcase their DIY works. And considering it was very relevant to what we do here, I sent a load of entries to them. Not that I am indulging in any vanity here, but the contest rule clearly stated that I have to be posing alongside my project.
My Woodworking projects
Posing with my DIY projects
In fact, I sent few more entries too. But, only the following were shortlisted.
There were other entries too from other hobbyists and it was wonderful that one of our entries was chosen as a winner.  And here’s what they had to say about the entries:

“We are delighted to see the kind of DIY skills our participants showcased through their #DIYProjects. With so many amazing #DIYProject entries it was hard to narrow down to three winners. Hence we decided to announce not three but four winners. Congratulations to all the winning entries!”
Winnders of MyDiyProject Contest
The #MyDiyProject winners
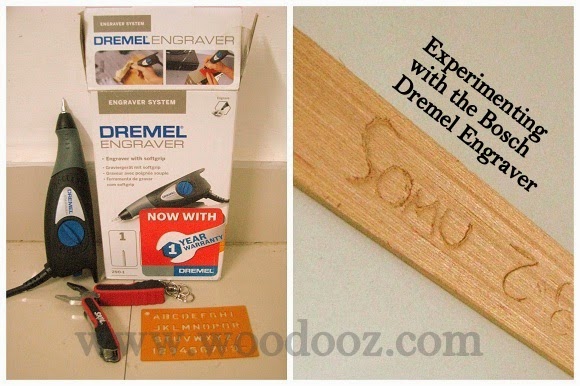
If you have been following Bosch India, you would by now be aware of their DIY Square in Bangalore. While I have only had the opportunity to read about it, it does seem like a go to place (And I have it in my agenda during my next Bangalore visit) for folks who want to try their hand at power tools and get some first-hand do it yourself experience. Not surprisingly, I received a Dremel Engraver as a gift couple of days after the winners were announced. Not surprising because there have been lots of workshops happening over the last few months at their DIY Square and the Dremel has extensively been the product of attraction.

The Dremel Engraver in their own words - "An engraving tool with variable depth control, for engraving on a wide variety of materials like metal, glass, wood, plastics, ceramics, etc. This kit also includes a letter & number template for easy engraving of letters & numbers."
Engraving tool - Dremel
Bosch Dremel Engraver and my experiment with it
I have been playing with the Dremel over the weekend and I am yet to get the hang of it. I still don’t know what kind of projects I would be using it on, but I intend to experiment with it more and put it to best possible use. I do have some thoughts, but need to gain more expertise in using the tool before I can even start executing the project. Will share it here as soon as I start giving life to those unexplored ideas. Meanwhile, it has been a long time and a comment from you would be really nice. :-)

Disclaimer : Do note that I received the Dremel as a gift for winning the contest hosted by Bosch India.This is not a tool review or a sponsored post. I was not contacted by Bosch to write this post.This is part of the series where I write about the tools that I use (/intend to use) for my home DIY projects. You can read about the other tools that I use by clicking this link here


DIY Woodworking is a trend that is catching up in India. I have written about my views on Woodworking in India and the myths around it  in Woodooz before. Earlier last month, I had the wonderful opportunity to speak to Monty Majeed of The Week – Smart Life on my opinion on DIY. To my surprise, the article was published this month which also featured fellow DIYers Indranil and Sudhakar. Considering the article is in the current month’s edition, I will wait until May (and also seek permission) before I can share the entire article in Woodooz. However, wanted to put the news here and share this proud moment with all of you.

Meanwhile, we had been reworking on an earlier Lampshade that we had built for the home and were very happy with how it turned out. 
Our new lampshade on the floor
The original lampshade was the one that we built at the very beginning when we started Woodooz. It was our second project and that makes it a very very personal one. Three years have gone and as you can see from the below picture, it needed to be changed.
The old one and the new one
As they say, practice leads to perfection. At least in this case, I am seeing a drastic improvement from how it looked and felt earlier, and how it is now. The frame we built now is stronger and the materials we used are of higher quality leading to a sturdier finish. Right from how it feels to the touch to how it looks to the eyes, the improvised version is 100 times better than the old one. Or should I just say, it looks absolutely professional. Happy for both the news and the improvement that we are seeing with every new project of ours.
Lamp Shade DIY
And don't let the photo fool you. The bleach that you see where the light is placed is a result of my poor photography skill. The shade looks absolutely warm and pleasing to the eyes with the light on. Now, this is  is going to adorn our living room for another few years. With all the improvements that have come into this project, I am all excited about the next few projects which incidentally are also lampshades. Hopefully, should be able to complete them quick. Meanwhile, do leave us your comments which probably is the only motivation that keeps us going.


Disclaimer 1 : This is neither a tool review nor a sponsored post. I have not been contacted by anyone to write this post. This is part of the series where I write about the tools that I use for my home DIY projects. You can read about the other tools that I use by clicking this link here.

Owning a tool or not having the skill to use one is probably one of the hurdles in DIY in India, and am sure many of you would agree. This is a reason why I invariably outsource the cutting wood activity to someone at the timber store.  It has always been easy that way. Give the dimensions and be done with it. But, with my side table, I was left with a challenge. I needed to have the plywood top cut to the exact dimensions as the frame inset measurement. The challenge though was that the frame was not fixed exactly at 90 degrees, which meant, giving the dimensions to have the plywood cut may not really work.

This is when I decided to take the task upon myself, and took out a tool gift that I received couple of years back – The oscillating multifunction power tool. I have used the tool earlier but I was not ready to write about it here until I was fully convinced that I could use it for a real project. Before I put it up here, I wanted to be sure that I am able to use the tool to suit my DIY needs at home. So, finally I braced myself and cut the plywood (12mm thick and 18 inches in length) in less than 5 minutes and the result is here for all to see.
Another DIY tool for home woodworking
Oscillating multi-function power tool
The concept behind the tool is quite simple. It comes with a spindle to which you can attach the required cutter / blade / other attachments. When powered on, the spindle oscillates back and forth at an astounding speed of 21k oscillations per minute (may vary from product to product). Imagine using a saw to cut wood and your one up and down manual motion of the saw as one oscillation. This tool can do 21,000 of those in just a minute. With the right angle, and the right pressure applied onto the wooden surface, getting your work done is a piece of cake. The plywood cut came out so perfect that I was kicking myself for not using the tool earlier.

Recommend reading : Some basic things to take care of before you start using a tool or even a kitchen accessory from the United States of America
Home DIY woodworking tool
Oscillating tool and the blade accessory
The accessories / blade attachments are sold separately and there are quite a few attachments available for various activities like cutting wood, pipes, removing grouts, sanding etc… (hence the name multi-function)  I only have an angled cutter that is now coming in handy for my DIY cutting needs. This now gives me the confidence to move from smaller projects to medium sized projects.  But the biggest advantage I see is that I can eliminate the dependence on timber stores for my home needs. I would have loved to do a video. Nonetheless, I am leaving you with a link to Youtube videos that talk about the tool’s versatility.
home based woodworking hobby
Trying the oscillating multi-function power tool
I would like to thank my cousin Raji for this gift and want to tell her that I have started fully using the tool. The official site claims that this is a tool suited for home DIY and hobbies and I fully agree. This is certainly a valuable addition to my tool kit which is mostly only hand tools, barring my electric drill and I highly recommend it for a budding home DIYer like me.

Disclaimer 2 : I am merely posing for the photo. Please exercise caution and ensure you read the user manual for the correct way to hold and use the tool. Also ensure you take precautionary safety measures before you start working on a DIY project using the tool.


The earlier two weeks, we looked at how to build the side table frame. Today, we look at how the frame can be finished to get the desired look as well as fixing the table top. Before you read any further, I suggest that you look at the below three posts to ensure continuity:
  1. Starting a Side Table project
  2. Side Table – Design, dimensions and materials required
  3. How to build the table frame using teak wood legs
Building a side table
DIY Side Table
At this point, it makes complete sense to go back and look at how staining can be done on a wooden surface. While this has been extensively covered, a little reiteration will certainly help you get a hold of the methods used. The first step is to sand the wooden surface. Sanding provides the necessary level of smoothness that is required for you to achieve the stained finish that you are looking for.

Recommended reading : The basics of sanding explained through a simple video
Sanding
Sanding and staining
The next logical step in the sequence is to apply sanding sealant. However, considering I already had an exceptionally even surface, and the teak wood was absorbing the stain very well, I decided to skip the sealing process. Sometimes, even when there is an established method, it does not hurt to experiment and resort to methods that work well for a particular project. I used gada cloth to apply the stain, and used another piece of the same cloth to immediately wipe off the excess stain.

Recommended reading : How to apply wood stain for your DIY projects
How to stain wood
Staining process continued
Finally, the frame is built and wood stain has been applied. Now the next step is to fix the top and middle layer. I used a 12mm plywood for both the layers. To fix the plywood on the frame, you can nail wooden reapers along the inner sides of the frame. Considering the plywood top is 12mm in thickness, the reaper should be nailed 12 mm below the top of the frame to ensure the plywood is in line with the frame top.
Wooden reaper
Using a wooden reaper to support the plywood top
What you see above is the reapers nailed on the inner side of the frame for the top layer. Similarly, I have nailed 4 more for the middle layer (not shown in the picture). The plywood needs to be neatly cut with the dimensions being almost equal to the inner dimension of the frame - In this case, about 14 inches x 14 inches. Once the reaper is in place, and the plywood is cut, all you need to do is merely place the plywood on top of the reapers. And your side table is ready to be used.

Do it yourself
A Do-it-yourself sidetable
We are still debating on how I should finish the table top. Right now, it is just the plywood surface. We are considering doing an art work on the top to give the side table an ethnic look. What do you think ? Should we consider other options. Let us know.


When I started my first DIY project, I looked at videos and tutorials, and started picking up basic skills. And this experience made me believe every art and craft can be learnt and mastered through Google and Youtube. Carving on wood is something I have been fascinated about and is one such skill, I thought, I can master by merely reading up and practicing. As a first step towards achieving this expertise, I BLINDLY bought a whole set of carving tools.
Wood Carving tools
Wood Carving Tools
My recent visit to a wood carving factory in Kandy, Sri Lanka came as quite a revelation to me. Much unlike the other sight-seeing locales, I took special interest in this item in our itinerary.  The one hour made me realize that few proficiencies are not so easy to acquire unless some portion of it is already innate in us. 
Carving
Carved Figurines
There is so much that goes into a craft that probably is not entirely documented. And the amount of knowledge these craftsmen hold is absolutely amazing. The years and years of practice leading to perfection was so evident in the precision with which they etched every intricate feature. They were making a larger-than-life-size figurine out of a single log and naturally that made me wonder what if they make a mistake. To my amazement, one of them retorted with oozing confidence, “We don’t make mistakes”.
Carving on wood
Craftsman at work
I had a chance to briefly work on one of the statues that was in the making, and it was surely not as easy as I originally  thought (Not that I thought it is any child's game anyway) it would be.  I only wanted to learn carving to be able to make small name boards for the home. And this experience brought a new found respect towards every individual involved in some craft or the other, however big or small it might be. While everything may seem so easy from a distance, I realized,  there is absolutely no short cut towards conquering an art form. 
Somu with wood carving tools
My failed attempt at carving
For now, I am giving up my idea of getting to do any sort of carving. For someone who cannot get a 2D figure right on paper, 3D art is going to remain a challenge. Even if I were to undergo any formal training, I doubt if any carving spark is innate in me. There is a reason why some folks are considered gifted, and this inborn talent is just about one of them. Do you agree with me ? Leave your thoughts.


Last week we looked at the first step in making our bedside table – getting the dimensions, design right and cutting the Teak wood legs to the desired measurement. This week, we will look at fixing the legs together to form the table frame. I have not used any specific joint to fix up the legs. All that I have used are just screws and adhesive to strengthen the joint a little bit more. 
Building the frame for side table
Side Table Frame

Tools / Accessories used

  • Star head screws (2 inches length). The screws need to be long enough to go deep into both sections of the legs being joined
  • Star head screwdriver
  • Fevicol SH
  • Electric drill. At this point, I would want to reiterate that having an electric drill at home will come in handy both from a DIY standpoint and also in getting some minor repairs done. If you want to get into DIY, you need to grab one drill immediately.
Required tools
Tools required
As I mentioned, I have used only the screws to join the legs together. Before driving the screws in, it is ALWAYS recommended that you drill a pilot hole.This will enable you to easily drive the screws in, prevent splitting of wood, and will act as a guiding hole for precisely driving the screws. The hole is drilled across both the surfaces that are being joined. The cumulative depth of the hole should be slightly smaller than the length of the screw. With the pilot holes in place, ensure that you screw both the wooden legs together. To add more bond, smear the surfaces with adhesive.

How to drive screws in
Drill pilot holes
I used two screws to secure each of the joints. Considering I had 4 vertical legs, and 8 horizontal ones (or 8 joints requiring 4 screws each), I required a total of 32 screws to complete the job. The below pictures are the work in progress snapshots of the legs being fixed. You may want to go back to the first photo on top to visibly see how the two screws are used to join the pieces. The screw heads are visible which may be a downside to it. However, the darker shade of stain that I intend to use will eventually blend the screws with the background.
Work In Progress - Side Table
Work in Progress
So, here it is - The Side Table frame. The next step is for me to stain the legs and look at how I would want the top to be covered. Glass, laminated plywood, decoupaged plywood, or painted (I mean the art kind of painting) plywood are some of the options. You can also throw in your ideas and I will see how that can be implemented too.
Side table do it yourself
The side table, almost ready to be used
I am going to be spending most of this week staining the wooden legs. And of course there is this long, boring and tedious task of sanding the surface. Most probably it will be a busy weekend and so I plan to use up the weekday early mornings to try and complete it. And I hope I will be able to put up the details of the staining process for you to see next Monday. Do leave a comment on what you think about how this project is progressing.


I had started the project on bedside table last week and had decided to put up the step by step process of the progress.  The first step towards making any piece of furniture is to get the design in place. This enables you to fix the dimensions, which in turn provides you the input on the amount of materials that you need to buy.  This being DIY, you can choose to have your own design and dimensions. We wanted the table to be in line with the mattress which fixed the height at 20 inches.

Measurement for table
Dimensions for the table

Materials and tools required

  • The Wooden legs : I wanted the legs to be 1 inch x 1 inch and required them to provide stability to the whole structure. Based on the above design, I needed the following:
    • 4 x 20 inches long legs (Vertically placed)
    • 8 x 14 inches long legs (Horizontally placed - 4 on top and 4 in the middle )
  • At the plywood store, I was shown 1 inch x 1 inch teak wood legs which was just perfect. They come in 8 feet length and costed Rs.25 per foot.
  • Based on the dimensions, I needed 192 inches (exactly 16 feet). To allow for minimal wastage, I bought 2 x 8 feet and 1 x 2 feet of the teak wood
  • A hacksaw blade for the cutting needs
Teak wood for table legs
Teak Wood Legs for the Side table

Cutting the wooden legs to required dimension

I have always maintained that it is fine to outsource your cutting needs should you have constraints in terms of space, non-availability of tools / skills. While it is quite a task to cut sheets of wood above 12mm in thickness and one may need a handsaw or a circular saw, for some of the requirements (as in this case), hacksaw blades would do the job neat and clean. It is easy to use, easily available and will not cost you more than Rs.15. I used a hacksaw blade to cut the teak wood legs.

Hacksaw blade
Cutting the wooden legs using hacksaw blade

Fixing the wooden legs

With the legs cut to the required dimension, the next step naturally is to fix the legs. Considering I am getting only limited time during the weekends, this will be the next step in the process. I still have not decided whether to use screws or a cross dowel to fix this up. Whatever might be the case, I will be using only butt joint to join the wooden legs together

Teak wood legs
Wooden legs cut and ready to be fixed

Do watch this space next Monday for the next step in the process. Hopefully, I should be ready with the basic structure of the table by this week. I am thinking of putting up a video post (at a later time) on this entire project subject to availability of time.  Do leave your feedback and share your thoughts on this project. 


It is exciting when the desire to DIY is fueled by an actual requirement at home. There is now the need for a bedside table in our guest bedroom that is bare with only a cot and no other piece of furniture. The broadband modem, mobiles/other accessories have no designated space while in the room. As always, I want to explore the DIY route before looking at readily available products. Another functional necessity and am already so pepped up.
Recommended Reading : Using Google Sketchup to create 3D designs
The plan for the table is based on a simple thought process. Avoid perception of taking up space in an already small room by keeping all sides open. The design is not anything original and you can find similar ones on the internet.
DIY bedside table
Simple Side Table plan designed with Google Sketchup
For now, I have only bought the wooden legs from the local shop. My initial plan was to keep the budget low (less than Rs.300) and build a low cost table. On second thoughts, want to build a really sturdy one and so stretched it a bit. The teak wood legs you see below cost about Rs.25 per foot. 
Recommended Reading : Easiest DIY Center Table you can ever build
The design has the necessary approval at home. While I am starting with what you are seeing above, during the course of building it, I may improvise and deviate from the basic plan. The cot is brown and the wardrobe / wall is white which should explain the color combination. The dimensions are not frozen as yet.
Side table for bedroom
Guest bedroom and the designated space for the side table
I will be making this as yet another simple and everyone-can-make-at-home kind of a project. I plan to put up the progress (dimensions, materials used, and the step by step process) of this DIY in a series of posts. So, watch this space if you think this assignment will be of interest to you.  


[Guest Post by Subbu Padmanabhan]
The delight in seeing one’s own near-perfect handiwork come to life is quite unparalleled by the satisfaction induced by the picture perfect outcome of a qualified expert. This joy provides everyone with unfailing inspiration and so when I experience the same elation, I want to share it. Adding life to walls with cartoon characters may not seem new. But doing it yourself brings in the needed novelty that is a result of your own unique creative skills. I decided to give my son Sharan's room a little transformation with his favorite animation characters and have now been doing it on request from other mothers too. Here's some tips on decorating your kid's room wall  with his / her favorite cartoon characters:

Wall decoration idea
Add life to your kid's room wall with cartoon characters
First and foremost, before you start doing anything with the wall, understand that the result has to interest your kid in the long run. Kids appreciate everything with a fancy value, but tend to move from one interest to the other quickly. Involve your kid in understanding what he / she would like to see on his / her wall for the next few years. You certainly don’t want him / her saying, “Mmmm, I like Chota Bheem better”, after two days of your hard work.

How to paint your kids room wall
DIY Wall Decoration

Materials you can use

From my experience, acrylic colors seem to be the best fit for adding splash of colors on the wall. I have used it on many walls with ease and have seen it give a striking finish to my works.
Wall painting materials
Acrylics for the wall
I use cartoon images from the internet for reference and mark the outline on the wall using a pencil. Once the outline is in place, just paint the colors without letting them spill out of the outline. Cartoon characters look good in solid colors and so you don't need to give any gradient effect to your paintings. In short, very basic painting skill is required to indulge in this DIY fun.
Chota Bheem on the wall
Chota Bheem on the bedroom door
You don’t have to use the whole wall area. Choose a portion of the wall space and make it your canvas. Don’t be scared to alter and give it a makeover.  If your kid would love it, give him / her sections that he / she can complete.  That would add to the fun, right ?

Tips for painting the wall

Wall painting using acrylic colors
The feature wall of the kid's room
It is as simple as that. Take your time. Don’t get bogged down by setting yourself timelines. Get it right and then move to the next step. Enjoy the process. And most importantly, relish the product of your own efforts.  Take pride and show it off to family and friends. I would love to hear your thoughts on designs that you have executed in your own rooms. Maybe, next time I do something like this, I will incorporate your ideas.  Do leave me a comment.

~ Subbu Padmanabhan

About the contributor
Subbu Padmanabhan is a mom to a 4 something year old boy, and works as faculty in a premier play school. She likes to indulge in mini crafts projects, for the school and her home, during her spare time. The wall art that you see in the backdrop of this bedside lamp is her handiwork too. She lives in Bangalore.


I had not been working much on DIY for a very very long time, and I hope that changes in 2014. While there are so many that are in mind, more time is what I need to execute them all. Maybe, this year around, will allocate focused time for Woodooz. My plan for 2014 is to work on simpler, easier and cost-effective projects that add functionality around the house that everyone can build. This miniature News Desk was a requirement from someone. While I should have spent more time on it, I ended up working on it overnight. Eventually, whoever wanted it, didn’t have reasons to use it, and promptly returned it. No specific requirement was given except for the dimensions (22 inches long, 7 inches wide and 8 inches tall).
Small newsdesk
News Desk
There is not much that I want to write here. This was quite simple to do. As always used 6mm thick sticks (1.5” wide)  with a 12mm strip (12mm wide)  in the middle. Since I did it overnight, didn’t bother to take the step by step pictures.

Newsdesk
Miniature News Desk
Apart from wanting to do more projects this year, I would also want to pay more attention to quality and proficiency going forward. Probably that could be my only resolution for this year. Hope the start to 2014 has been wonderful for you and if it is not anything personal, do share your resolution for the year in the comments section.


As another year draws to an end, it is indeed delightful to hope for pleasant surprises and fulfilling revelations in the brand new year that is round the corner. 2013 has been a good year for Woodooz. Though I would have loved to have 1 post in a week, work in all its glory took away most of the time that I would have otherwise reserved for  DIY.
As is customary, I wanted to look back at some of the key high-points of 2013. But before that, here’s some of the important statistics.  Statistics, though are mere numbers, they certainly help me understand where the blog is heading, and so I make it a point to keep close track of them.
  • We managed 32 posts in 2013
  • That is about one post every 11 days
  • We hit 600+ fans in Facebook
  • We reached 250 Email subscriptions and
  • 250+ RSS Subscriptions

Popular posts of 2013

Some high points

Time has been playing the killjoy and we haven’t been able to spend as much time here as we want to. A slight decline in traffic in the last quarter of the year comes as a jolt, but we want to leave that behind. There are so many ideas in mind, and we hope to convert them all into blogposts. Until the next post, here’s wishing you all a year filled with joy and happiness.  Leaving you now with some clicks from our recent vacation.
Vacation in Srilanka
Photos from our recent trip to Srilanka
Happy 2014
A Happy New Year
- Somu


I have been trying to see what I can put down here that can be of use and my recent conversation with a friend prompted this post. She was wanting to get shelves installed in her kitchen and had been coordinating with professionals to get it done. One of the many needs in any kitchen is the requirement for additional shelves at some point or the other. And it was mere coincidence that I was working on completing an earlier project of mine which involved installing a glass shelf to the cabinet. My camera is giving us big trouble, and I could only manage the below pictures. Hoping that they serve the purpose. So, here’s how you can install a glass shelf to a cabinet without professional help.

Materials and tools required:

  • The glass shelf. The process holds well even if you use a wooden shelf. The length of the shelf needs to be 1 or 2 mm lesser than the length of the cabinet. I got mine for Rs.90/-
  • Shelf brackets or bats (The ones you see in the picture are called shelf bats) - Rs 35/- a pair
  • Drilling machine (Do remember that this is a must have tool for even some of the small requirements at home)
  • Adhesive (if required)
Shelf brackets - Glass shelf support
Shelf Brackets
I went to my regular plywood store and gave the dimensions of the glass and got it cut from the store. Since my size was small, he could give it to me from a spare piece and that saved me some cost.
Shelf glass
Glass panel for the shelf

Step 1 : Mark the height and drill holes

Mark the height on both sides of the cabinet where you want to install the shelf. Ensure that the height is same on both the sides.

Drill two holes along the line marked. This by far may seen as the most cumbersome activity in the whole process. Get yourself a drilling machine and you would realize it is not a big deal after all.The hole size should not be bigger than the bat / bracket cylindrical protrusion (refer photo). The depth of the hole should be just enough for the entire bracket to be comfortably inserted into the hole. Drill a bit and insert the bracket to test. Keep drilling (with intermittent testing with the bracket) until you are able to comfortably place the shelf support into the drilled hole.
Drill holes
Drill holes for the bat insertion

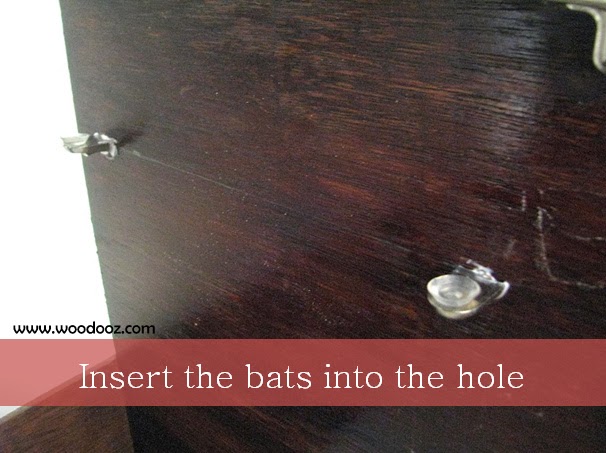
Step 2 : Insert the shelf bats into the hole

Insert the shelf bats into the holes drilled and secure them in place. If the hole diameter is small, the bat cannot be inserted. If it is bigger, the bat will not be secure in its position. To avoid any loose insertion, I added loads of Fevicol and then inserted the bats in place.

Install shelf bats
Insert the shelf brackets

Step 3 : Place the shelf on the bats

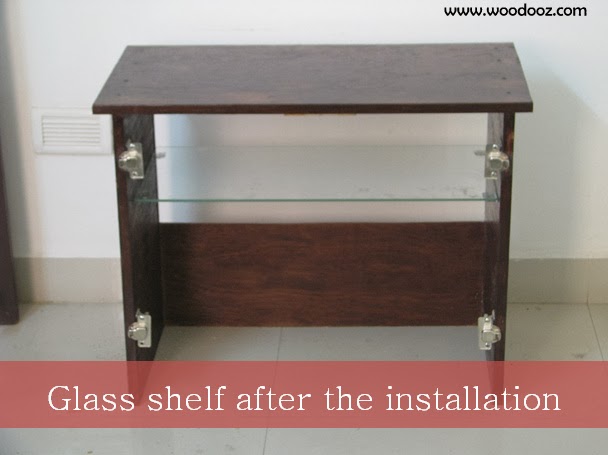
The final step is to place the shelf on the bats. Notice that the bats have a cup shaped top ? With little pressure applied the glass shelf is held together by vaccum suction. Just same as any vaccum suction hooks that you would have seen.

How to install glass shelf
Learn to install a glass shelf
And it is as simple as that. With just a little bit of practice with an electric drill, you can pretty much take care of some of your woodworking needs all by yourself. Installing a glass shelf, getting a cabinet door installed, installing a glass door are among some of the requirements that you can fulfill with this skill. Comes in quite handy at the most vital situations. Share your thoughts. Let me know if you found this post useful.
- Somu


There is always this fun activity of engaging my 4 year old niece whenever she comes home. Sometimes it is the little cars, sometimes the crayons and sometimes we play with the scrabble board. Yesterday, when she came home to personally deliver her hand painted diya for Kaarthigai Deepam, Preethi decided to give her some water color challenge. 
I don’t know what is with kids and Dora. When my niece was given an outline of Dora and Boots, she was all the more excited to sit down and complete the task.  She hand-picked a brush from Preethi’s collection and gave the outlined characters undivided focus. Mix of red and white becoming pink had her thrilled and we could see it all over her face. And here’s what she came up with in a matter of 45 minutes.
Water color painting
Dora and Boots in Water Colors
She is the youngest up-and-coming artist in the family that we have featured in Woodooz. You have already met the oldest one here. Give her your feedback and encouragement. We are going to show her this post and read her your comments when we meet her next. 


Picture this – You post photos in your blog that come out of your own camera. If not all of them, at least about 99% are your own photos. No copyright, plagiarism or crediting confusions, right? Despite all the care taken, you get a call from an unknown number that identifies you as the rightful owner of your blog and you are informed of a flagrant trademark violation. What would you make of it?  
My instant reaction was, "WHAT !" But as the conversation unfolded, and as more details were provided to me, I realized the gravity of a photo (that came from my camera) that I had inadvertently posted to explain a certain How-to process. While I tried to reason out with the caller, I quickly understood that it is probably not right on my part to have posted what I had posted.
                             
I recognized that a violation can happen not just by posting a copied photo, but also by posting a product image in your original photo.  I didn’t take much time to respond. I apologized and took down the post within couple of hours of the call. I removed one photo from the post and heavily edited the other one to ensure nothing was amiss. And I re-posted the edited version that night.

I have posted many photos of products in the past. This and this are good examples. But in this specific post, I had used a brand image to detail a procedure which is not the product’s original intended purpose. While the whole image capture was completely unintentional, it didn’t strike me at that point that it may probably be showing the brand in sort of a bad light. 

It is quite a popular post here in Woodooz. But then, it is only right on someone’s part to object to the use of their brand without their consent, right ? There was no mention of any trademark / copyright information that I could find in the product website. Yet, on moral grounds, I decided to honor the request to remove the image. This has now got me thinking and I plan to scan all the pictures to ensure there is nothing wrong with them.

While I do that, tell me this ! Did I do the right thing ? How would you have handled the situation ? And do share your thoughts on what else could be a violation on a personal blog. Would love to hear your views. 

- Somu


Have you ever been put off by the idea of doing something with wood because of the hard work that it involves? Have you been giving up on executing a thought because you didn't have the necessary tools? Do you like to explore woodworking as a hobby but don’t know where to begin? Here is a list of some simple and easy projects that you can do to give your interest a kick start. Why do I call them simple and easy? All these projects use easily available materials, requires a hack saw blade and don’t take much time to complete. 
Further reading: My 17 point recipe on how to start a woodworking hobby
DIY woodworking projects
Simple and easy DIY Woodworking projects
1. DIY Photo Stand (Beginner level)
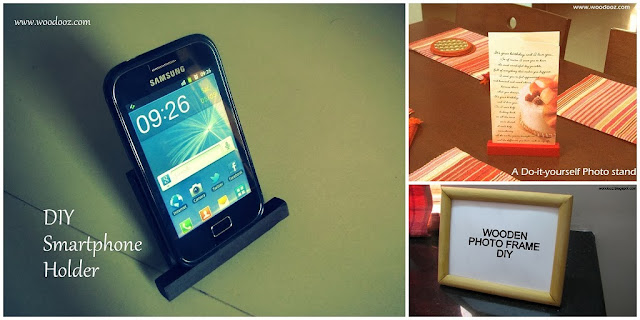
    If you have a display space at home, this is a really wonderful thing to own. Inspired by a menu card holder, this is one of the easiest projects I have ever done. Takes just a couple of wooden reapers and adhesive and you have your own photo stand.
2. A Smart phone holder (Beginner level)
    Another very functional project. I was really glad that I made it. Makes watching Youtube much easier than ever. Again, just a couple of wooden sticks and some glue is all you need.
3. A Photo frame (Beginner to intermediate level)
    This serves the same function as the photo stand, except that it is a conventional photo frame. This DIY apparently is among the top 5 popular posts in Woodooz. Little bit of creativity and you can have personalized photo frames to hold all your memories together.
4. Wooden Wall clock (Beginner to intermediate level)
    You can make a simple clock to a really fancy one and all that depend on the thought you put into the projects. However small / big your clock may be, the concept behind making one is just the same. You will need to get the clock mechanism, but beyond that, you can use pretty much any material to make your own clock.
5. Broadband router holder (Beginner level)
    This is the ugliest looking holder that you would have ever seen. But, what the heck, it really serves its purpose. The inspiration was a mobile phone charger holder that I saw at a duty free shop in the airport. The design is raw and rough, but it certainly saved us some floor space. Try it out if you think you have a similar need.
Starting with smaller projects and then gravitating towards bigger and more complex ones can help sustain your newly found interest. And the sustenance is key to your interest growing into a passion that you most certainly love to indulge in. If you let non-availability of materials and tools to discourage you, these 5 projects will help get you back in track. Do you have any other small and easy projects in mind? Leave me your thoughts in the comments section.

- Somu

Know more about us

About Us
Reviews
Media
Our showroom location
Return and refund policy
Review us on Google

Connect with us


Mail us
Subscribe to our newsletter

Our Address :
Woodooz Home Decors,
3/371, First floor,
Metukuppam, Thoraipakkam,
Old Mahabalipuram Road (OMR),
Chennai - 600097.
Ph : +91 9884070470
Email : contact@woodooz.com
Created By SoraTemplates & MyBloggerThemes