Category : DIY Woodworking


This is one post that I have been raring to post for a long time. Just wanted April to pass and wanted to ensure due permissions are in place. This was the first time that Woodooz has been featured in the print media and that has been keeping us on cloud 9 all along.

The background : 

The week - Smartlife was doing an article on DIY in India and wanted the opinion of few hobbyists. I had the wonderful opportunity to voice my thoughts along with other DIYers and the article was published last month in the monthly edition of Smartlife.

Thanks to Nisha Ramchandani for being constantly showing interest in what we have been doing in Woodooz and also for referring the blog and our work to Monty who was writing the article.

Thanks to Monty Majeed of The Week for reaching out and for patiently listening to me on the phone for close to 20 odd minutes. Special thanks for wonderfully paraphrasing the conversation.

Thanks to Nathan G of nathangphotography for braving the distance and coming all the way to our place for a mini photo shoot. It was nice meeting up and to hear his inspiring story of how he gave up a plush IT profession to pursue his passion for photography. 

Without further ado, will leave you with the scanned images of the article. If you are the types that prefer the text version, you can read the entire article here.

Idea of DIY in India
DIY as a hobby
Indranil at work
Indranil of IndianDIY
Woodworking DIY
Sudhakar Prabhu
The blog as been idle for a long time and the last few posts have not been centered around our work. This little motivation has pepped us up quite a bit and we wish to push ourselves to indulge in lots of pending DIY around the home. A lampshade is waiting to be completed, a painting is just half done, and need to start work on a small cabinet to house my tools. And very soon, will populate these projects here. 

Do you agree with the article. What is your opinion on DIY woodworking catching up as a popular hobby ? What do you see as the hurdle in you wanting to jump into this wonderful activity ? Do leave me a comment. 


I had started the project on bedside table last week and had decided to put up the step by step process of the progress.  The first step towards making any piece of furniture is to get the design in place. This enables you to fix the dimensions, which in turn provides you the input on the amount of materials that you need to buy.  This being DIY, you can choose to have your own design and dimensions. We wanted the table to be in line with the mattress which fixed the height at 20 inches.

Measurement for table
Dimensions for the table

Materials and tools required

  • The Wooden legs : I wanted the legs to be 1 inch x 1 inch and required them to provide stability to the whole structure. Based on the above design, I needed the following:
    • 4 x 20 inches long legs (Vertically placed)
    • 8 x 14 inches long legs (Horizontally placed - 4 on top and 4 in the middle )
  • At the plywood store, I was shown 1 inch x 1 inch teak wood legs which was just perfect. They come in 8 feet length and costed Rs.25 per foot.
  • Based on the dimensions, I needed 192 inches (exactly 16 feet). To allow for minimal wastage, I bought 2 x 8 feet and 1 x 2 feet of the teak wood
  • A hacksaw blade for the cutting needs
Teak wood for table legs
Teak Wood Legs for the Side table

Cutting the wooden legs to required dimension

I have always maintained that it is fine to outsource your cutting needs should you have constraints in terms of space, non-availability of tools / skills. While it is quite a task to cut sheets of wood above 12mm in thickness and one may need a handsaw or a circular saw, for some of the requirements (as in this case), hacksaw blades would do the job neat and clean. It is easy to use, easily available and will not cost you more than Rs.15. I used a hacksaw blade to cut the teak wood legs.

Hacksaw blade
Cutting the wooden legs using hacksaw blade

Fixing the wooden legs

With the legs cut to the required dimension, the next step naturally is to fix the legs. Considering I am getting only limited time during the weekends, this will be the next step in the process. I still have not decided whether to use screws or a cross dowel to fix this up. Whatever might be the case, I will be using only butt joint to join the wooden legs together

Teak wood legs
Wooden legs cut and ready to be fixed

Do watch this space next Monday for the next step in the process. Hopefully, I should be ready with the basic structure of the table by this week. I am thinking of putting up a video post (at a later time) on this entire project subject to availability of time.  Do leave your feedback and share your thoughts on this project. 


It is exciting when the desire to DIY is fueled by an actual requirement at home. There is now the need for a bedside table in our guest bedroom that is bare with only a cot and no other piece of furniture. The broadband modem, mobiles/other accessories have no designated space while in the room. As always, I want to explore the DIY route before looking at readily available products. Another functional necessity and am already so pepped up.
Recommended Reading : Using Google Sketchup to create 3D designs
The plan for the table is based on a simple thought process. Avoid perception of taking up space in an already small room by keeping all sides open. The design is not anything original and you can find similar ones on the internet.
DIY bedside table
Simple Side Table plan designed with Google Sketchup
For now, I have only bought the wooden legs from the local shop. My initial plan was to keep the budget low (less than Rs.300) and build a low cost table. On second thoughts, want to build a really sturdy one and so stretched it a bit. The teak wood legs you see below cost about Rs.25 per foot. 
Recommended Reading : Easiest DIY Center Table you can ever build
The design has the necessary approval at home. While I am starting with what you are seeing above, during the course of building it, I may improvise and deviate from the basic plan. The cot is brown and the wardrobe / wall is white which should explain the color combination. The dimensions are not frozen as yet.
Side table for bedroom
Guest bedroom and the designated space for the side table
I will be making this as yet another simple and everyone-can-make-at-home kind of a project. I plan to put up the progress (dimensions, materials used, and the step by step process) of this DIY in a series of posts. So, watch this space if you think this assignment will be of interest to you.  


I have been trying to see what I can put down here that can be of use and my recent conversation with a friend prompted this post. She was wanting to get shelves installed in her kitchen and had been coordinating with professionals to get it done. One of the many needs in any kitchen is the requirement for additional shelves at some point or the other. And it was mere coincidence that I was working on completing an earlier project of mine which involved installing a glass shelf to the cabinet. My camera is giving us big trouble, and I could only manage the below pictures. Hoping that they serve the purpose. So, here’s how you can install a glass shelf to a cabinet without professional help.

Materials and tools required:

  • The glass shelf. The process holds well even if you use a wooden shelf. The length of the shelf needs to be 1 or 2 mm lesser than the length of the cabinet. I got mine for Rs.90/-
  • Shelf brackets or bats (The ones you see in the picture are called shelf bats) - Rs 35/- a pair
  • Drilling machine (Do remember that this is a must have tool for even some of the small requirements at home)
  • Adhesive (if required)
Shelf brackets - Glass shelf support
Shelf Brackets
I went to my regular plywood store and gave the dimensions of the glass and got it cut from the store. Since my size was small, he could give it to me from a spare piece and that saved me some cost.
Shelf glass
Glass panel for the shelf

Step 1 : Mark the height and drill holes

Mark the height on both sides of the cabinet where you want to install the shelf. Ensure that the height is same on both the sides.

Drill two holes along the line marked. This by far may seen as the most cumbersome activity in the whole process. Get yourself a drilling machine and you would realize it is not a big deal after all.The hole size should not be bigger than the bat / bracket cylindrical protrusion (refer photo). The depth of the hole should be just enough for the entire bracket to be comfortably inserted into the hole. Drill a bit and insert the bracket to test. Keep drilling (with intermittent testing with the bracket) until you are able to comfortably place the shelf support into the drilled hole.
Drill holes
Drill holes for the bat insertion

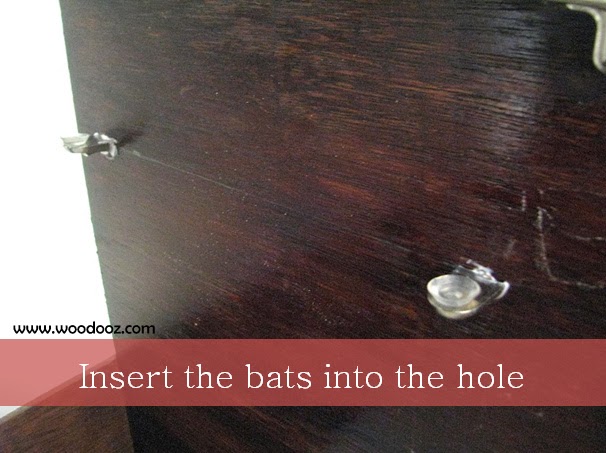
Step 2 : Insert the shelf bats into the hole

Insert the shelf bats into the holes drilled and secure them in place. If the hole diameter is small, the bat cannot be inserted. If it is bigger, the bat will not be secure in its position. To avoid any loose insertion, I added loads of Fevicol and then inserted the bats in place.

Install shelf bats
Insert the shelf brackets

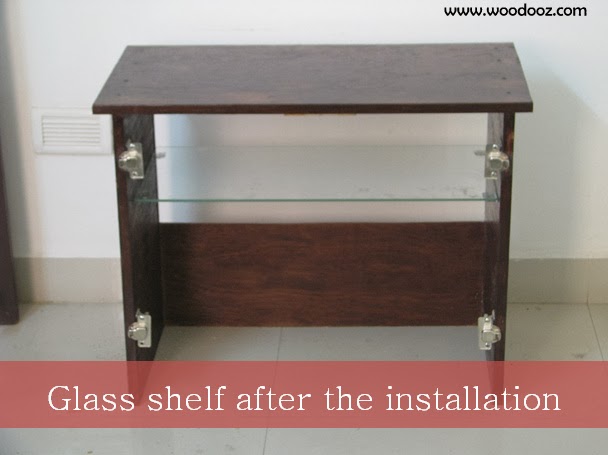
Step 3 : Place the shelf on the bats

The final step is to place the shelf on the bats. Notice that the bats have a cup shaped top ? With little pressure applied the glass shelf is held together by vaccum suction. Just same as any vaccum suction hooks that you would have seen.

How to install glass shelf
Learn to install a glass shelf
And it is as simple as that. With just a little bit of practice with an electric drill, you can pretty much take care of some of your woodworking needs all by yourself. Installing a glass shelf, getting a cabinet door installed, installing a glass door are among some of the requirements that you can fulfill with this skill. Comes in quite handy at the most vital situations. Share your thoughts. Let me know if you found this post useful.
- Somu


One of the most common questions that I get on mail and on comments is, ”Where do I start if I want to develop interest in carpentry” ? Not that I have gained enough authority on this subject, but since am quite often faced with this question, I decided to write about what worked for me. The objective of this post is not to make a professional woodworker out of you, but to draw your attention towards basic carpentry and the everyday projects that you can build around the house. So here goes - My 17 point recipe for starting a carpentry hobby:
Carpentry as a hobby
Starting a hobby in carpentry / woodworking
  1. Don’t let anyone make you think that DIY woodworking is not for the Indian conditions. It is as much possible here as much as it is elsewhere.
  2. Your first project: Choose one that is easy to make. Completing a DIY project, however small it may be, will encourage you enough to take up the next one. Start with something like a smartphone stand or a photo frame or whatever you want to make. My first project was a center table.
  3. Take a plunge and give your project a jump start. Don’t let something you don’t know slow you down. You will learn as you progress.
  4. Gift yourself a basic electric drill. You must own one.
  5. You don't need to have an entire collection of tools before you start. Buy them as and when you need them. I bought my collection of tools over a period of 3 years.
  6. There is no shame in outsourcing wherever you don’t have the skills or tools. I cut my plywood at the plywood store. I don’t have the space or proficiency to own and use a circular saw at home.
  7. Plan, plan, plan. Put your design in paper before you start the actual execution. Use a design software if necessary. It will save you materials,cost, time and energy.
  8. Keep your design simple and easy to make. Worry not much about joints to start with.
  9. Space can always be a constraint for an apartment dweller. Use whatever little space you have efficiently. A guest room or a balcony can be life savers. Just make sure you clean up once you are done.
  10. Read, read, read. Every bit of information is available on the Internet. Google and Youtube have been my best friends. Buy or borrow a book if necessary.
  11. Join like minded communities or forums. This will help you reach out to professionals who can provide valuable inputs.
  12. Join woodworking classes if your city has one to offer. It will put the foundation in place and help build more confidence.
  13. Practice, practice, practice. Nailing, screwing, gluing, cutting, sanding  – All come with practice.
  14. There is paint or stain, and clear varnish. Don’t confuse yourself with other finishing methods in the beginning. You will naturally transition to the next level with every project.
  15. Enjoy what you do. Carpentry is beyond the hard labor that it seems to be and beautifully functions as a hobby you can pursue with fervor.
  16. Take a break once in a while. This can be addictive and you don’t want it to get on your nerves.
  17. And finally, give utmost importance to safety. If you work in haste, you will repent in leisure.
Do you think you can add some more ingredients to my recipe ? Please let me know in the comments section.
Linking in : Colours Dekor


Do it yourself is fun. The pleasure I derive from finishing a project is immensely fulfilling. The near end of one assignment almost immediately marks the beginning of the next envisioned idea. And there are countless conceived designs that are waiting to be executed. My grouse though is that most of the ideas are still only in their conception phase. I find it extremely hard to maintain the consistency with which I would like to indulge in this hobby.  And that, quite naturally, affects the frequency of posts you see here. While there are many factors, there is one main challenge that I face in being able to sustaining the DIY steadiness.

Time

There is me time, we time, free time. There is work time, travel time. And amid all this I have to squeeze in hobby time. While working on a DIY project is one thing, making a post on it is another thing altogether. My last post on building a shoe rack took 6 hours of my Sunday to make just the illustrations. And the shoe rack itself took close to 12 effective hours spread across multiple days.

The fact that woodworking is an addictive hobby, it is not difficult to understand that you would soon get sucked into it much like any other pastime. Sometimes I am glued on to it for hours together completely oblivious to the passage of time. Spending time compromising on other priorities is quite concerning right?  Though at one point, I would have easily declared “not finding time” as a made-up myth, I am coming to realize that it is an apparent truth and a reality.

It is easier to read and hear about things like, “You have to work around your obstacles if you are really passionate about something”, and other such philosophies. But in reality, it becomes quite impossible to make compromises for just a hobby, even if it means am obsessively passionate about it. Right ?

Do you relate to the situation? How do you handle it? Leave me a comment. Am sure it would make me feel better.
Linking in : Colours Dekor


Making a shoe rack or a cabinet may seem complex and quite a task for a home DIYer, but you would be surprised to know how easy it is when you break it down to simpler steps. This is a step by step tutorial for making your own cabinet (like the one below) at home with just an electric drill, screws and screw drivers. Before you move further, do take a moment to read about pilot holes and butt joints. For the first time, I am trying to put up a 'how to' series by merely using illustrations. Would love to hear your feedback on this.

Materials Required

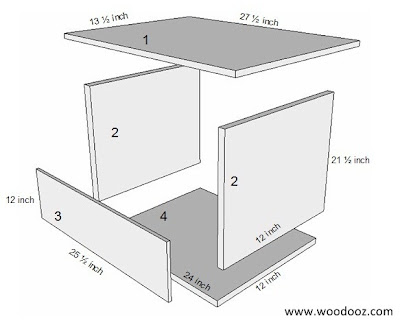
  1. 1 number of 12 mm plywood for the top (27.5 inches x 13.5 inches). This will be the cabinet top
  2. 2 numbers of 12 mm plywood for the sides (21.5 inches x 12 inches)
  3. 1 number of 6 mm plywood for the backing support (25.5 inches x 12 inches)
  4. 1 number of 12 mm plywood for the bottom (24 inches x 12 inches)
  5. Additionally, you would also need 12 mm plywood for the following (Not shown in the image below)
    • The shelf
    • The cabinet doors
  6. Rubber bushes (4 numbers)
  7. Door knobs (2 numbers)
Measurement of materials required
Dimensions for the shoe rack
You can get these materials in your neighborhood plywood store and you can have the plywood cut either at the same store (like I did), or in a timber store for a minimal cost. All you need to do is give them the dimensions. Of course, you can have it cut yourself if you have the necessary tools.

Tools and supplies required

  1. An electric drill
  2. Screw driver set
  3. Some star head screws (2 inches)
  4. Fevicol SH or an equivalent wood adhesive

Make the basic structure

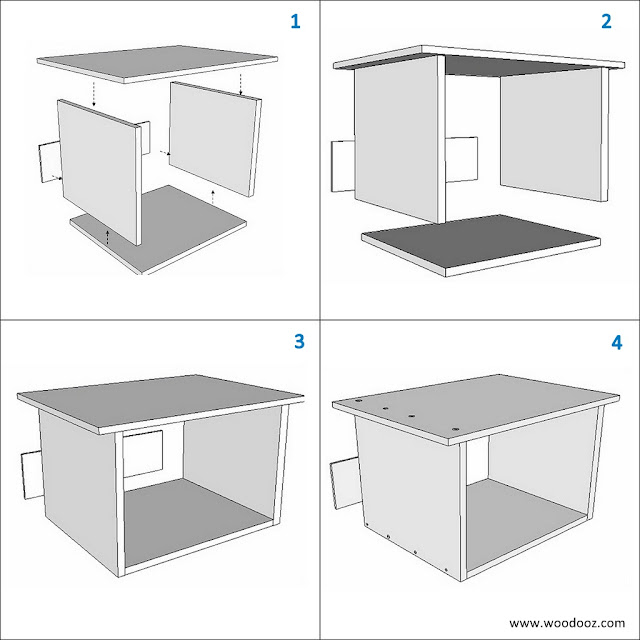
  1. The idea is to make the basic structure or the shell of the cabinet using simple butt joints. The top plywood plank is placed on the side vertical planks which are further joined together in the bottom (Check image below)
  2. Place the top on the vertical side planks. The dimensions are such that there is a space of 1 inch on all sides of the top planks.
  3. Similarly place the bottom plank between the two sides and fix the three together.
  4. Secure the planks together using 2 inch screws (indicated by dots) as shown in the image below. For additional reinforcement, you can use adhesive. To make it easier for driving the screws in, drill a pilot hole extending from one surface to the other surface.
Shoe rack DIY
Shoe Rack Do it Yourself

Fix the shelf and the doors

  1. When cabinet is made with butt joints, there is every bit chance that it would be weak and would wobble if considerable weight is applied. To overcome this issue, the backing support in the rear is mandatory. It is your personal choice and you can decide to cover the entire rear with the backing support.
  2. Install the shelf. You either drive screws into the shelf through the sides or you can also use shelf brackets. The advantage with shelf brackets is that you can remove the shelf to make more space when desired or you can adjust the placement of the shelf at any height you need at any point in time.
  3. Installation of the cabinet door is beyond the scope of this post. 
  4. However, you can learn the trick from this detailed post on installing a cabinet door.
A do it yourself shoerack
Make your own shoe rack
Attach rubber bushes to the bottom of your shoe rack to ensure that the rack is not placed directly on the floor. You can also have a simple knob installed. Whether you want to have a single door or a double door is up to you. But any length of the cabinet beyond 1 feet 9 inches, a double door would be preferable.
Shoe Rack illustration
DIY Shoe Rack
Of course, you will have to suitably finish it using stains or paint. Hope you find this useful. If you find information lacking, or need more inputs on this one, feel free to shoot a mail to contact@woodooz.com. Do leave your comments and let me know what you think of this DIY.
Linking in : Colours Dekor


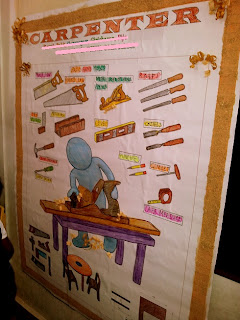
My cousin invited us over during the weekend to her kid's project day at his school. The theme was "Community helpers". 5-6 kids took up one community activity and had to explain the role of the respective helper in the society. Postal service, Police station, Fire Station, Hospital, School, Agriculture were some of the stalls on display. It was a pleasant surprise to see my nephew take up the role of a carpenter :)
Carpentry in India
Carpenter - A Community Helper
"I am a carpenter and I do various kinds of wood work. I use these tools to build houses, cots, shelves, chairs", is what the kids were explaining to the onlookers. They had all kinds of woodworking tools on display including a drill, hammer, planer, clamp, chisels, screw drivers, hand saw and more. They also had miniature models of a shelf, couple of chairs and a table. And they were well prepared to take up any question related to what was on display in their stall.

Woodworking
Carpenter and his tools

Carpentry tools in India
Carpentry Tools
We went there to cheer for and encourage my nephew and were pleasantly caught unawares to see him explain an activity that I have, in recent times, been so passionately taking up. I liked it that the parents chose a respectable uniform for the mini carpenters despite many insisting on going with the cliched "Lungi". Carpenters, much like many others, work towards making our lives much easier and it is a positive sign to see this thought being instilled in the kids.

Do you agree that carpentry in India can be beyond just a profession and can be a leisure activity that anyone can indulge in ?  Or think it is just another myth ? Leave me your comments.

Due credits : While I did take the pictures, the credit for the charts and the entire set up goes to the parents of the kids and the school faculty.


Linking in : Colours Dekor


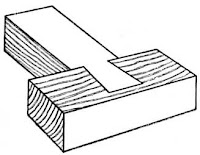
The woodworking workshop class in my 1st year engineering always spelt boredom. Back then, I was taught to use the planer to smoothen the surface of the wood. I had to work with saw, hammer and chisel to make dovetail joints (exactly like the one you see in the image). There was also foundry as part of the class where I had to file metal and make joints.

In hindsight, I wish I had made the most use of it. But in reality, I never really enjoyed my workshop class and always looked at means to avoid it.

I take immense pleasure in doing the same things now. But what was so different and difficult back then?
A dovetail joint
Dovetail Joint
Img courtesy :
basiccarpentrytechniques

What made it uninteresting for me?

First and foremost, I had to make dove tail joints without getting an opportunity to see those dovetails on a finished product. In a sense, I did not understand the rationale behind a joint. I understood planing wood resulted in a smooth surface, but never realized the consequences of the otherwise.

I did not build a cabinet or a table and in the process learn the technicalities. Maybe then, I might have understood its use better. On the contrary, a dovetail joint is all that I had to make.

It was like learning alphabets, and not using them to construct sensible sentences or like learning recursive loops, and not using them to write practical programs.

Just a funny cartoon
Looks like the same logic works for complex math too
img courtesy : loldaddy

What would have otherwise made it interesting for me?

Personally, planing wood or making joints is still so boring that I would rather not indulge in it. But what makes it interesting and necessary is the associated outcome. I need to really look at a stained finish with and without sanding for me to appreciate the need for sanding.  And it takes a wobbly cabinet to make me understand the value of a joint in the overall process of woodworking.

Rather than gaining perspectives on just the techniques, learning to make a functional product and in the process understanding the underlying principles makes learning woodworking more enjoyable for me.

I have never been bothered by the intricacies of a product. It is always about durability and good looks and it does not largely matter how one has implemented it (at least until sometime ago). Which is why to me, making a handy piece of furniture end to end, and then to work backwards to learn the specifics that went into building it, would have made more sense

Your opinion matters

What is your opinion? Have you ever had to make batter in your home economics class, but never got the chance to bake a cake? How does that feel? J Leave me a comment.

- Somu

Subscribe to our RSS feed

You may find the below projects interesting. Do check them out.

Linking in : Colours Dekor


When I started indulging in woodworking DIYs, I wanted a platform to showcase all that I did. Besides being a showcase, I also wanted to use the platform to reach out to other woodworking hobbyists. Most (in fact all) of what I do is learnt from the plethora of information that is available on the net. However, nothing comes anywhere close to garnering inputs from someone directly. 

When local carpenters were not too keen on revealing their trade secrets, I started seriously looking for fellow hobbyists. DIY woodworking not being a popular hobby in India, there were not many blogs that I came across in this niche (in India that is). There were two though that I was happy to discover and wanted to present them here. 

Indian DIY and Woodworker

This blog run by Indranil Banerjie is all about hardcore woodworking. Here he talks about his home work shop, use of various power tools, and other woodworking tips. In his own words, “ I will offer my advice and relate my experience with DIY and woodworking issues in this blog and hopefully this might motivate you to join the movement”. 

House on the Rock

Vinay Oommen, who is a doctor by profession, runs the House on the Rock. Vinay shares his woodworking projects like the simple bookshelf, key chain holder, kid’s table and more that he made for his home. He is pretty new to blogging and has a keen sense of humor which is evident from this post of his. In his own words, “This website aims to provide those interested with tips and pointers on starting woodworking from scratch”.


In the coming weeks, we also want to list our favorite arts, crafts and home decor blogs that we ardently follow every day. Meanwhile, do visit these woodworking blogs and let these gentlemen know what you think of their work. I would love to add more such Indian Woodworking blogs onto this list and so, if you know a certain blog , do leave a comment. Even otherwise, leave a comment :)

If you like Woodworking, you will certainly like these other posts too

  - Somu


A Pilot hole is a small hole that is drilled into wood, before driving a screw, a larger drill bit or a nail. Following are the common reasons why a pilot hole is required:


  • It is not possible to generate enough power using ones hands to drive a screw directly into wood, unless a power screw driver is used. Pilot holes make it easier to drive screws using a hand screw driver


  • When a screw / nail is driven directly into wood, it might possibly split the wood. The chances are very high if the screw / nail is used along the corners / edges of the wood. Pilot holes help prevent tension on the wood making it easier for screws to be sunk without causing any damage


  • When using a larger drill bit, it is possible for the drill to slip while it is being driven. The pilot hole increases accuracy by acting as the guiding fissure into which a larger screw / drill bit can be easily and precisely driven
What is a pilot hole?
Pilot hole for driving a screw in wood
Pilot holes have to be lesser in diameter and depth than the screw that is being driven into it. Larger holes will not create enough grip around them for the screw to tightly hold on to the wooden surface.

Pilot holes are commonly used within the house for installing a bathroom hanger, key holders, hanger rods for the wardrobe etc… while they are also extensively used in furniture making, cabinetry, and other woodworking needs where screws and nails are predominantly used.

If you liked this post, you may also be interested in
What is sanding ?
What is the difference between Wood stain and paint ?
How to install Euro hinges ?
How to install a glass door ?

P.S. Linking in : Lines Across my face
- Somu


Before getting into the how tos of Priming and Painting wood, it helps to understand a little bit about the difference between wood paints and stains. This tutorial is particularly useful for your everyday small wooden DIY projects while it can also be extended to bigger ones like your furniture.
Note: This post only addresses painting on bare wood. The technique is different when an already finished wood needs to be repainted.

Why is priming required on wood ? (Back to Top)                                                                                           

  • Priming is essential to provide the undercoat and topcoat of paint an even surface
  • It allows for uniform absorption of paint, helps cover the grains and pores and thereby enables a flat, opaque, and smoother finish.
Some safety pre-requisites (Back to Top)                                                                                          


Primer and paint give out strong fumes. It irritates the eyes and can also cause certain discomfort if inhaled. You may want to be better prepared with woodworking safety equipments like face masks and eyegears while indulging in this activity.

Materials and consumables required (Back to Top)

Primer allows for uniform absorption of paint, helps cover the grains and enables a flat and smoother finish
Wood primer and paint
Primer, Paint and Brush


Hobby woodworking with limited set of tools can make you believe you need to take lesser precautionary measures. However, it is  true when they say safety should be given prime importance irrespective of the size of any woodworking project. Working with fumes, dust and wood chips may be seemingly harmless, but they can have radical outcomes if necessary caution is not exercised. So, here’s a list of three safety gears that I feel are essential and important for a hobby woodworker:

Safety Eye gear / glass 

Using a power drill for drilling a hole in concrete walls or wooden planks can be potentially dangerous if the bit were to break off during the process. Protect your eyes unless you want a flying piece of bit piercing right through your eyes. Saw dust and wooden chips also need to be kept away from the eyes. I don’t work with flames, but then if you are the types that uses gas welds, you know what I am talking about. Wearing an eye gear may seem unnecessary and also obstructive to the task at hand, but goes a long way in ensuring your safety. Do save your eyes. You may want to give them to someone later.
Safety Glass / Eye gear

Safety gloves

Wood chips’ getting into my skin is a common issue that I used to face, especially while sanding plywood. Just one slip is all it takes for a chip to prick through your finger. The sore palm is another experience that I had to go through before I learnt wearing gloves is important. Not only does it prevent minor mishaps, it also provides for a firm grip while handling tools. The hammer falling on your feet is the last thing you would want. And unlike the eye gears, gloves are comfortable to use and really aid in handling tools better. Use of latex gloves (Available at Rs.3/- a pair at Nilgiris) while painting / staining / varnishing is also recommended.
Safety Gloves

Respirator

Stains exude invisible fumes, paints and primers smell bad, and saw dusts usually fly all over the place. When it comes to matters of the lungs, it is always and always critical to be safe. Just as smoking is, inhaling fumes and dust are health hazards too that you would want to stay clear of. Working in a highly ventilated area is probably the best tip you can get as far as using stains or varnishes. But like me, if you work in the confines of your home, BEWARE. Fumes have a wider reach and they can very quickly spread through the entire house. I sometimes have to insist that my wife wears a respirator too. Your safety and your family's, they go hand in hand. The least you can do - Cover your nose with a hanky at all times.
Respirator / Face Mask

There are other safety equipments and gears that one may need to use depending on how heavy duty their work is. But for a hobby woodworker that uses minimal power tools, I feel glasses, gloves and masks are mandatory. Here are few other safety tips that should follow:
  • Wear appropriate and tight clothing. You may not want a Power drill to accidentally get caught in your loose outfit. Just imagine a dupatta getting caught in a motorcycle wheel. It is kinda exaggerated, but am sure you get the point.
  • Wear shoes if you can. Hammers, wooden planks, Paint cans and other heavy tools – All of them have the potential to break your feet, crack a bone or at least to give you one painful moment.
Safety before all else. Always remember that and have fun with your creations !

Show your awesomeness. Click here to leave  us a comment.


Have you ever had an "If-only-I-had" moment while working on a project ? It could be as simple as acrylic paint spilling on your dress or a hammer almost crushing your thumb... What is your take on safety while working on simple DIY projects. Share your thoughts. Leave a comment.

Linking in : Lines Across My Face
- Somu

Know more about us

About Us
Reviews
Media
Our showroom location
Return and refund policy
Review us on Google

Connect with us


Mail us
Subscribe to our newsletter

Our Address :
Woodooz Home Decors,
3/371, First floor,
Metukuppam, Thoraipakkam,
Old Mahabalipuram Road (OMR),
Chennai - 600097.
Ph : +91 9884070470
Email : contact@woodooz.com
Created By SoraTemplates & MyBloggerThemes