Category : Blog


Having a virtual group of like minded people to discuss your line of interest is a boon. While it provides the opportunity to network, it also aids in learning new ideas, having purposeful exchanges and making new friends.
Some of the online DIY Woodworking discussion boards tend to get overwhelming with surplus information up for grabs. While information is good, it gets muddled when the language and jargons used have local significance. It would be absolutely great if I have a network where I can discuss my queries, issues, and my work besides other things in a manner than I can better relate to and understand. And that is what “Anything is DIYable” has to offer.
DIY Woodworking discussion board - India
DIY Woodworking forum in India
It is a medium for folks with a strong inclination towards all things DIYable. This forum, in their own words, is home to Indian DIYers and Hobbyists. The growing member list is very enthusiastic and is made of multifaceted individuals with interest towards various activities around the house that one can attempt to do oneself. From home appliances, to Audio video, to Automobiles, to computers, gadgets, plumbing, tiling, to woodworking and carpentry - works are showcased, and ideas are exchanged.

And what makes the forum appealing is the fact that it is completely Indian. I also believe that the group gets together once in a while and have workshops on a topic of interest. If any of the categories mentioned above interest you, you should check out DIYable.

- Somu
Did you like this post ? Enter your E-mail address and join our growing E-mail list


You may also be interested in:


The requirement

What I like about the DIY projects I am getting is the variety in the requirements and the purpose that they are meeting. My recent assignment is to build an inverter battery case that will house the heavy battery and the inverter stabilizer. Considering the inverter is in the living room, the need was to build a cabinet around the whole thing which will look neat and can double up as a small side table.
Battery and stabilizer
The inverter

Making the trolley - Phase 1

One constraint though. The battery needs to be fed with water at least once every two months. So an enclosed cabinet will not serve the purpose. Either the cabinet should open up to expose the battery or the battery should easily move in and out. I went with the latter option and decided to place the battery on a trolley.

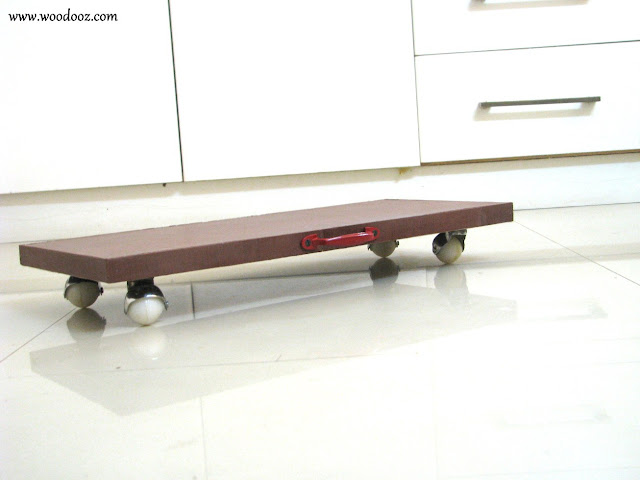
The first phase of the project was to build the trolley. I used 19mm plywood board for the trolley and had wooden laminate installed around it. I installed trolley wheels beneath the board and also had a door handle screwed in. The handle is to aid in pulling the trolley out of its enclosure. I tried using it as a skate board for sometime and ended falling flat.

Plywood with edge beading
19mm Plywood plank

Battery trolley
The trolley
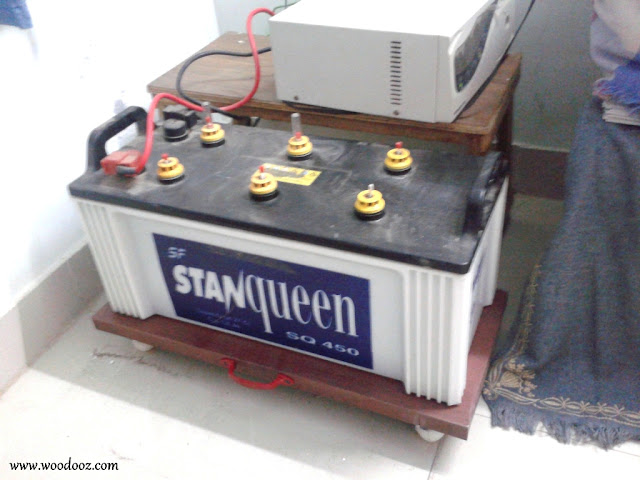
Yesterday, I had the trolley delivered and installed. The dimensions ended up being perfect and it was really easy to pull the battery around.

Installation of the trolley
Battery on the trolley

Making the cabinet - Phase II


Cabinet design in #D
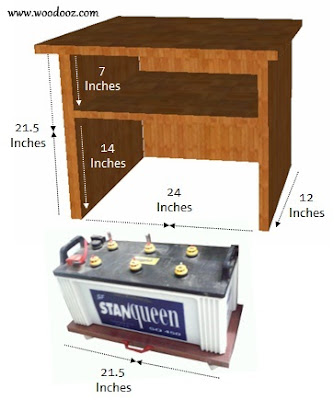
Tentative design and measurements
I have to now build the cabinet around the battery. Since the trolley needs to move in and out, decided to not have any base for the cabinet. It will have one additional shelf to house the stabilizer and will have doors covering the front of the cabinet. While the doors will hide the inverter, they will also have sufficient ventilation to allow for any smoke to sneak out. Adequate ventilation also needs to exist in the sides and rear.

This 3D design that I created using sketchup is very simple and tentative. Once approved I will be starting work on Phase II.

Most countries and states may not understand the need for inverters in the house. But, with daily power cuts being the norm in Chennai, almost every household has one. Do you have one too installed in your home ? How have you covered it up? There are ready made cases available. What did you go for ?

- Somu
Did you like this post ? Enter your E-mail address and join our growing E-mail list


If you liked this, you may also like


What my obsession makes me miss

Ever since we made our first DIY center table, I have been very passionate about doing one project after the other, and have taken a certain pride in showcasing all our works. This little balcony is where I do most of my work from. I roll down the bamboo blinds to beat the heat and get engrossed in my own work. It gets so obsessive that at times I have to be reminded of the things I miss. So, for a change, I gave DIY a break, rolled up the blinds and decided to open my eyes to the things I should not let pass (All pictures below were taken right from the comforts of our balcony).
Working in the balcony

While am facing the other side and working on my gate, there is a flock of cranes that are cooling it off behind my back in the mini lake that is an outcome of winter showers. Sometimes a dog playfully runs behind one of them. In a place like Chennai, such a sight is unheard of. Luckily for us, we have another year or two of this visual luxury and it is indeed criminal to show my back to this picture perfect splendor.
Flock of cranes
Flock of cranes - A view from the balcony
Like a sage in his unperturbed penance, this cormorant stays put in that pillar almost every other day. Unmoved and focused on that prized catch that it may spot inside the water. It takes a moment like this to realize the grandeur of life around that should not be missed because of certain fixations.

Cormorant
A cormorant waiting for that elusive fish
They are common mynas but they are not so commonly seen perching on our window sill. And so when there is a couple happily posing, I would rather not be elsewhere hammering. 

Common Mynas
Mynas on the window sill
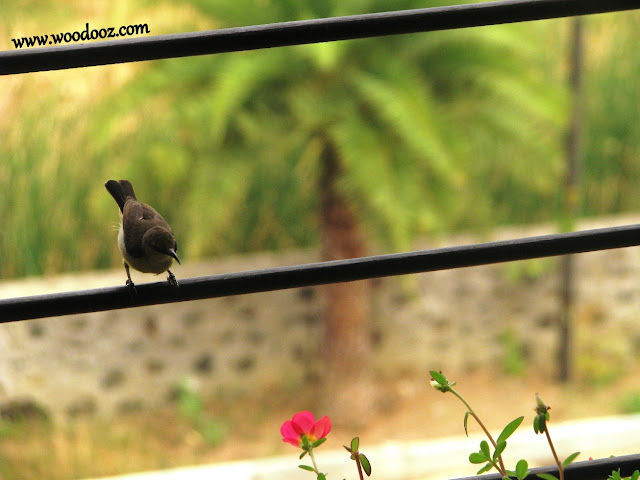
Preethi’s mini balcony garden (that calls for a separate post by itself) invites humming birds almost every other day. Imagine seeing them flapping their wings and trying to suck nectar out of the flowers. We experience that sometimes, and know what keeps them away often ? Someone squatting on the balcony floor with  preoccupation, wood and tools. These birds have now inspired us to make a mini bird bath for them.

humming bird
A humming bird - Or so I think
On a rainy day, my work space is all wet and soggy and it spoils any project I may have in hand. The only consolation is the fresh change these rains bring. Next time, given the choice between sweating it out in my make shift work space (the guest room) and taking pleasure in the weather sipping a hot cup of chai, I should remember to go with the latter.\

Balcony Garden
Flowers in their full bloom - Balcony Garden
Oh sometimes, I spot these too. Considering this is not something I would see on a normal day, why would I even want to miss it. I played it safe and took this picture from 4 storeys above and at least about 50-60 meters away. Am obsessed with DIYing, not dying. 

Water snake
Slimy and slithery - A water snake
This is just one aspect of it. There is whole lot of other things that get hit because of my obsession. A weekend outing, a movie together, shopping, maybe my favorite show on TV, reading a book (4 years since I did that), or just that do nothing moments. This is a hobby and I should learn to give it only its due. But by being the addiction that it is now, it is really robbing me off my time that I would spend on otherwise more fulfilling things.  To step back and slow down is an art. Its about time to start mastering it.

Do you get overly obsessed too with your hobby? What is your way of ensuring that you do not get sucked into it ? Share your thoughts. It will certainly help me.

Did you like this post ? Enter your E-mail address and join our growing E-mail list


If you liked this, you may also be interested in

Linking in : Colours Dekor


When I made my first paper mache craft in Woodooz, the process of making the paste was very brief that many found it not so handy. Since then there have been many online and offline requests and so I decided to make a descriptive post on how to make the paper mache clay.  The DIY nameboard  and the paper mache tribal masks were made using the very same process described below.

1. Materials Required

  • News Paper strips
  • Flour (Maida)
  • Salt

2. Start with the paper

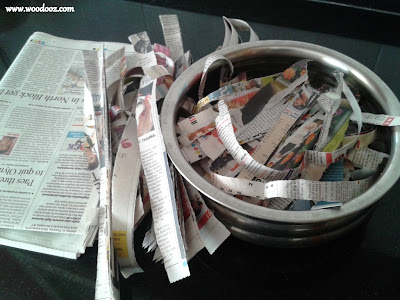
  • Cut the news paper into small strips
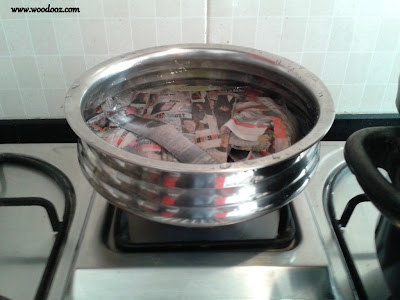
  • Soak the strips in water. Allow it to be in water over night (Atleast about 8-10 hours)
  • The strips should be completely soggy
  • Alternatively, you can boil the strips in water to quicken the process
Make strips
Cut the paper into strips
Boil the strips in water
Soak the strips in water and boil

3. Grind the boiled strips

  • Allow for the strips to be soaked in water (at least 30 mins) after boiling
  • Take the strips and drain the water
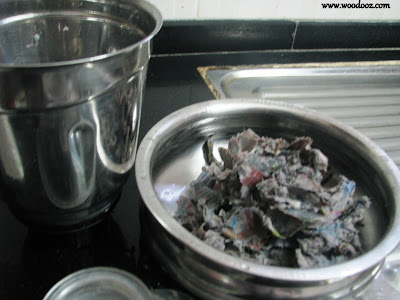
  • Grind the strips in a mixer 
  • The picture below is after the strips were ground
The clay should be ground
Grind in mixer

4. Add maida (flour)

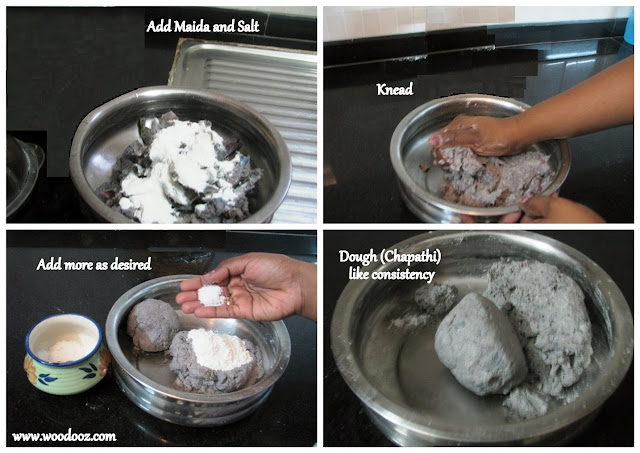
  • Slowly add maida and salt to the ground mix
  • The need for maida is to provide the necessary consistency to convert the mix into a clay like paste
  • Keep adding maida and salt as you knead the mixture until you get a dough (Chapathi) like consistency
  • For this demonstration, I used two sheets of news paper and 250 grams of maida
  • The key here is the dough like consistency and so you would know when to stop adding the maida
Add maida and knead
How to make paper mache pulp

5. Use the clay

  • Once you reach the desired consistency, your clay is ready to use
  • Lay it on a plastic sheet so that it does not get sticky
  • Make the shapes that you want to make using the paper mache clay
  • Allow it to dry for more than 24 hours
  • Once dried the shape you have made is ready to be painted. Use an acrylic primer base if required
  • Unleash your creativity and add colour to your paper mache project
Paper Mache Project
Make your paper mache project
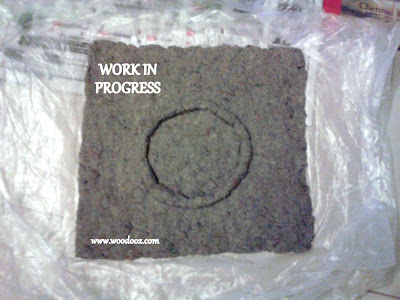
Just ensure that you do not disturb your project while it is dryingOnce dried, it becomes very strong and stiff. And so, that's how you make the paper mache paste. I have something in mind for this project which I shall save for another day after it is complete. For now, it is just work in progress.

Do leave me your comment and let me know if there is anything amiss. Let me know if you used a different method to make this clay. If you do use this tutorial and make your paper mache project, let me know. I would love to know how it turned out.

~ Preethi
Join us in Facebook


If you liked this post, you may also like


Owing to increasing number of queries on where Mod Podge in India can be found, we requested Hobby Ideas to give us a list of stores across the country where their Mod Podge product is available. We have personally not checked the validity of these addresses and numbers. Nonetheless, we hope you will find good use for it should you be in need of Mod Podge.

This post is not sponsored. We put this up here based on our own interest to assist our readers in finding what they come here looking for.

If your city is not listed here, and you are not able to get hold of Mod Podge, learn to make a cheap alternative to Mod Podge using Fevicol.

If you came here looking for information on Adhesives, we have some inputs on different types of adhesives.

Leave your comments and let us know if you found this information useful. It will make our day.

ADDRESS CONTACT NAME
HOBBY IDEAS
Unit No 008-009, Lower Ground floor
Infiniti Mall, Near Goregaon Sports Club
Link Road, Malad (W) – 400064
+ 91 22 66490239
+ 91 22 66430921
Mr. Leslie Mendonsa
HOBBY IDEAS
Kemps Corner,
Noah's Art,Ground Flr,
Kwality House,Kemps Corner,
Mumbai - 400036
+91 22 23825621
+91 22 22937776
Ms.Havovi Chothia
HOBBY IDEAS
Unit No. G-48, Ground Floor,
Inorbit Mall, Sector 30A, Vashi,
Navi Mumbai - 400705
+ 91 22 27814501
+ 91 22 27814502
Mr. VISHAL
HOBBY IDEAS (R CITY MALL)
R City Mall, 3rd Floor
L. B. S. Marg, Ghatkopar (West)
Mumbai - 400086
022 - 67703671
022 - 67755800
022 - 67755823
HOBBY IDEAS (PHOENIX)
The Phoenix Mills Ltd, Phoenix Mill Comp,
Unit No Block 17B-3B, Gr Flr Next to Big Bazaar
462 Senpati Bapat Marg, Lower Parel
Mumbai, Zip-400013
PH: 022 30401174
022-30404272
9323821853
HOBBY IDEAS (Shopper Stop, Andheri)
Shopper Stop Ltd.
211, S.V. Road, Andheri West
Mumbai -400058
9819848631 Yasmin
HOBBY IDEAS
Unit No. 18, Lower Ground Floor,
Iscon Mega Mall, Near Rajpath Club,
S. G. Highway, Ahmedabad – 380052
+ 91 79 40032194 Mr. Kalpesh Parekh
HOBBY IDEAS (SHOP IN SHOP)
Crossword Book Store, B-6,
Shri Krishna Centre,
Near Mithakali Six Roads,
Ahmedabad – 380009
079 - 26468031
079 - 26425186
079 - 26928857
079 - 30128688

HOBBY IDEAS (STAPLES)
East Land Holdings Pvt. Ltd.
Muncipal No. 102, Hosur Road,
Opp. Big Bazaar, Koramangala,
Bangalore – 560001
080 - 40928005
HOBBY IDEAS (STAPLES)
# 90/4, Outer Ring Road,
Opp. Innovative Multiplex,
Marathali, Bangalore – 560037
080 - 66990600
080 - 66990605
080 - 66990606
080 - 66990609

HOBBY IDEAS (Garuda Mall)
NO.17/18/20, 5th Floor, Garuda Mall
Magrath Road, Bangalore 560025
HOBBY IDEAS (Banerghatta)
No-17, bannerghata rd, j.p nagar, 3rd phase
Bangalore:-00560078
09886622944
HOBBY IDEAS (STARMARK)
Emami Frank Ross Ltd.
South City Mall, Shop No. 234,
2nd Floor, 375,
Prince Anwar Shah Road,
Kolkata-700068
033 - 40072216
HOBBY IDEAS (STARMARK)
Emami Frank Ross Ltd.
A/c Lord Sinha Showroom
Emami Market, 3,Lord Sinha Road
033 - 40063314
033 - 40063303
033 - 40063305-07
033 - 40063315

HOBBY IDEAS (STARMARK)
Emami frank rose ltd
starmark mani square mall
shop 164 /1 manisquare kolkota main road
Kolkota 700068
HOBBY IDEAS (Noida)
The Great India Place mall
Shop NO: 328, 3rd Floor,
Sec 38 Noida 201301 U.P
HOBBY IDEAS (SGS Mall)
SGS Mall landmark
,Pune 1
HOBBY IDEAS
G – 38 GROUND FLOOR
PHOENIX MARKET CITY
VIMAN NAGAR
NAGAR ROAD PUNE – 14
020 – 30950336
30950323
MR. SRIKANT
HOBBY IDEAS
Shop No. 124, Ground Floor,
Iscon Mall, Opp. Rajhans Cinema, Dumas Road,
Surat – 395009
+ 91 261 2259120 Mr. Deepak Majithiya
HOBBY IDEAS
Empress Mall,Grnd Flr
Behind Raman Science Center,
Dr.Bezonji Mehta Rd,
Nagpur - 440018
9373469044
9049505357
Mr.Vivek Kaware
Linking in : Colours Dekor


My cousin Raji would always ask Preethi, “What would you need from Michaels?” or  “What would Somu need from Home Depot or Lowes?” and we never had an answer. We were doing our DIYs with available materials and resources that we didn’t stop to think what else we would need that can help with the quality quotient of our work.
And so, when she mailed that she has sent me few gifts through my BIL who was visiting Chennai, I was very excited. Not only was she thoughtful in her gesture, but she was also bang on target as to what I would have loved to own.

Woodworking projects for DIY
Woodworking projects
One of the gifts was “The Big Book of Weekend Woodworking” that has 150 easy to do projects. I always roam the internet looking for inspiration and this book had everything to keep me busy for many weekends together. All the projects are easy to do with clear illustrations to aid the hobbyist in me.

The projects are categorized into 12 different categories with kitchen projects, office projects, useful household projects, clocks and more being among them. The illustrations with drawings and patterns are a treat to my itching hands that are of late up to indulging in one project or the other.


I have read the book end-to-end couple of times in the last week itself. Now it is just a question of deciding what I want to make for myself and our home. The book is an inspiration galore and I am way too excited as I figure out the projects that I want to get going with immediately.

Tool Box DIY
DIY Tool box
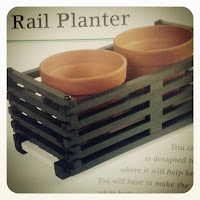
Rail Planter you can make
A Rail Planter
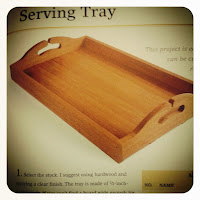
Serving tray project
Serving Tray
Thanks Raji for the thoughtful gift. The book is a source of inspiration and your gesture a source of encouragement. This book got me thinking about why such knowledge resources are not locally available for an India based hobbyist. But then, I shall save that thought for another day.


Tell me what was your first gift that got you going with your passion. Leave me a comment.

Other useful resources you may be interested in

Picture credit : The pictures were taken from the "The big book of weekend woodworking" book
Linking in : Colours Dekor
- Somu


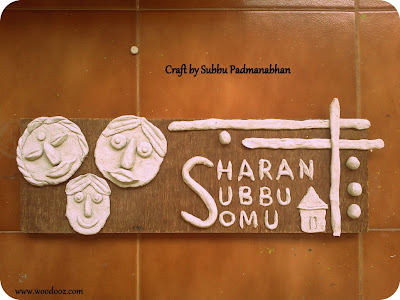
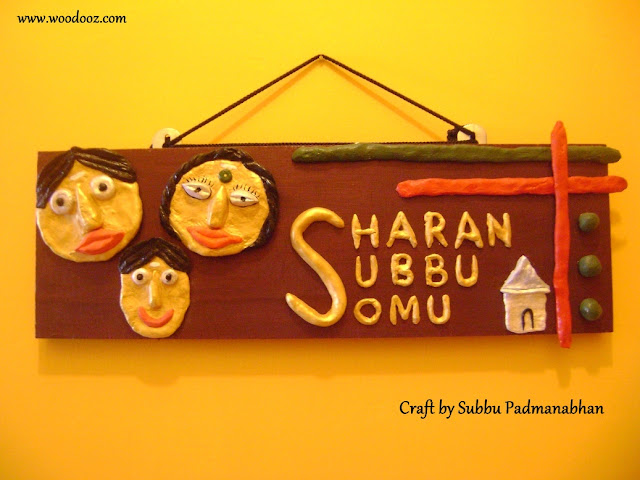
Second in our series of WOODOOZ SHOWCASE, we bring to you a craft project by Subbu Padmanabhan. We once did two tribal face masks and then a personalized name board using paper mache. Here’s a paper mache craft idea that combines the faces and the name plate into one beautiful welcome board for the entrance.

Read more to know what Subbu has to say about her project, in her own words.

"I had a spare wooden plank and lots of time during my son’s summer vacation and wanted to use them resourcefully. One of the many things I made was this name board for my home in Bangalore.

I wanted to make a home, faces to represent the occupants of the home and then our names. Making the paper mache paste is easy and you can find a detailed step by step description of how Preethi made the paper mache paste here in Woodooz. One additional thing I did was add chalk paste putty when I ran short of flour."

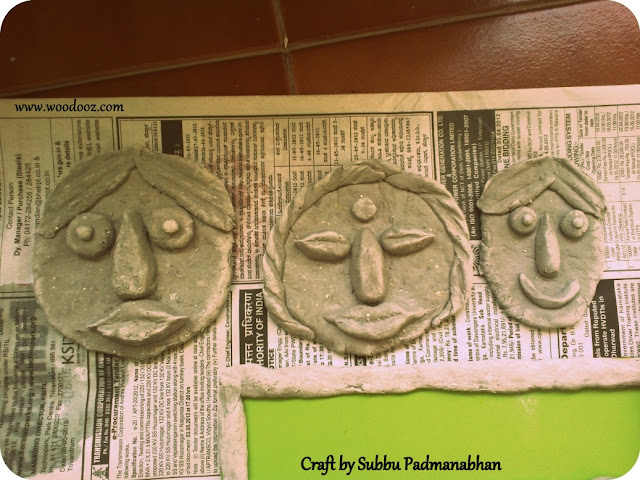
Paper Mache Faces
Paper Mache faces

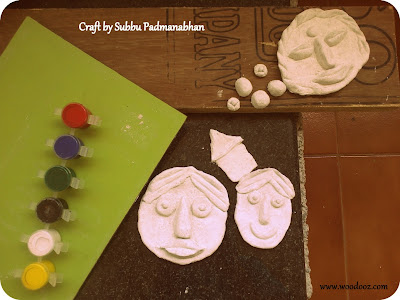
"The grey color is because of the water in the mix. Once the figures are made, they need to be allowed to dry for a minimum of 24 hours before you can do anything with it. Once dried, it takes a lighter color with all the water drained off. I made the letters separately and then set it on the plank."
Paper Machie DIY
Arranged to be glued
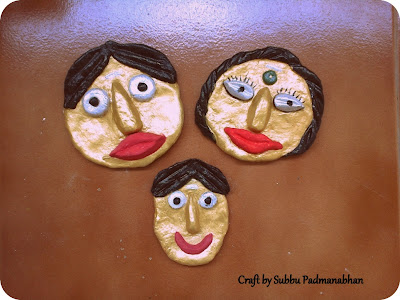
"Once I was happy with the arrangement, I set out to color the faces and the letters. I used acrylic colors to give the entire project some life."

Acrylic colors for painting paper mache
Acrylic colors for painting
"You can use acrylic primer as a base coat as it also allows for hiding the pores in the figures."

Paper mache masks
Paper mache faces painted
"Once the coloring was done, I used fevicol to stick everything onto the 6mm plywood plank. While you can use wood paint to prime and paint the wood I used acrylic color to give it uniform texture as the faces. I used gold predominantly to go well with the contrasting brown color of the backdrop. After giving the glue time to dry up, the plank was up on my entrance wall."

DIY Paper mache craft
DIY Paper Mache Craft
"How do you like it?  Do you think something is amiss ? Let me know your thoughts. Leave a comment."

By the way, her friends in the apartment loved the name plate so much that one of them wanted to learn how it was made and another wanted to custom make a plate similar to this one. Isn’t that wonderful ?

About the Artist
Subbu Padmanabhan is a mom to a 3 something year old boy, and works as faculty in a premier play school. She likes to indulge in mini crafts projects, for the school and her home, during her spare time. The wall art that you see in the backdrop of this bedside lamp is her handiwork too. She lives in Bangalore.

You may also be interested in

Linking in : Colours Dekor
- Somu


How does a big, bad, broken nose on an absolutely beautiful, freckle-less face look?

Our Blog Woodooz
Our contacts contact@woodooz.com
preethi@woodooz.com
somu@woodooz.com 
Our Facebook handle /woodooz
Our Pinterest account /woodooz
Our feedburner RSS /woodooz
Our Twitter placeholder /woodoozmagic (The big, bad, broken nose @#$%^)
That’s just how our Twitter placeholder @woodoozmagic looked amidst all those other social networking handles. When we chose Woodooz for our blog, we loved it so much that we didn’t research on its availability on the virtual world. And unfortunately for us the handle was already taken for Gmail and Twitter. That’s how @woodoozmagic came into existence.

We managed the gmail situation by moving to our own custom domain. But this Twitter thing was surely an irking factor. What made it even worse was the handle @woodooz was lying idle with absolutely no updates, besides a hello for the last 2 years.


It was at this point that my friend Sai, brought to my notice on how I can report an account for brand impersonation and how Twitter helps win the handle back if the reasons and evidences provided are genuine.

It has always been our wish to build a uniform brand identity for WOODOOZ across the virtual world. So, with an open mind and a hopeful heart, I registered a case of account impersonation with Twitter.

After few mail exchanges, and more than a month’s wait, Twitter delivered the good news in our inbox today. It is indeed incredible because at one point we thought we will have to live with this asymmetry for ever.

We are now officially WOODOOZ across all Social Networking sites that matter Go ahead and join us on Twitter. It would be wonderful to have you around.

Leave a comment and share your views on what you think about uniform branding across all social networking sites. 

- Somu and Preethi

You may also be interested in

Linking in : Colours Dekor


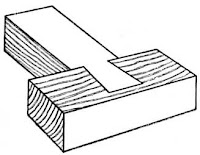
The woodworking workshop class in my 1st year engineering always spelt boredom. Back then, I was taught to use the planer to smoothen the surface of the wood. I had to work with saw, hammer and chisel to make dovetail joints (exactly like the one you see in the image). There was also foundry as part of the class where I had to file metal and make joints.

In hindsight, I wish I had made the most use of it. But in reality, I never really enjoyed my workshop class and always looked at means to avoid it.

I take immense pleasure in doing the same things now. But what was so different and difficult back then?
A dovetail joint
Dovetail Joint
Img courtesy :
basiccarpentrytechniques

What made it uninteresting for me?

First and foremost, I had to make dove tail joints without getting an opportunity to see those dovetails on a finished product. In a sense, I did not understand the rationale behind a joint. I understood planing wood resulted in a smooth surface, but never realized the consequences of the otherwise.

I did not build a cabinet or a table and in the process learn the technicalities. Maybe then, I might have understood its use better. On the contrary, a dovetail joint is all that I had to make.

It was like learning alphabets, and not using them to construct sensible sentences or like learning recursive loops, and not using them to write practical programs.

Just a funny cartoon
Looks like the same logic works for complex math too
img courtesy : loldaddy

What would have otherwise made it interesting for me?

Personally, planing wood or making joints is still so boring that I would rather not indulge in it. But what makes it interesting and necessary is the associated outcome. I need to really look at a stained finish with and without sanding for me to appreciate the need for sanding.  And it takes a wobbly cabinet to make me understand the value of a joint in the overall process of woodworking.

Rather than gaining perspectives on just the techniques, learning to make a functional product and in the process understanding the underlying principles makes learning woodworking more enjoyable for me.

I have never been bothered by the intricacies of a product. It is always about durability and good looks and it does not largely matter how one has implemented it (at least until sometime ago). Which is why to me, making a handy piece of furniture end to end, and then to work backwards to learn the specifics that went into building it, would have made more sense

Your opinion matters

What is your opinion? Have you ever had to make batter in your home economics class, but never got the chance to bake a cake? How does that feel? J Leave me a comment.

- Somu

Subscribe to our RSS feed

You may find the below projects interesting. Do check them out.

Linking in : Colours Dekor


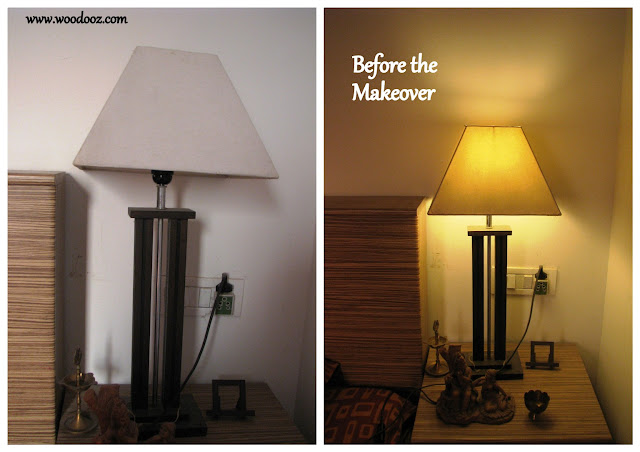
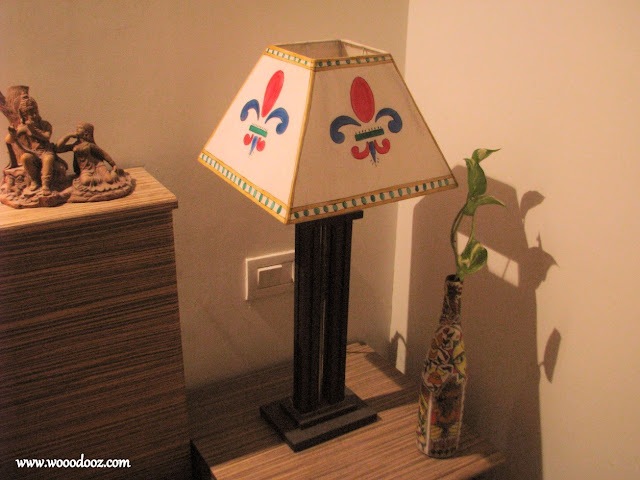
A plain white lampshade is like an empty canvas. You make what you want to make out of it. I received this really nice table lamp as a wedding gift and have long been wanting to give it some color. If you have been reading our blog, you would by now know how much we love making our own DIY lampshades. And so, I wanted to do something about a lampshade that didn't have the Woodooz stamp.

Before the makeover

The shade was made of plain white cotton fabric and that made it much easier for me. I wanted this to be a really short and easy effort like the 15 minute lampshade DIY and so went with a very simple design.
Lampshade before the makeover
Lampshade - Before the makeover

After the Makeover

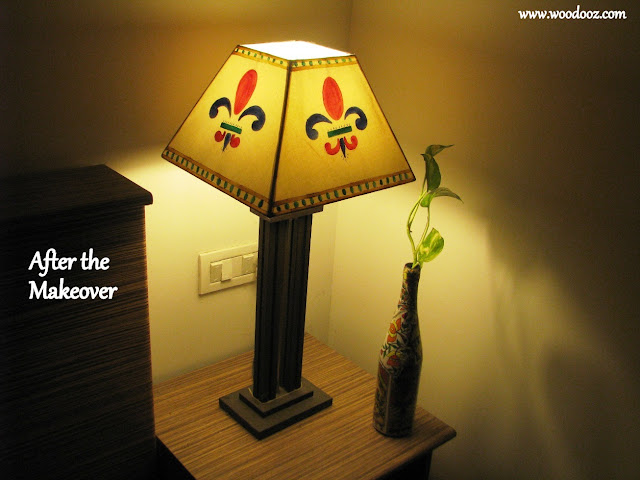
I used acrylic colors to fill the design and so, this is how it ended up looking. I am still undecided about the amount of white space in the shade. For now, I loved the simplicity of it and thought will add more designs and colors later.  I used all the primary colors just so it enables me to play around with the bedspread and the curtain colors in the future.

Lampshade - After the makeover
Lampshade Makeover DIY

Lampshade DIY
After the makeover
Let me know what you think ? Do you think I should have added more elements ? Please leave your comments and make my day. While you do that, I would also request you to join us on our Facebook page. Somu and I promise not to spam your wall.

~ Preethi


Have you read our other Lampshade posts ? 

Linking in : Colours Dekor
- Somu


A triangle, a circle, a square and some lines.  The tribal women of Maharashtra used just these figures to create a traditional folk art popularly known as Warli.

These paintings depict the social life of these tribes and are predominantly painted in white on mud walls. As is evident from many Warli paintings you may come across, they portray human figures that are dancing, farming, hunting or indulging in other such regular activities.
Now, why am I talking about Warli all of a sudden ? I recently noticed Warli art in the walls of my favorite restaurants in Chennai, and I was mighty impressed at where and how they had used it. Considering I found it in a space where I least expected to see an ancient art, I wanted to share it here. Even from the central figure in the art below, I can bet my bottom dollar that you cannot guess where the below picture was taken.
Wall art using Warli
Warli art on the wall
Would it surprise you if I said I clicked this in the men's room ? I don’t know if it is any desecration of an age old art, but I sure know someone really put his / her creative mind into good use here. Seeing this, I could not stifle my chuckle, and in all the urgency I had, I managed to stop and click this picture J
Warli Painting
Indian Warli on a European closet
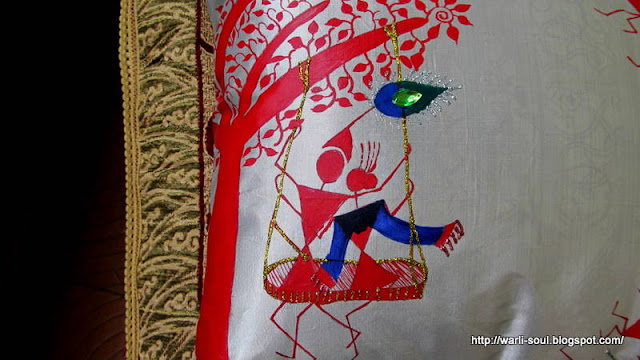
Talking about Warli and creativity, I am reminded of Aparna of Warli-Soul and so wanted to dedicate this space to  mention her work. They say Warli does not depict mythological characters or images of deities, but here is someone who stretches her imagination to create beautiful art out of the same Triangles, Circles and squares.
Indian art Indian God
Radha and Krishna on Warli - By Aparna
I so love niche blogs and I believed Warli as a niche had very limited scope for variety. I have time and again been proven otherwise by her work. She is a trained Warli artist who portrays these stick figures in newer, modern backdrops. Patricia of Colours Dekor also carried a feature of this lovely blog under the blog finds category. I strongly recommend that you check her blog Warli-soul to know what I am talking about. 
Warli Painting - by Aparna

Subscribe to our RSS feed

Meanwhile, I am going to have Preethi do a Warli on one of the walls at home. Help me convince her :)

You may also be interested in

Linking in : Colours Dekor
- Somu

Know more about us

About Us
Reviews
Media
Our showroom location
Return and refund policy
Review us on Google

Connect with us


Mail us
Subscribe to our newsletter

Our Address :
Woodooz Home Decors,
3/371, First floor,
Metukuppam, Thoraipakkam,
Old Mahabalipuram Road (OMR),
Chennai - 600097.
Ph : +91 9884070470
Email : contact@woodooz.com
Created By SoraTemplates & MyBloggerThemes