Category : DIY


  • Do you prefer a designated space for your phone ?
  • Do you find it hard to hold your phone while watching a video on Youtube ?
  • Do you place the phone face up on the table and barely hear your alarm because the speaker is in the rear ?
  • Like me, do you get into the habit of looking for your phone under the couch, under the pillow, or in the balcony, because you don't know where you kept it ?
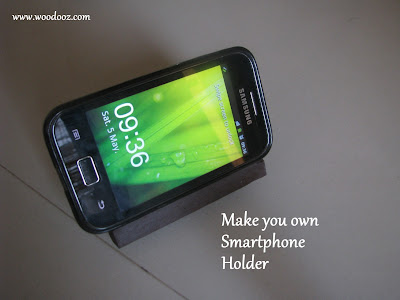
Here's an easy to do Smartphone holder that you can build yourself to keep your phone safely in one place. Remember the over-sized mobile phone charger holder that didn't need any nailing down ? This time I wanted to make a right-sized holder for my smartphone.
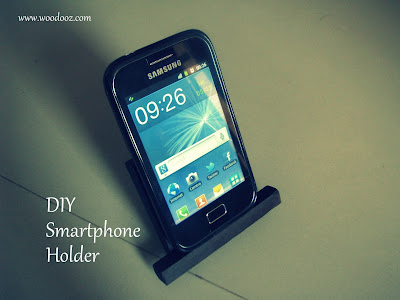
Smartphone Holder DIY
DIY Smartphone Holder / Stand
This is a simple DIY that uses wooden sticks. Scroll below to find out how you can make a smartphone holder.

Smartphone stand
Make your own smartphone holder

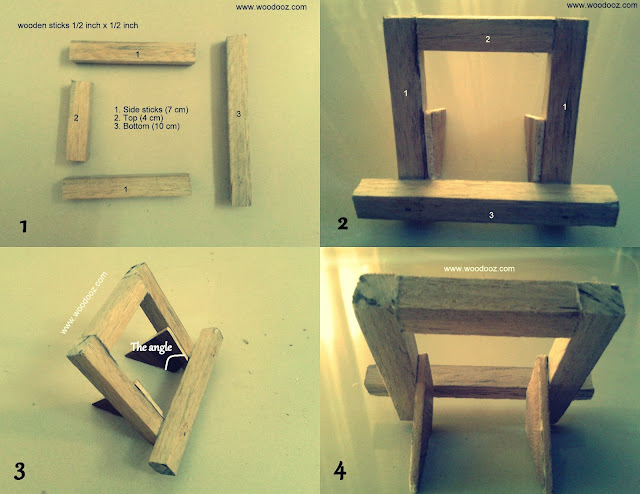
Materials Required - Picture 1

    • I used 1/2 inch x 1/2 inch sticks (The same sticks that I used for this bedside lampshade base)
    • Used wooden board (4mm) for the supporting rear (You can also use thick card or cork board)

Cut and glue the sticks together - Picture 2

    • Cut the sticks to your required dimensions. The dimensions should be such that it should be able to hold the phone vertically and horizontally
    • Glue them together. Notice how stick 2 is in line with sticks 1, while the base (stick 3) that will hold your phone is glued on top of the side sticks ?
Smartphone holder - DIY
Smartphone holder - Do it yourself

Make the triangular rear support - Picture 3

    • Cut a triangle out of the card board and stick on the inner sides of sticks 1 
    • This board will support the holder while it is leaning backwards. The backward lean is required to prevent the phone from slipping off.
    • The angle of the backward lean is decided by the angle between the two inner sides of the triangle. 

Make sure your speaker is not hidden - Picture 4

    • Make sure the dimensions of the sticks are such that they do not hide the speaker when the phone is placed on the holder. 
    • So, here it is, a smartphone holder for less than Rs.10. Yeah, really. Less than Rs.10
    • Paint, stain or do whatever you want to give your holder color.
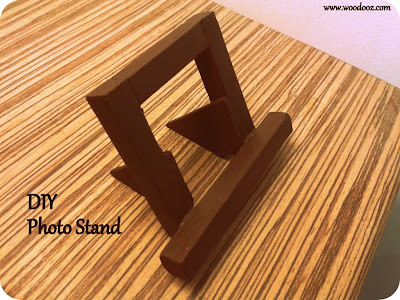
You can also additionally use it as photo holder, or greeting card holder. Works out to be a neat alternative to DIY photo frames.
DIY Photo Stand
Photo stand DIY - Place your photos on the base :)
So, how did you like this simple DIY? Where do you place your Smartphones? Much like me, are you just as careless and never bother about how you handle your phones ? Leave a comment.
Subscribe to our RSS feed. It is just a click away
Woodooz

If you liked this DIY tip, you may also be interested in our other posts :

Linking in : Colours Dekor, Made with Love Party
- Somu


DIY Laptop Stand

Working from home is turning out to be more resourceful especially considering the commute distance. The low center table  has always been where we laid the laptop while working. However, there are times during a call when we needed to work from the room, and it was not possible to move the table. And so the need to make a portable DIY laptop stand. While it was intended to be used as a laptop stand, here are other functional uses for this piece of furniture.
Make your own DIY laptop stand
DIY Laptop stand


Seriously. Why make your own Mod Podge when it is readily available !

In Chennai, until sometime back, Pidilite’s Hobby Ideas Glue ‘n’ Gloss was the only decoupage glue (that I am aware of) available in crafts stores. But recently, when my search for Glue 'n' Gloss hit a roadblock, I was given to understand they have decided to stop its production. And hence the need to make my own Mod Podge from easily available resources.
A decoupage on wine bottle using Hobby Ideas Glue n Gloss
Click to view our decoupage post
After a bit of research on the net, here’s what I found. This is a quick DIY using Fevicol. I tested it on a piece of wood using news paper bits and it did work. However, be aware that this is only a cheap alternative (not in cost but in quality) to Mod Podge.

Quick tutorial on how to make your own Mod Podge

  • Get Fevicol MR from your near by hardware / crafts store
  • Mix equal parts of water to it (50-50 mixture). You can also use Camel’s acrylic gloss medium instead of water
  • Shake / stir well until the glue and water form a dilute homogeneous mixture
  • Use it the way you would use Mod Podge 
  • Apply few layers of clear varnish to protect your work. Fevicol + Water cannot provide the same kind of protection Mod Podge can 
Make your own Mod Podge
How to make Mod Podge at home

Some Caveats

  • The classy effect of Glue ‘n’ Gloss is blatantly missing. 
  • And to play the devil's advocate, here's a blog post on why this method is not recommended for long lasting effect
  • So, use your discretion. Make this DIY decoupage glue only because Mod Podge is not available in your locality. 
I wrote to Pidilite about this and they were kind enough to call back. Glue ‘n’ Gloss is officially going out of production and their Hobbyideas ModPodge is available in select stores (Chennai unfortunately is not in that list). Here’s the address of two stores, besides many others, that are stocking the Mod Podge

HOBBY IDEAS
Kemps Corner,
Noah's Art,Ground Flr,
Kwality House,Kemps Corner,
Mumbai – 400036
912223825621/ 912222937776
HOBBY IDEAS (STAPLES)
East Land Holdings Pvt. Ltd.
Muncipal No. 102, Hosur Road,
Opp. Big Bazaar, Koramangala,
Bangalore – 560001
080 - 40928005


The next time I am in Bangalore, I know where I am going to be shopping. Meanwhile, if you are in Chennai, do you know places where I can get Mod Podge. Until then I am going to try this home made Mod Podge recipe.

Update : Click here for the complete list of stores in India where Mod Podge is available.

References :
SHARE YOUR THOUGHTS
If you have used this DIY glue, do let me know your experience with it

Linking in : Colours Dekor
- Somu


Here is a short DIY tutorial on how to make your own wooden DIY photo / picture frame . These photo frames are built completely with wood materials that are easily available at the local plywood store.

All the materials, supplies and tools required were bought at a local hardware store in Chennai. Only tool that is used is a hack saw blade which is available for Rs.2/- at the hardware shop. Ready made wooden frame moulds are also available which come with the groove for glass / picture insertion.
Photo frame DIY
Wooden DIY Photo Frame
Home made picture frame
DIY Photo frame

How to make a picture frame
Make your own photo frame

1. Materials, supplies and tools required

  • Wooden sticks (1/2"x1/2")
  • Plywood beading (Usually used for edge banding and available in different designs. We have used the curvy edge banding for this frame
  • Glue (Fevibond / fevicol)
  • Hack Saw blade
  • Set square (To mark the 45 degree miter joint)
  • X-acto knife or a pencil knife

2. The wooden stick base

    The wooden stick will form the base of the photo frame and will not be visible from the front. The frame face (Beading) will be glued onto this base.

3. Cut the wooden sticks

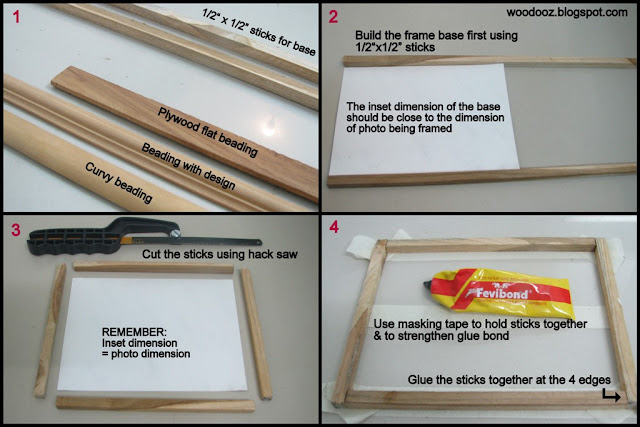
    Cut the wooden sticks to the desired length using a hack saw blade. These cut sticks will be glued to each other to form a rectangular base onto which the frame face will be glued. The inset dimension of the rectangular base should be equal to or slightly higher than the dimension of the photo being framed, else the photo will not fit into the frame.

4. Glue the sticks together

    Generously apply glue on the edges of the wooden sticks and glue them together. Use masking tape to hold the sticks together while the glue is drying. Allow for at least 3 hours before the glue can completely dry. Allowing it to dry ensures the glue bond is much stronger.
Useful tip: Use a masking tape to hold the sticks together. This will ensure the sticks do not move away from each other and will also provide enough pressure to strengthen the glue bond
Do it yourself photo frame
Learn to make a wooden photo frame

5. Build the frame face using plywood beading

    Now cut the frame face. The outer edge of the frame should align with the outer edge of the base. The frame will look good if it is joined together on the edges using a miter joint (the edges are at a 45 degree angle)

6. Mark the 45 degree angle

    Before cutting the frame, mark the 45 degree angle using a set square. To ensure the hack saw blade cuts along the 45 degree line, create a ridge or groove along the line using an Xacto knife / pencil knife or a mica cutter. This will ensure the blade does not slip while cutting and will result in an almost perfect 45 degree cut.

7. Cut the wooden frame

    Cut the 4 frame sticks to the desired dimension using the hacksaw blade. 

8. Glue the frame to the base

    Generously apply glue both on the rear of the frame and the rectangular base. Use masking tape to hold the frame tightly onto the wooden base. Allow for at least 3 hours of drying time.
Useful tip: Make a ridge or groove along the 45 degree line to ensure the hacksaw blade does not slip and stays on the cutting line resulting in an almost perfect cut
How to make a photo frame using wood
Wooden photo frame - Do it yourself

9. Clear view of the frame face being glued onto the wooden base

10. Rabbet

    Rabbet is a step-shaped recess cut along the edge or in the face of a piece of wood, typically forming a match to the edge or tongue of another piece. The additional width of the frame stuck to the wooden base forms a recess or groove (called rabbet) at the rear, onto which the picture will be housed

11. House the photo in the rabbet

    Overturn the picture and place it neatly on the recess formed at the rear of the frame.

12. Your wooden photo frame is ready to be showcased and showed off

FAQ: What is Miter Joint?
A Miter Joint (mitre in British English), sometimes shortened to miter, is a joint made by bevelling each two parts to be joined, usually at a 45 deg angle, to form a corner, usually a 90 deg angle. Common applications : Picture frames, pipes and molding.
Source: Wikipedia


Curious to know how the photo frame has been made to stand  upright on the table ? Join us on FACEBOOK just so you don't miss the follow up post on making the stand using wood / cardboard / cork board and a hinge.

Meanwhile, let me know what you think of this DIY. Do you think there is a better way to do this ? Are there alternatives to a wooden stick for making the frame ? Have you done a DIY frame post yourself ? Do share the link. Would love to know your methods.

Linking in : Lines Across my Face, Colours Dekor


Do you have the need to cover a cabinet with a glass door?
Do you feel your existing cabinet glass door can do with some newer look?
Or do you just wish to learn something cost effective and functional?
Then this tutorial is for you.
After three years of following up with the original vendor who built our TV floor unit, we decided to install a door for the centre cabinet .The DTH system and DVD player are remote controlled and hence installing a glass door was the obvious choice. Here’s how you can do a glass door installation.


Cost of project: Low- includes cost of the glass panels, and glass door hinges
Difficulty level: Medium to high
Time required: 2-4 hours


Installing a cabinet door is a very easy and functional activity and can be done with the help of few easy-to-use tools. While the need to install a door may not be so frequent, this tutorial will help when you have a creaking / broken door that needs replacement. Considering this is the first DIY tutorial on Woodooz, I would appreciate any comment/ feedback. Feel free to drop in your opinions. 
This tutorial is also useful if you are specifically looking for details on how to install door hinges / European cup hinges. Note: Click on the pictures for a bigger / clearer view if required

CONTENTS
1,2:Cabinet identification,Materials reqd 3. Plywood door dimension 4. The European Cup Hinge
5. Mark Points to Secure Hinge 6,7 Bore hole, Install door 8. Add more hinges


Step 1 - Identifying the Cabinet
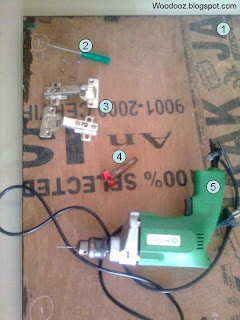
Step 2 - Materials Required

Step 1 : Identify Cabinet Needing a door (Back to Top)
  • Identify the cabinet needing a door
  • Our TV stand turned Shoe Rack badly needed a door and was the obvious choice for this exercise. The rack is in the living room, and going by the contents in the cabinet, you can pretty much understand why this needed to be covered.
  • Measure the sides of the cabinet before buying the plywood for the door

Step 2 :Materials and Tools required


My fetish for Madhubani painting continues.. Although we shifted to our new house 2 years back, decorating it happened in phases and is still happening. We still have to adorn our walls with interesting art pieces. One such wall was the partition between the living and master bedroom. I found a beautiful Madhubani wall hanging in My Dream Canvas and was completely awed by it. We had leftovers of hand made paper that we bought for our earlier projects.

Madubani Painting

Madubani Wall hanging
You would get handmade papers in Fab India. We purchased ours from Auroville on Cathedral road, chennai. The problem with hand made paper- water or oil based painting cannot be done. It has to be acrylic and I used acrylic thinner as the medium. To give it a 'close-to-original' look, I used just the basic colors. (In the past, people only used vegetable dyes and hence had fewer color options). So here it is - Ram and sita who are the subjects in most Madhubani paintings.


We couldn't wait for the framed pictures to get displayed. It took less than 10 minutes for it to get installed making an electric drill a handy tool to have at home :)

~ Preethi


Though we didn't build anything here, this DIY deserved a post merely for the functionality it offered and the ease with which baby proofing can be achieved. We thought some might even benefit from it.

We have seen this in couple of places in the neighborhood and so when we had to baby proof my bro's balcony, we knew exactly what to get and where to find it. Here are some pointers:
  • The mesh is made of fiber (So we were told) and is available in any local hardware store in large rolls
  • It is priced per square feet and so the balcony railing measurements are needed for the purchase
  • Though it comes with a reasonable price, you may want to check with couple of hardware stores to get the best pricing
  • The mesh can be secured to the balcony railings using plastic tags. No fancy tools required.
  • It can also be used to cover gaps between staircase railings inside your apartment or in the common area
  • And it takes less than one man hour to fix it
  • Baby, child proofing the balcony
    Balcony Baby Proofing
The fiber mesh is a good alternative to rusty iron / steel meshes or the clumsy nylon ropes tied between railings. It has a plastic feel to it, is flexible and quite strong, can be trimmed using a pair of scissors, and comes with very reasonable pricing. So, if you have wide railings, here's an easy cost-effective way to cover the gaps.

Also check out the picket fence project

- Somu


I am very excited about getting my hands on some needles and thread this time. We were needing a traditional looking door hanging and I decided to make one. I spent some time in choosing the color of the fabric and the thread. My obvious choice was to go with a red fabric with traditional colors like chrome yellow, turquoise blue and leaf green. Things one would need are: Embroidery hoop/ring, needles, Floss/color threads, scissors, fabric, decorative mirrors, golden bells (I got them from RS Stores, LB Road, Adyar).
Traditional handmade wall handing
Embroidery
I started the project by sticking a sheet of newspaper at the back of the fabric basically to make it stiff. We had a simple design in mind and started with the borders in black. The design you see has back stitches in black and cross stitches in green for the borders. The second layer was done with chain stitches in blue. I filled up the center by sticking the mirrors to form a pattern and outlined each with Abla embroidery. It was a very time consuming exercise but it was worth it. As there was a lot of gap between these mirror patterns, I filled it up with small flower and leaf designs using chain and fish scale stitches. The outcome was decent enough and we hung it in our door way.

DIY Door hanging
Hand Embroidery - Door Hanging
I feel little satisfied and nice every time we step into the house and see some vibrant colors warmly welcoming us. It was a great experience and now I am simply thinking of the next idea.
- Somu


Child safe door barriers or safety gates / picket fences are a must in homes with little babies and toddlers. They are very effective in keeping kids away from areas within the home they are not intended to be in. At the same time, these baby proof doors also help create a safe boundary, within which kids are free to roam about and play.

Potential areas where the babies need to be kept away from are the kitchens, balcony areas (learn how to baby proof your balcony) and stairways. This DIY door barrier / picket fence was built to keep my niece away from the kitchen especially when the grinder is on. We built this fence using wooden sticks that are about 2 inches wide and half an inch thick.Considering it was supposed to be baby safe, the first thing I did was to ensure all the edges are made blunt and the surface is smoothed using sand paper.

child proof barrier supplies
Child safe barrier - Supplies
The wooden sticks were nailed together (7 vertical sticks nailed / screwed onto 3 horizontal sticks). We made two similar gates which we joined together using regular door hinges in order for the doors to half open. What you see below is work in progress for one of the gates. The gate was painted (learn how to paint wood) and varnished for protection.

Baby proof picket fence - Work in progress
Baby proof barrier doors - WIP
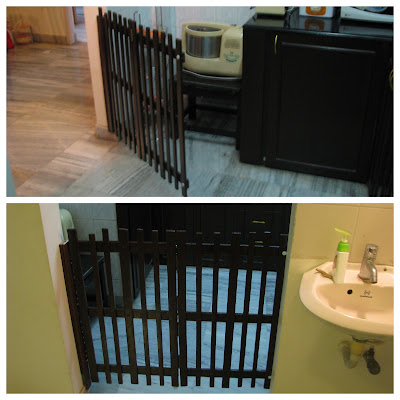
The two gates were joined together using hinges and one side of the gate was fixed  (again using regular door hinges) to a wooden panel installed on the side of the wall. You can see a break in the middle of the gate indicating the hinges (marked in the picture below).

Child proof picket fence-door barrier
Child safe picket fence
As you can see, we had to coordinate the color to ensure that it matches the kitchen cabinet colors. Fortunately for us, the kitchen entrance and the Grinder section were at 90 degrees to each other. The installation was made in such a way that the kitchen entry is blocked when the gate is closed... and the grinder area is closed when it is open. And because it was along the corner, it also became non-intrusive providing easy access to the kitchen when the grinder is not in use.

baby proofing the kitchen using child safe door barrier
Baby Proof / Child Proof fence / door


Over to you : Tell me how have you baby proofed your home ? Did you have an off the shelf product installed ? Did you make one yourself ? Share your thoughts and ideas.

P.S. Linking in : Colours Dekor, Lines Across My Face, Kreative Korner
- Somu

Know more about us

About Us
Reviews
Media
Our showroom location
Return and refund policy
Review us on Google

Connect with us


Mail us
Subscribe to our newsletter

Our Address :
Woodooz Home Decors,
3/371, First floor,
Metukuppam, Thoraipakkam,
Old Mahabalipuram Road (OMR),
Chennai - 600097.
Ph : +91 9884070470
Email : contact@woodooz.com
Created By SoraTemplates & MyBloggerThemes