Category : All


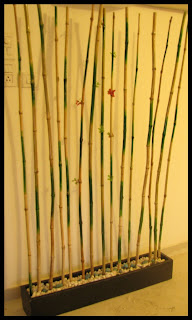
Bamboo room divider, or wall decoration unit
Bamboo Room Divider / Wall Decoration
bamboo room divider or screen or wall decoration
Bamboo Decoration
Room dividers are a great way to provide partition in a room with larger dimensions. Most commonly, these dividers are used between the living and dining space, when the hall and dining rooms are part of the same larger space. Some of the often used dividers are : wooden dividers, screens, book shelves, or the folding wooden panels. 

Bamboo dividers can be a wonderful addition to the décor of the room and is a nice deviation from the regular space dividers. Because these partitions are not solid panels, they also create the perception of a bigger space while at the same time creating the much needed divide between spaces.

This particular divider can also be used as a wall decoration unit. In this case, we installed the bamboos in the backdrop of a plain wall to provide the wall emptiness with some glitz. The bamboo sticks were sanded, varnished and the artificial leaves added to the grand finale effect.

Let us know what you think.

And thanks to Emreen, for, she is the one that led us to the bamboo leaves (KUSAL).
- Somu


bamboo divider unit
Bamboo Room Divider / Wall decoration - Before
Bamboo room divider and wall decoration unit
Bamboo Room Divider / Wall decoration - After
Quite an exciting project, but just as time consuming and laborious too. The need was to make a bamboo unit to fill up a non-intrusive wall space.This is something that my friend saw at a showroom and wanted us replicating it. Since we were already working with bamboos on a different project, we jumped at the opportunity after browsing through some images on the net.

Bamboo as a raw material is readily available, inexpensive and is easy to use These bamboos are less than an inch in diameter. The hardest part of the project was to sand the bamboo stems to remove the waxy outer coating and to achieve a smoother surface. The slowest part of the project was the time it took for the oil paint (green) to dry. Once dried, it was varnished.  A hole was drilled in each of the nodes in the bamboo for a leaf to be inserted. The bamboos were made to stand by screwing them onto a wooden plank.

The base is a regular black box made from 19mm plywood planks. The planks were joined together using 2 inch screws. No other fancy joining technique used. The insides were painted black while the exterior was covered with black laminate. The box was stuffed with thermocol after placing the bamboos in place and finally covered with pebbles. Only thing missing is the bamboo leaves.

We delivered in late in the night yesterday and so, we are yet to get a full fledged feedback. We are sure some changes here and there would be required. Will follow up. And considering we have been onto this for the last 45 days, we are gonna take a well deserved two weeks break from woodworking :)... So,here it is - a bamboo room divider.

P.S. Do you know where we can find artificial bamboo leaves in Chennai ? Would appreciate any pointers in this regard.
- Somu


Though we didn't build anything here, this DIY deserved a post merely for the functionality it offered and the ease with which baby proofing can be achieved. We thought some might even benefit from it.

We have seen this in couple of places in the neighborhood and so when we had to baby proof my bro's balcony, we knew exactly what to get and where to find it. Here are some pointers:
  • The mesh is made of fiber (So we were told) and is available in any local hardware store in large rolls
  • It is priced per square feet and so the balcony railing measurements are needed for the purchase
  • Though it comes with a reasonable price, you may want to check with couple of hardware stores to get the best pricing
  • The mesh can be secured to the balcony railings using plastic tags. No fancy tools required.
  • It can also be used to cover gaps between staircase railings inside your apartment or in the common area
  • And it takes less than one man hour to fix it
  • Baby, child proofing the balcony
    Balcony Baby Proofing
The fiber mesh is a good alternative to rusty iron / steel meshes or the clumsy nylon ropes tied between railings. It has a plastic feel to it, is flexible and quite strong, can be trimmed using a pair of scissors, and comes with very reasonable pricing. So, if you have wide railings, here's an easy cost-effective way to cover the gaps.

Also check out the picket fence project

- Somu


It is the little things that we do that make a really huge difference and sanding is just about one of them. It is probably the most boring, cumbersome and time consuming of all the tasks that are involved in the process of woodworking. However, if done right (learn how to sand and pick the right grade sand paper), the outcome can just wow you.
Sanding
What is sanding ?
Each piece of wood that you buy comes with scratches and may be coarse in appearance. Running your fingers along the surface of the wood would reveal the irregularity in the wooden piece. Sanding is the process of removing the scratches, and the roughness on the wooden surface in order to attain a smooth and even finish.  Sanding is done by hand using ordinary sand / emery papers (available for Rs.5-10 at any local hardware store) that are available in different grades / grits starting from extra coarse to very fine.  It is performed by simply rubbing the sand paper in the direction of the grains on the wooden surface.There are also power sanders available for this purpose.

What is sanding
Chairs sanded and waiting to be re-finished
Personally I start with a coarse sand paper of grit 80 and work my way towards the finer ones (220 or 350 grits). So the process itself involves sanding with 80 grit sandpaper and subsequently with 100,120,150,220 and 350 grit sand papers. The number of sanding cycles performed  and the grades of sand papers used  is specific to the level of smoothness one desires. A Sanding block can be used to ease the process. While there are commercially available blocks, you can learn how to make your own Sanding Block from our earlier post.

Sanding offers the following advantages and hence becomes a necessary evil that cannot be overlooked:
  • Provides a smooth and even appearance to the wooden surface,
  • Removes scratches and other blemishes
  • Enhances the grain patterns
  • Prepares the wooden surface for staining or painting

- Somu


Preethi likes to fill up our balcony with lotsa green patches - from herbs, to ornamental and flowering plants. What started with just one pot, has now mushroomed to over 15 and is looking at ever expanding. This particulary never gets a thumbs up from me as it pervades into my carpentry work space.

 Guess she thought, one sure way for me to appreciate her balcony garden, is to have me make something for the garden itself... and maybe that's how the need for the corner stands / shelves emerged. I would have preferred to make the stand with a rounded (quarter) curve, but then it seemed to intrude too much into the already small balcony. So, a triangular stand it was and making it was quite easy . All I had to do was to cut across a square plywood (cut to the required dimension of the corner wall space) diagonally.
Corner Shelf / Stand
I used a .75 inch thick / 1 inch wide plywood  beading (L-Shaped and screwed into the wall) to support the triangular plank which was in turn screwed to the L Shaped plywood beading. The plank was sanded and stained before it was installed and now is ready to bear the load of more tiny tots in the future. :)
- Somu


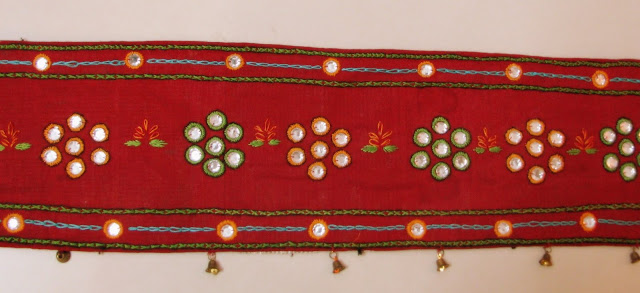
I am very excited about getting my hands on some needles and thread this time. We were needing a traditional looking door hanging and I decided to make one. I spent some time in choosing the color of the fabric and the thread. My obvious choice was to go with a red fabric with traditional colors like chrome yellow, turquoise blue and leaf green. Things one would need are: Embroidery hoop/ring, needles, Floss/color threads, scissors, fabric, decorative mirrors, golden bells (I got them from RS Stores, LB Road, Adyar).
Traditional handmade wall handing
Embroidery
I started the project by sticking a sheet of newspaper at the back of the fabric basically to make it stiff. We had a simple design in mind and started with the borders in black. The design you see has back stitches in black and cross stitches in green for the borders. The second layer was done with chain stitches in blue. I filled up the center by sticking the mirrors to form a pattern and outlined each with Abla embroidery. It was a very time consuming exercise but it was worth it. As there was a lot of gap between these mirror patterns, I filled it up with small flower and leaf designs using chain and fish scale stitches. The outcome was decent enough and we hung it in our door way.

DIY Door hanging
Hand Embroidery - Door Hanging
I feel little satisfied and nice every time we step into the house and see some vibrant colors warmly welcoming us. It was a great experience and now I am simply thinking of the next idea.
- Somu


Wood stains and paints are similar in one sense that they help add rich color to wood. However, there are quite some differences that exist in the look and feel they offer and the application procedure.

Complete guide to wood staining

Paint forms a thin film on top of the wood on which it is being applied. Because of the formation of the even layer, the wooden piece gets a consistent look across its surface. This layer helps hide the blemishes on the wooden surface, which in turn eliminates the need to sand the wood with multiple grades of sand paper. Since the wood may not take in paint homogeneously across its surface, it is recommended to use a layer or two of primer before application of paint. The primer allows for uniform absorption of paint thereby giving the wood surface a smooth unvarying finish. Paints and primers normally have high drying time (close to 8 hrs or more) and are usually applied using brushes. Here is a short tutorial on how to use primer and paint on wood.
Wood stain vs paint

Wood stains, on the contrary, allow for the grain patterns on the wooden surface to be visible and enhanced on application. They fill in the pores and grooves on the wood thereby taking in the shape of the stained material. Since stains make the grains (and also the scratches) visible, it is necessary to sand the wooden surface to ensure there is absolutely no scratch / blemish on it. Stains may be directly applied on the wooden surface using a sponge or a clean rag cloth. However, as in the case of paints, the wood may not absorb the stain equally along its entire surface and hence the use of sealers is recommended before the application of stain. Sealers form an invisible film on the wood thereby allowing for equal absorption of stain. Stains have a quick drying time, somewhere between 10 to 30 minutes.

Paint / stain only add color to wood and does not protect wood. A final coating of varnish is usually recommended. Paint / stain is a personal choice and depends on the kind of look and feel one desires.

- Somu


DIY photo frames (Learn how to make a photo frame) are fun to make and can be made using simple plywood edge reapers that are available in the local hardware store. While there are many designs available, one can also opt for various color finishes based on their choices and taste. 

 For these two frames, I used carved wooden reapers (sometimes used for plywood edge banding) for the frame face. I placed a 4mm glass plate cut to the required dimension on which the photo can be positioned. The rear of the frame was filled with a thin sheet of OST to secure the glass in place. Sanded,sealed and stained (walnut color) the frame to give it the desired finish.
make at home photo frame
Photo Frame Made at home
DIY Photo frame
DIY Photo frame
Some limitations though. The 45 degree diagonal cut is still not perfect due to use of hand tool. The 4mm glass adds quite some weight to the entire frame. My regular supplier didn't have anything lesser. So I still need to scout for the 3mm or 2mm glass plates for my next work. And guess, am still at least another 2 frames away from achieving that elusive perfect professional finish.

You can make these photo frames for your personal pictures as well as for your art work on canvas. Depending you whether you want it displayed on a table, or hung on a wall, you may want to use a stand or a clamp in the rear of the frame. Click here to learn how to make a photo frame at home

P.S. Just for the records, there was no specific reason for using a Katrina Kaif photo for the purpose of this post.
- Somu


Child safe door barriers or safety gates / picket fences are a must in homes with little babies and toddlers. They are very effective in keeping kids away from areas within the home they are not intended to be in. At the same time, these baby proof doors also help create a safe boundary, within which kids are free to roam about and play.

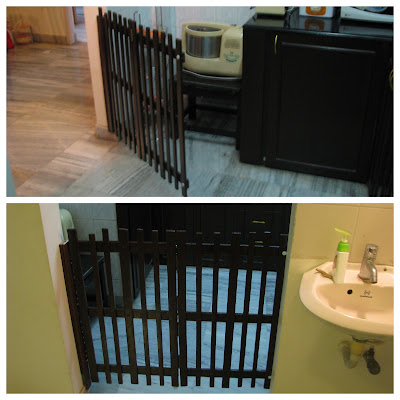
Potential areas where the babies need to be kept away from are the kitchens, balcony areas (learn how to baby proof your balcony) and stairways. This DIY door barrier / picket fence was built to keep my niece away from the kitchen especially when the grinder is on. We built this fence using wooden sticks that are about 2 inches wide and half an inch thick.Considering it was supposed to be baby safe, the first thing I did was to ensure all the edges are made blunt and the surface is smoothed using sand paper.

child proof barrier supplies
Child safe barrier - Supplies
The wooden sticks were nailed together (7 vertical sticks nailed / screwed onto 3 horizontal sticks). We made two similar gates which we joined together using regular door hinges in order for the doors to half open. What you see below is work in progress for one of the gates. The gate was painted (learn how to paint wood) and varnished for protection.

Baby proof picket fence - Work in progress
Baby proof barrier doors - WIP
The two gates were joined together using hinges and one side of the gate was fixed  (again using regular door hinges) to a wooden panel installed on the side of the wall. You can see a break in the middle of the gate indicating the hinges (marked in the picture below).

Child proof picket fence-door barrier
Child safe picket fence
As you can see, we had to coordinate the color to ensure that it matches the kitchen cabinet colors. Fortunately for us, the kitchen entrance and the Grinder section were at 90 degrees to each other. The installation was made in such a way that the kitchen entry is blocked when the gate is closed... and the grinder area is closed when it is open. And because it was along the corner, it also became non-intrusive providing easy access to the kitchen when the grinder is not in use.

baby proofing the kitchen using child safe door barrier
Baby Proof / Child Proof fence / door


Over to you : Tell me how have you baby proofed your home ? Did you have an off the shelf product installed ? Did you make one yourself ? Share your thoughts and ideas.

P.S. Linking in : Colours Dekor, Lines Across My Face, Kreative Korner
- Somu


The color theme in our living room is predominantly beige and brown with shades of orange. We wanted a wall hanging with a shade of orange/red to complement the furniture and upholstery. I wanted to put up a painting of a couple for our new home and when I was browsing for some interesting patterns to blow up, I came across a wonderful piece of art by Arvind Kolapkar. It was love at first sight. So I tried to reproduce it…. What do you think ? Do let me know... Click to leave me a comment. 

Painting - Arvind Kolapkar
Here's what Saffronart has to say about Arvind Kolapkar : 

"His  works are bright, happy expressions of joyous unions. In most of his paintings, one observes an amorous couple or groups of friends enjoying each other’s company, giving his work the appearance of a tribute to the relationships that people share. A flute is a constant motif, appearing in almost all of his canvases, provoking one to make references to the mythical Krishna and his idyllic world of joy. 


Kolapkar’s acrylics on canvas can be easily identified by the bright use of a single background colour; slender, elongated women in black with coloured foreheads and noses; and the presence of a flute. "

P.S. Linking in : Artsy Craftsy Jan

- Somu


The first tool that we bought was an electric drill (Specifications: clock wise rotation, single speed drill. There are more advanced models available though) and two drill bits (one each for concrete and wood).

We have come to realize that it is one of the handiest tools to have around the house, irrespective of whether you are into woodworking. We have hung a clock, a picture and a painting on the wall – professional charges for which would have cost us a good Rs.100 to 300 for each nail drilled. So far, we have used the drill for :

1. Drilling pilot holes for screws
2. Drilling holes for installing hinges
3. Drilling nails / screws into the wall

The availability of the electric drill and the necessary skill to use it has its own day-to-day practical use inside the house eliminating the need to approach a professional carpenter (for installing curtain rods, door knobs, door stoppers, wall hangings etc) / electrician (for installing a bell or lamp shade on the wall).

Most certainly a must have.
- Somu

Know more about us

About Us
Reviews
Media
Our showroom location
Return and refund policy
Review us on Google

Connect with us


Mail us
Subscribe to our newsletter

Our Address :
Woodooz Home Decors,
3/371, First floor,
Metukuppam, Thoraipakkam,
Old Mahabalipuram Road (OMR),
Chennai - 600097.
Ph : +91 9884070470
Email : contact@woodooz.com
Created By SoraTemplates & MyBloggerThemes